admin, Author at Delete Computer History - Page 10 of 15

Block Internet Sites

Posted by | Uncategorized | No Comments
Block Internet Sites, Porn and Online Usage with Parental Controls

To Quickly Block Sites Using a Browser. Click Here!

How to Use Parental Controls

There is an old saying that there are two sides to every coin. Inside the computer industry is well-known that Steven Jobs had a strong dislike for pornography and a strong desire to protect children. As the Macintosh is a closed system, at least relatively to Windows, you have very good control. All you have to do is know what to do. Let’s look at that now. For Windows Parental Controls, Click Here

  • Click on the icon with the gears
  • Chose System Preferences.Your screen will not have the red arrow. Alternatively you can go to the icon of the Apple
  • Select System Preferences in the drop-down menu.
    Delete Computer History
    This will bring up the window OS X System Preferences as you see here.
    Delete Computer History
  • 4. The first step is to create in the row labeled System a new user by clicking on the Users and Groups icon.This will bring up a new window for a new user.
    Delete Computer History
  • 5. In the graphic please take careful note of the first line labeled New Account. By default it is a standard account. Use the drop-down menu to select Managed with Parental Controls. This will bring up further fine-tuning you allowing either Apple or complete manual control yourself.

Personally I find Apple has done a good job in the thinking of parental control in its settings which befits Apple’s philosophy. For the fastest set up use the age group offerings as seen in the graphic

Delete Computer History

And if you want highly precise control that is available to you. By using the age group settings Safari has already pre-selected appropriate sites which you can customize with the plus and minus icons. Also notice you can log a minors activity, as seen in the graphic.

Delete Computer History

Of course being Apple there is a lot more than just filtering websites to an age-appropriate audience. Let us continue on. Under Apps you can simplify the view of the computer desktop as well as and/or limit applications the account can open.

Next, take a look at the next tab called People

Delete Computer History

As you can see in the graphic you can allow (or disallow) joining multiplayer game centers and whether they can add game Center friends or not. Also once again because Apple chooses a closed ecosphere’s, email accounts and instant messages can be limited to certain users and permission requests set up. And there is so much more.

Let’s take a look at the tab called Time Limits
Delete Computer History
The included graphic reveals to you flexible yet precise control for controlling the time available both on school mice and weekends. And there is one more tab to look at. This feature allows your to block internet sites at specific times also.
Delete Computer History
Let’s say you want them to learn how to type on a computer keyboard. You can turn off the use of speech dictation, limit printing and/or CD and DVD burning. There is one feature that is available that I think is not a good idea. You can disable changing the password. I believe you should teach your child good personal computer security and insist they change the passwords early and often.

In closing, OS X provides great tools to block internet sites. This tour of Parental Controls a friendly reminder to not share your passwords and to click on the lock to prevent changes.

OS X offers a superior protection set over other Operating Systems, which they can do because they are a walled garden. The system is well thought out and very user-friendly. Just use this guide for set up and remember to change the age guidelines for each child as they get older.

Other Tutorials

Speed Up a Slow MAC

Restrict Websites

Posted by | Uncategorized | No Comments
How to Restrict Websites

Wonder how to restrict websites or web content? Restricting any particular website can be done in multiple ways. You may want to restrict a website for adult substance or other content that may have potential danger to harm you computer. Whatever may be the reason, you can easily restrict a website by following simple procedures. Following are the easy methods by which you can block a website permanently.

Through the Host File

One of the safest ways to restrict websites is through your host file. This is an easy process that will block access to URL on all your browsers and restrict access using your computer.

Watch the Video to Restrict Host File


Through Online Browsers

Your internet browsers too have a security feature that can be enabled to restrict a website. No matter which online browser you have, it would have an essential feature to block unwanted site display. You simply need to input the name of the website you want to block. To restrict a website through internet browser, follow the below procedure according to the browser you have:

For Visual Instruction to Restrict Websites, Click Here.

For Internet Explorer: Select the “Tools” tab and go to the “Internet Options”. Select the “Security” tab and click on the “Restricted Sites” button; now either select the sites already displayed or “Add” in the new sites you want to block or restrict. Click “Ok” and it’s done!

For Firefox: Go to “Tools” to select “Options” and in it, select “Privacy” and then “Exception”. Here you can feed in the sites to be blocked, click on the “Block” button and it’s done!

For Opera: Select “Tools” and from the options displayed, select “Advanced” and then select “Blocked Content”. Type in the site names and it’s done!

Through Link Scanners

Apart from all the above methods, you can also consider adding a link scanner.These are also known as web reputation sites that restrict websites. The websites usually provide a unique add on packages to allow you safe internet browsing. They scan a website and notify you about the threat. Some of the link scanners check for the malicious links while some other types of scanners may also check the site’s ratings or credibility and potential danger of spyware or online scam. This is an effective measure to protect children from being exposed to adult or malicious websites. Be careful, some of these sites are just scams.

Through Security Software

This is the easiest way to protect your computer from any spyware or malware. It is not necessary that every computer user is technically trained to manage complex computer settings. In such a case, the internet security software can efficiently restrict a website even if the settings of your computer are not properly attuned. You may find some of this software as freeware. For example Microsoft Security Essentials and AVG are good free options

Through Anti Virus

Installing quality antivirus system can also be very helpful to restrict any website with harmful contents. If your system is already affected with some kind of a Trojan or computer virus, some of the unwanted websites gets unrestricted access to your computer automatically. Antivirus software is recommended for secure browsing and downloading. Though plenty of antivirus software is readily available as free to be downloaded but they are not too sensitive to detect and block really dangerous sites. Norton has the ability.

Computer Froze

Posted by | Uncategorized | No Comments
Your Computer Froze, Now What?

Computer Lockups, computer froze, Windows freeze are all ways to describe a major even when your system unexpectedly stop working do to a major conflict. Tracking down this conflict is the most important way to solve this problem. However, system lockups can be attributed to a number of problem areas. However 9/10 times it’s a software problem. This tutorial will cover most of the major area that caused your computer froze problem. You may want try to use a registry cleaner to speed up your PC, stop windows freezes and cleanup your system, click here to learn more.

Step 1: End Resource Hungry Processes

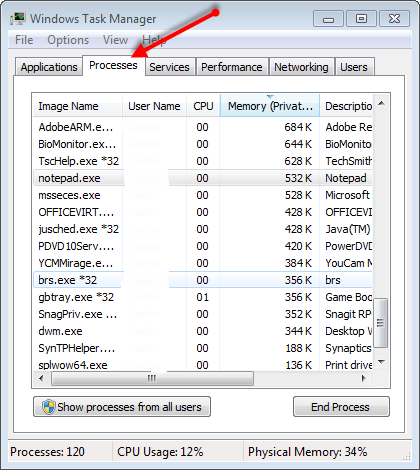
The Windows Task Manager will give you the ability to break and shutdown programs that are caused Windows to bottleneck.

  • Press CTRL-ALT-DELETE
  • Click the Processes
  • Evaluate the programs in the task manager.
  • Click the process and then double click End Process.

Delete Computer History

Step 2: Control TSR Programs

System lockups in Windows are often the result of program conflicts. This can occur when too many programs are loaded and stay in your RAM memory. Think of your RAM as a limited amount of oxygen. Too many programs vying for this resource will cause your system to bottleneck and next thing is your computer froze. These RAM eating programs are called Terminate and Stay Resident programs. These load up automatically when Windows loads. This may be why your computer froze here is how to stop them.

  • Click Start
  • Click Programs
  • Click Startup
  • Right Click and Delete the unwanted Startup program file.

OR

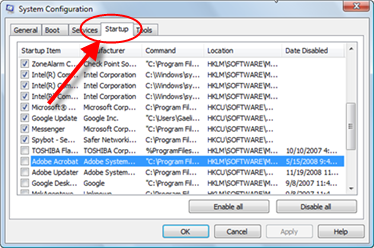
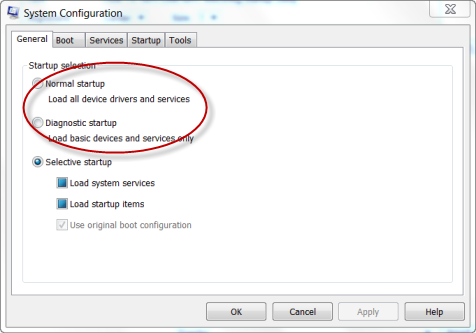
  • Or type MSconfig in the RUN command line.
  • Click the Start-up tab
  • Remove the checks from the unwanted programs.

For instructions on how to remove start up programs, Click this link
Delete Computer History

Step 3: Monitor the System

One of the best was to find the answer why Windows freezes is to check the system health. Windows has a great tool called Reliability and Performance Monitor. It records the interrupts in processing, spikes in memory usage, and hard disk failure. If you think that your problem is high CPU usage, check out this tutorial.

  • Press CTRL-ALT-DELETE
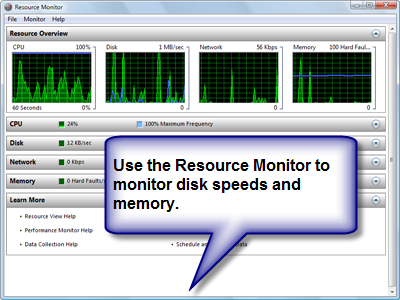
  • Click the Resource Monitor in Task Manager
  • Click the tabs under Disk, Memory, CPU and Memory.
  • Search for any irregularities, spikes or interruptions.

Delete Computer History

Step 4: Fix Bad Hard Drive Sectors.

Your hard disk is a important part of your computer that has moving parts. This fact makes it susceptible to damage. Although, this damage is minute physically, it cause major software problems. This damage is called a bad sector. Windows constantly tries to fix these sectors. However, it cant repair the damaged area, your system will lock up. You need to instruct it to skip over or clean up the sector. Here is how:

  • Click the Windows button or Start and open the Computer folder.
  • Find and Select your hard drive, right click the hard drive icon.
  • Choose Properties from the drop down list.
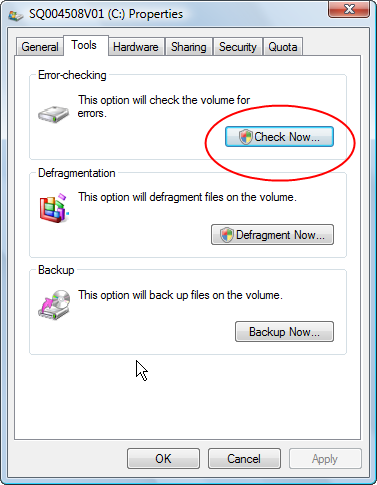
  • In the Local Disk Properties dialog box, click the Tools tab.
  • Click the Check Now button.
  • For maximum cleanup click “Automatically fix…” and “Scan for …”
  • If you see new dialog window, click Schedule disk check to start.

Delete Computer History

Step 5: Driver Incompatibility.

Driver conflicts can cause your computer to operate at a standstill, crash and slowdown. Updated drivers assure that your hardware and software can communicate efficiently. If these files are not updated Windows can be interrupted and freeze when it tries to access your hardware.

In the Disk Manager you can run a scan for driver conficts. To run this scan follow the instructions below.

  • Click Start
  • Choose Run command.
  • type “compmgmt.msc”, This will run a scan of your drivers.

Or

  • Click Start
  • Click Control Panel
  • Click System
  • In the System menu, click the hardware tab.
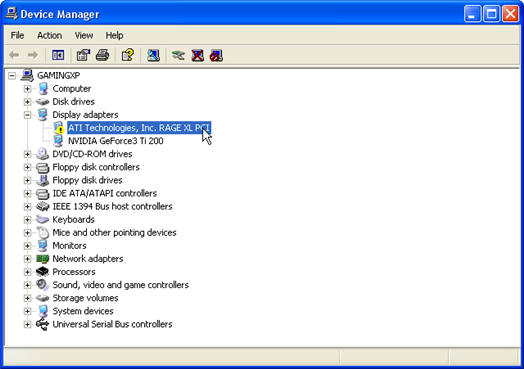
  • Click Device Manager to bring up a full list of installed hardware drivers, Look for exclamation marks that indicate trouble.
  • Right click and choose Properties to evaluate the status and troubleshoot the hardware device.

Delete Computer History
Hopefully this helps you solve why your computer froze. It a common problem that can be fix often with a few tweaks. If you have tried these tips. You should try to use a system restore or use your repair disk to alleviate the problem of why your computer froze.

For more on why your computer froze up. Check out this page>/a>

POPULAR TUTORIALS

Best Registry Cleaners
FIX REGISTRY PROBLEMS

Insufficient Memory Error

Posted by | Uncategorized | No Comments
Fix an Insufficient Memory Error

When your computer runs out of workable memory, you will get an insufficient memory error. Before we begin, lets look at the different kinds of memory in your computer.

Memory refers to short-term data storage on your computer, other wise known as RAM. A lot of information is loaded into your RAM. When you load a program, the program files will be dumped into the computer’s memory. Therefore, shutting the program down will cause the majority of it’s data to flushed out of the memory. Shutting your PC down for the most part causes the files loaded into RAM to be ‘forgotten’ by the computer.

Increasing RAM, increases the amount of data your computer can remember, making it faster. You computer also has Virtual Memory RAM.

Repair An Insufficient Memory Error with a Registry Cleaner.

Step 1: Check Your Memory

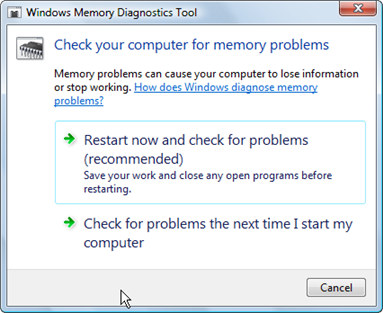
If you have an insufficient memory error, the root cause may be faulty memory. So, its best to run a memory test to ensure that your memory is functioning properly. Windows has a Memory Diagnostic tool to check for problems in your RAM.

  • Click Start
  • Type memory into the search bar.
  • Choose Memory Diagnostic Tool.
  • Choose the option to check your memory.

Delete Computer History

Step 2: Adjust Visual Performance

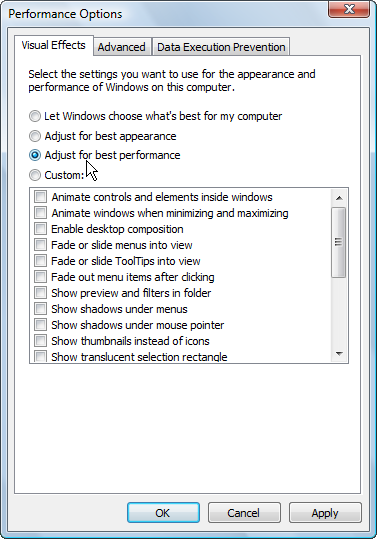
Windows has a lovely interface. Fading icons, translucency, drop down shadows, animated windows are just a few of the fancy features. However, these features are completely unnecessary to your computer performance. All these features are poured into your RAM. So, if you would like to avoid insufficient memory error and speed up your PC, adjust your visual options. Here is how:

  • Click Start, and then click Control Panel.
  • Click System.
  • Click Advanced System Settings
  • Under Performance, Click Settings.
  • Under Visuals Effects, you may choose from a list of options such as Adjust for best performance or custom. If you choose Adjust for best performance all the features will be unchecked.

Delete Computer History

Step 3: Activate Virtual Memory

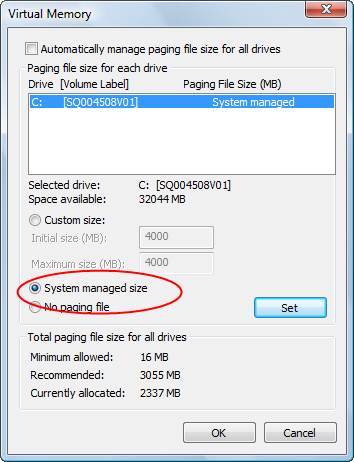
You can free up memory by accessing your paging file. Virtual Memory can stop an insufficient memory error by reserving free space on your hard drive to act like RAM. Information can dumped there instead of clogging up your RAM. Here is how:

  • Go to your System Properties in the Control Panel.
  • Under the Advance tab under Performance, click Settings.
  • Select Advanced
  • Choose change under Virtual Memory.
  • Select your Hard Disk.
  • Click System Manage Size.

You can customize your Virtual Memory Settings to any size you prefer. Click Customize Virtual Memory RAM to see how.
Delete Computer History

Step 4: Use ReadyBoost

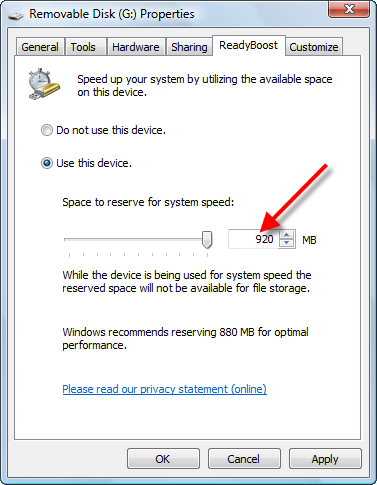
ReadyBoost is a feature offered in Windows Vista that allows you to use a USB storage device as a secondary memory device. This acts very similar to Virtual Memory RAM. Often using ReadyBoost can be faster than your paging file memory. Using the ReadyBoost feature is an excellent way to avoid an insufficient memory error. Here is how to use ReadyBoost.

  • Plug in a USB device.
  • Click Start
  • Choose Computer
  • Right Click your USB device
  • Select Properties
  • Choose ReadyBoost
  • Adjust the “Space to reserve for system speed” by sliding the bar

Delete Computer History

Step 5: Limit Programs In Memory

By simply closing programs and stopping unnecessary tasks, you can free up RAM. This is a simple procedure. But, make sure you don’t prevent essential programs from loading

  • Click Start button and load the Control Panel.
  • Under the Control Panel menu, click Programs.
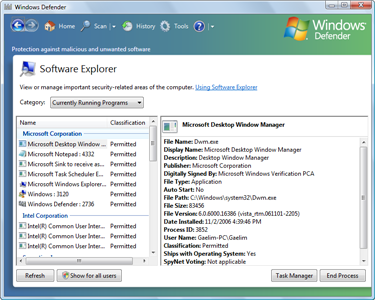
  • Under the Windows Defender heading choose View currently running programs.
  • Choose Startup Programs from the Category option.
  • Remove Programs that you feel unnecessary for startup.

For Window XP, you can use the msconfig option. Just type msconfig in your RUN command box. For details on how to Speed Up your Start up in XP and Vista, click Remove Unnecessary Startups.
Delete Computer History

Windows Restarts

Posted by | Uncategorized | No Comments
Random Windows Restarts can leave you clueless- Learn how to repair a computer that keeps restarting.

Windows Restarts can be sudden and without warning. Windows XP and Vista are configured detect and repair errors automatically. However, this wonderful feature is far from perfect. Often with no warning your system simply restarts. No error message can leave the user clueless to what the next step should be. An error that cause Windows automatic restarts usually goes by the name of a fatal error.

The windows automatic restarting is an attempt by your computer to limit the damage an error can cause. Particular your registry is prone to damage from such errors. Nevertheless, random restarting is running away from the problem. You can prevent Windows restarts by configuring your computer to stay online if an error occurs and display the responsible error message. You can often use are error check also known as a registry cleaner to find and repair errors.

Windows Restarts can be often easily fixed with a Registry Cleaner. Click Here to Learn How.

Use System Failure Settings to Stop Automatic Restarts.

  • Click Start and Open the Control Panel
  • Go to System and Maintenance, Click on System.
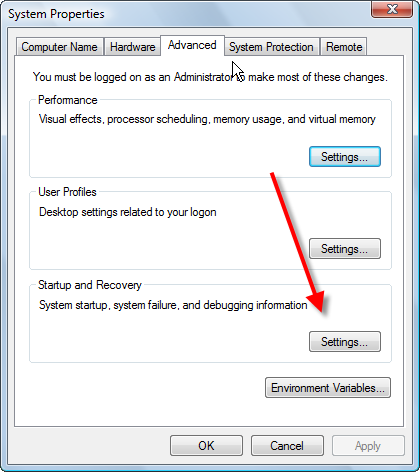
  • Select Advanced System Settings and choose Advance tab.
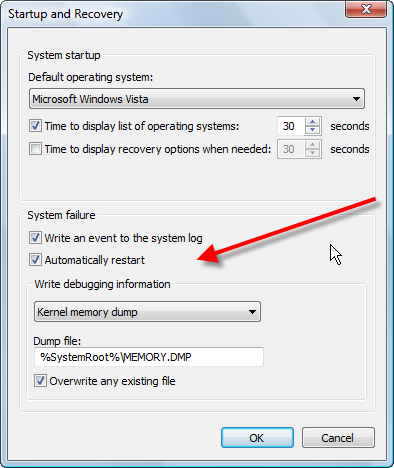
  • Under Startup and Recovery, click on Settings.
  • Under System failure uncheck Automatically restart.

Delete Computer History

Use “Event Viewer” to Pinpoint Errors.

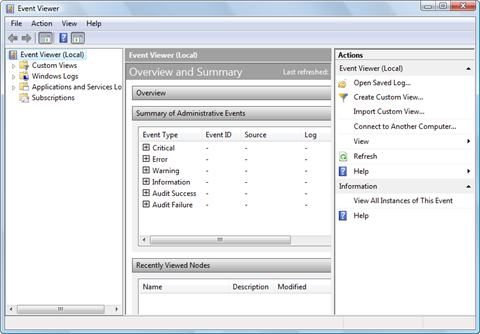
Windows event viewer is an valuable tool that can easily be used to help you discover the cause of a computer that keeps restarting. The event viewer has a detail tree that will allow you to view all files or applications that were accessed within a specified period. The two sections that you should pay special attention are Critical and Error

  • Click Start
  • Click Control Panel
  • Click System and Maintenance
  • Click Administrative Tools
  • Double-Click Event Viewer.

Delete Computer History

Use “SFC/Scannow” command to Repair Errors.

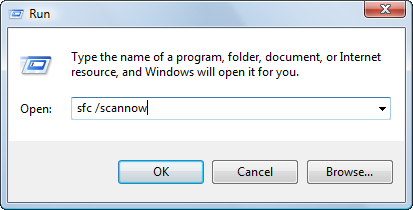
You can often fix Windows Restarts while its running. If you have your are admistrator, you will be able to use use SFC command. This administrative tool allow Windows to try and repair itself. If will scan all system files and replace any that are damaged or missing. If repairs are needed, you will need to supply the Windows CD so that the functional files can replace the ones that are causing your computer to constantly restart itself. Registry Cleaner often are more affective because they will help you to make a backup of your registry and often fix other damaged errors without the need to replace files. Here how to use the SFC command

  • Click Start
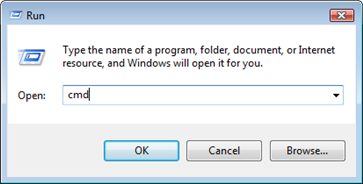
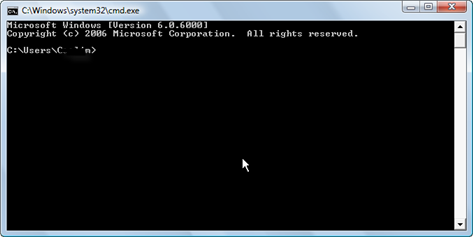
  • Right Click the Command Prompt or type cmd
  • Type sfc/scannow
  • The tool will scan for damaged files. When prompted provide the Windows original disk for repair.

Delete Computer History
By changing the computer configuration to not restart, you will will be forcing your computer to provide you with error codes. This may sometimes cause Blue Screens. This is not a bad thing. Because these screens will also provide you with vital information on the errors causing random computer restarting.

Popular Articles

Best Registry Cleaner
Fix a Slow Internet Connection
Speed Up Internet Videos

Startup Problems

Posted by | Uncategorized | No Comments
How to Fix Startup Problems

There are a ton of reasons why your PC is experiencing startup problems. However, most of the time, these problems can be attributed to 7 major causes. Many of these problems can be remedied with just a few simple steps. Hopefully, this article can help you solve your boot problems.

Examine your Startup Configuration

If you can boot up but things are super slow and problematic once windows start. You are probably having trouble with a startup programs. The best way to end this problem is to streamline your startup programs. This is done using MSconfig.
Delete Computer History

It loads OK…But startup is slow

Slow startup can be caused by a lot factors. However, you can tweak and alter your settings to make everything load quicker and more streamlined

To learn how to stop slow startup problems and boot up in 30 seconds, click here

7 Boot Up Problems and Quick Fixes

1.Check Optical Disk Drives

Leaving a CD/DVD in your drive can sometimes interfere with the boot process. Remove all boot-able disk and restart your PC. This is especially relevant when you have your Windows Recovery disk or start-up disk in your optical drive.

2.Check USB Devices

Flash drives and USB storage drives often have their own boot-able programs and operating systems. Keeping these permanently inserted can cause startup problems. Many printers and cameras also have card readers that hinder your boot process. Remove these devices from your PC and reboot.

3.Check for Overheating

Overheating is a major cause for unexplained blue screens, computer crashes, freezes and especially boot problems. Check your computer fans and the inside case for dust build up. If you don’t hear the fan moving, check its functionality. Allow at least 30 minutes for a cool down period before attempting boot up your PC. Also download a temperature monitor and evaluate your heat output. Anything over 55 degrees Celsius should cause concern.

4.Check For Strange Noises

Noise is a big indicator. Beeps and unusual beeping noises will indicate that there is a problem with your motherboard. Use your manual to discover the beep codes meanings. Then you can possibly alter your BIOS to end this boot problem. Other noise can be attributed to a lose internal connection such as a unfastened cables. Also, noise may indicate your fan is not working correctly. Open check for any loose fitting hardware.

5.Check Your Cables

Double check to make sure all cables have not dislodged themselves. The most important of these is the power cable and the monitor cable. If these are securely fastened, remove the the case and check all internal cables. Pay particular attention to your graphics card because they can have multiple cables inputs.

6.Check Your Software

Having a faulty start up configuration or a rogue malware can cause Windows improperly boot. A quick solution to boot problem is to start Windows in Safe Mode. You can enter safe mode by pressing F8 when your computer is starting up. If Windows loads with no problems, it’s a safe bet that a software issue is causing your startup problems. Run your anti-virus/anti-spyware programs.

7.Check The Boot Sequence

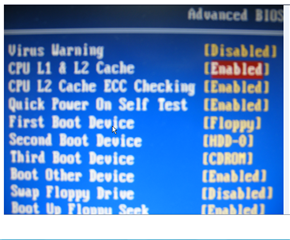
If your hard drive is not the first device that your computer boots, you will have startup problems. If you have been getting messages stating “NTLDR is Missing”, your hard drive is not loading. Depending on your computer, you may need to press F2, F10, F12 or Del in order to access your BIOS. In the Advanced BIOS Options menu, make sure the Boot Sequence shows the hard drive loads first.
Delete Computer History
All in all, these boot issues can be solved easily. If this particular set of solutions didn’t help, you may need to reinstall Windows. If you suspect a hardware issue is causing startup problems, it may be time to upgrade.

Popular Articles

Best Registry Cleaner
Fix a Slow Internet Connection
PC Speed Killers

Corrupt File

Posted by | Uncategorized | No Comments
How to Repair a Corrupt File

Corrupt files or Missing File? Have you seen an This error messages warning that you have a file is missing or corrupt? If you have, there are a number of reasons why you may have a damaged file. Malware, improper installs, and poor maintenance are usually the major causes of these file errors. However, this problem can often be easily rectified with a few simple steps. Even if you haven’t seen an error message, chances are your system is loaded with corrupt files. Registry Cleaners can fix errors.

Often third party software does not work perfectly with Windows software architecture. With that said it is often very difficult to cleanly remove it from your system when you uninstall it. The files that linger often share application with existing software. This can cause a lot of problems. So, try to use a program uninstaller or use ADD/REMOVE as executive uninstall.

SCAN AND REPAIR

Windows XP, Win 7 and VISTA have a wonderful application that allows you to auto-repair damaged files. This is known as SFC SCAN command. This administrative tool allows Windows to try and repair itself. It will scan all system files and replace any that are damaged or missing. If repairs are needed, you will need to supply the Windows CD so that the functional files can replace the ones that are causing your computer to constantly restart itself. Registry Cleaners often are more affective because they will help you to make a backup of your registry and often fix other damaged errors without the need to replace files. Here how to use the SFC command

  • Click Start
  • Right Click the Command Prompt or type cmd
  • Type sfc/scannow
  • The tool will scan for damaged files. When prompted provide the Windows original disk for repair.

Delete Computer History
Please remember to always remove old version of downloaded software and use proper shutdown procedures to avoid corruption of exiting files and software. Also search duplicate files. Click here to locate duplicate files

RELATED TUTORIALS:

Fix a Missing Dll
Speed Up Slow Internet Connection
Stop Buffering Problems

100 Percent CPU Usage

Posted by | Uncategorized | No Comments
Stop 100 Percent CPU Usage with CPU Affinity

What to do when a program is running at 100% CPU?

100 percent CPU usage can cause computers to freeze or crash. So, the most important thing is to identify if the program is a virus, error filled software, or just a CPU intensive program. Once you’ve identified what process is causing the problem, you can stop the process by either ending the application or stopping the process that linked to the program.

Why is the program running at 100 percent CPU usage?

This usually occurs when a program is very CPU intensive like a video game that requires tons of resources. If a program is RAM intensive or you PC lacks sufficient RAM, your CPU will have too take up the slack. spyware or a program that has errors will also cause CPU spikes. You can use error fixing software to stop 100 percent CPU usage, Click here to learn more.

You can limit the CPU usage by setting the CPU Affinity

CPU Affinity will give you process control over the CPU. Most computers have multiple CPU cores. This sounds great however a lot of programs are not designed to run on multiple cores. Therefore, allowing a program to use all the CPU cores may actually produce much more CPU usage than needed. You can limit a program to just one core without sacrificing any performance by the program. A lot programs can run at top speed completely fine just using one CPU core. Remember that some game are meant to run on multiple cores.

How to Set CPU Affinity?

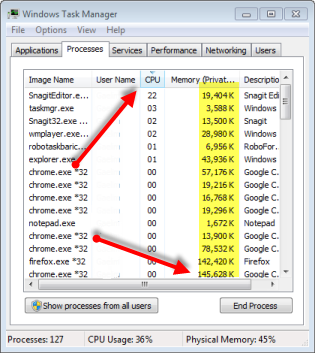
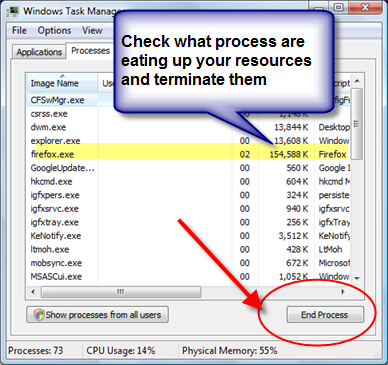
You will have to access the task manager to do this. In the task manager, you will need to access the process tab. In the process tab, there will be a list of all the processes. You can reorganize them to see which process is eating up the RAM. Identifying the one that is eating up the most CPU usage will take a bit more investigation. However, a rule of thumb is high RAM usage can be linked to high CPU usage. However, the third column is the CPU column. When you identify the process that is eating up your resources. You can set the CPU Affinity by right clicking the process and choosing the Set Affinity. Here is the method below.

  • Press Ctrl-Alt-Delete to bring up the Task Manager.
  • Click the Process tab
  • Choose the process and right click the process.
  • In the Menu select Set Affinity
  • Set the number of cores by un-checking the CPU cores.
  • Click OK

Delete Computer History
Choose the Process that you suspect of eating up your CPU Usage or causing spikes.
Delete Computer History

Watch the video to see how to set the CPU Affinity


There are lot of ways you can limit CPU usage by reduce RAM and cutting down on background process. To learn more about how to speed up CPU performance and, click here.

Reduce CPU Usage

Posted by | Uncategorized | No Comments
Reduce CPU Usage

1. Why do you have high CPU usage?

CPU becomes overloaded when multiple tasks are running simultaneously, which causes overheating and reduces the speed of your computer. Firstly, we have to identify the processes that consume the most CPU resources. There are two ways to go out this. This most resource hungry process can be terminated or we can shut down a collection of unnecessary processes. Both strategies should help you reduce CPU usage. On the hardware front, adding more RAM will allow processes in our computer work more efficiently. In order to reduce CPU usage on Windows Operating System following steps should be carried out. Registry Errors can cause Slow CPU performance, click here to learn more.

Watch the Video on How to Reduce CPU Usage


2. What processes are running?

We have to know the list of processes running simultaneously on our computer using Windows Task manager and the amount of process CPU is consuming.

Determine which process is consuming the most resources in CPU by sorting all processes running on computer in descending pattern based on CPU usage using Windows Task Manager.

  • Press Ctrl + ALT+ DELETE to open the Task Manager.
  • Click the Processes Tab
  • Evaluate the CPU column to see how programs are using the most CPU resources.

Delete Computer History

3. How to stop a process?

Loading time and speed of the computer can be increased by shutting down the process which consumes large space in CPU. It can be done by highlighting the specific process displayed in the Task manager and by pressing the end process button present below the Windows Task manager the process which we highlighted will be shut down. This allows other processes to run efficiently. To see visual step by step instructions, check out this tutorial.

4. How much memory does a process or program need?

We have to identify the amount of memory required to run a specific process which consumes more space in CPU. It can be carried out by clicking the start button present in the Computer Desktop and then right click “Computer” icon and then select properties from the menu and next to installed memory field we can review the required memory for that process.

You can install extra RAM by consulting our computer manual when we need to install a game or any program which exceeds our CPU memory space limit.

5. Reduce the CPU Usage in Your Antivirus Settings

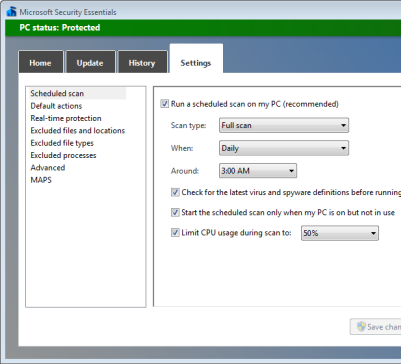
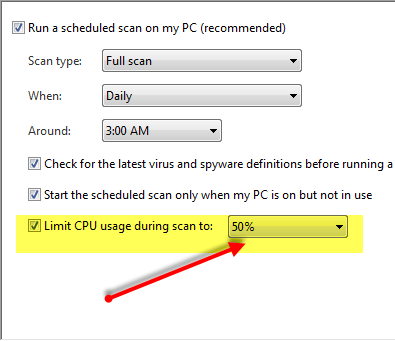
Most antiviruses will give you an option to reduce the CPU usage load while it is scanning. Some of these programs can eat up to 90 percent of the CPU process. Antiviruses programs like Microsoft Security Essentials will allow you to reduce the CUP load to 10%. In your antivirus check the settings to reduce the CPU usage while scanning.
Delete Computer History

Reduce CPU Usage in MAC

To reduce CPU usage in Macintosh Operating Systems following steps are needed:

1. Use the Activity Monitor

By opening the Application folder move to Utilities and click Activity Monitor. In that select CPU tab there you will see the list of processes running on your computer. Your monitor will display the list of tasks which are currently running with its CPU usage. We can see the sorted list of process running in descending order based on it CPU usage. For more ways to Speed up your Slow MAC, read this tutorial.

2. Identify and Stop the Process

Proceed to identify the process which occupies large space in CPU and shut down by pressing Quit Process button. By shutting down that process we can increase our computer speed and CPU usage.

We can determine whether our computer needs extra RAM in Mac Operating System in the following way. In the Activity Monitor we can see System Menu tab by clicking it we can review active and wired levels of your computer. If huge memory is occupied in our computer’s CPU means we have to install extra RAM.

For More Ways to Reduce CPU Usage and Speed up Your CPU Speed

For More Video Help for High CPU Usage, Click Here

Write Caching

Posted by | Uncategorized | No Comments
How to Enable Write Caching?

What is Write Caching?

When your hard drive stores data, it’s written to separate disk that occupy your hard drive. This is a physical process that takes time. When you hear your hard drive accesses it noisy because it working hard to provide you the files you want. RAM on the other hand is temporary storage. Its fast and virtual, so the data can easily be brought to you without any difficulty. This performance option acts by allowing your information to be stored in a temporary space like RAM. The data is not sent to a temporary cache and cued to be written on your drive later. Windows send a single that allows your computer to CPU saying that the data is finished writing when actually it’s just sitting in a cache. Less CPU and hard drive processing power are needed which give your PC more power for other applications and function.

Should I enable this function?

This option can be risky because the data is not written to the hard drive. So any interruption of Windows or sudden computer shutdown equals a potential loss of the data in the cache. However, it does take the strain off your CPU by taking it out off the hard drive data writing process. So, if you want a boost in performance, it seems to be a worthy tweak.

How to enable write caching?

You will have to change your hard drive policy options to use this option. This option is applicable to the hard drive in which your operating system is loaded.

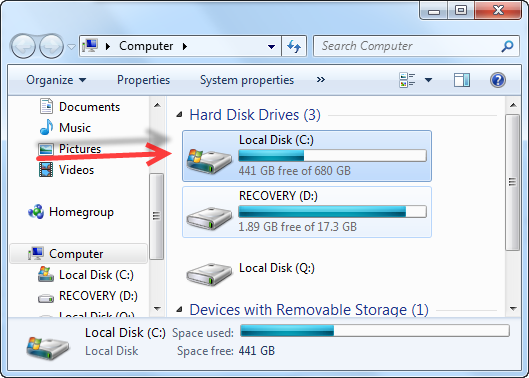
  • Click Start, choose Computer
  • Under hard drive, right click the hard drive you want to enable write caching, Choose Properties
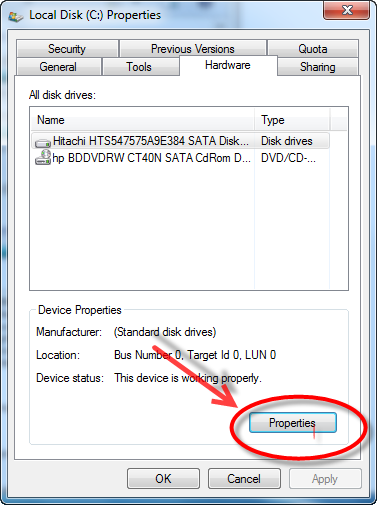
  • The Local Drive Properties Menu will load, choose Properties in that menu.
  • In the hard drive menu, choose Settings.
  • Click the Policies tab , check the box that says Enable Write Caching.

Delete Computer History

Make sure you select the Hard Drive in which you want to add this performance measure to.

Delete Computer History

Are there other ways that you can improve your hard drives performance? Of course there are various ways to speed up your hard drive. Older hard drives may need a bit more help. But bigger and newer ones are much faster and need less maintenance. You can speed up your current hard drive in the following way.

Related Tutorials

Speed Up Windows 7 with this tutorial