admin, Author at Delete Computer History - Page 7 of 15

Web Base Proxy Sites

Posted by | Uncategorized | No Comments
Be careful when choosing a web base proxy sites. You could be getting scammed!

Recently a lot of free web base proxy sites have been thrown up by spammers and bandwidth thieves. So, you should take precautions when choosing from a web based proxy list.

When choosing to use one of these free services use this check list to make sure they are legitimate.

  • Provides the user with a contact form, number, or email.
  • A detailed FAQ page which details protocol and security
  • Recommended by other net users
  • Give the user control over scripts, ads, pop-ups
  • Never ask for user id or email for free service!

The reliability of a web proxy is also important. The web base proxy should at least have a 80% functionality attempting to establish contact with the proxy. There are many reason why a web base proxy is not functional. But this should not be the norm when using the web base proxy service.

Below are a listed of trusted web base proxy sites that have our seal of approval.

HideMyAss.com– It offers a full range of control for ads, scripts. Very high reliability and security.
Rating: 10

Proxy4free – This is a quick fix. It will give you a list of new and good web proxies
Rating: 10

Youhide.com– This is one of the best free web based proxy sites. That offer a lot of control of ads, scripts, etc.
Rating: 8

Proxy.org– Allows you to surf anonymous and has advanced options for user to tweak thier anonymous surfing experience.
Rating: 9

If you want to bypass firewalls with web base proxy sites. Click here to learn more

What is a proxy server

Posted by | Uncategorized | No Comments
What is a proxy server?

The answer to what is a proxy server is very simple. A proxy is a kind of buffer between your computer and the internet. Why would you want a buffer between your computer and the internet? The main reason used by many is to hide your IP address.

Your IP address holds vital information about your computer location and ISP. Your IP address can be used to track your web activity. This is the reason why an IP address is often referred to as digital finger print. Many feel that this is an invasion of privacy. So, masking your IP address provides you with anonymity on the web. You can also use Web Proxies to sidestep restrictions on firewall. This requires no software or downloads.

This is Your IP Address

You are visiting from:
IP Address: 14.102.114.173
Host: 14.102.114.173

How to enter proxy settings

You can easily change your IP address by surfing thorough a regional server or anonymous server.

What is a proxy server list? A proxy server list is a list of servers that you can manually enter into your web browser in order to surf via a proxy.

Here are instructions on how to setup a proxy in Firefox:

In Firefox

  • Open Firefox, choose “Tools” menu
  • Scroll down to “Options” and Click
  • Choose “Advanced” Tab
  • Under Connections Click “Settings”
  • Choose “Manual proxy configuration”
  • Type in your proxy number
  • Click use this proxy server for all protocols
  • Restart your browser

Using a Proxy to break Firewall and Network Restrictions

One of the popular reason people use a proxy is to break firewalls. This can be done with a web proxy or a firwall breaker. Click here to learn more about firewall breakers

What is a proxy server anonymous list? Click Here to find anoymous proxy

Trojan Horse Removal

Posted by | Uncategorized | No Comments
Trojan Horse Removal

What is a trojan?

Trojan horse removal is essential. But first lets define what a trojan horse is in the computer world. A trojan horse is an executable program that is designed to disrupt or hijack applications on your computer. The reason why these programs are developed are often to initiate other attacks from more advance malware such as spyware. In essence, trojan horses are used to break down security to make your computer more vulnerable to attack. A good AntiSpyware program can be an easy step for trojan horse removal .

5 Trojan Horse Removal Steps

Trojan horse deletion can sometimes be as easy as using a spyware removal program. These programs can identify the trojan by name or behavior. This should be your first step before moving on to more difficult removal procedures.

Step 1: Identify the Trojan

If you know the trojan you have you can move on to step 2. Before you begin trojan horse removal, you must be able to identify the malware. Luckily your computer will have already given you clear signs that you have a trojan horse infection. When you have a trojan horse your computer will often send you an error message that an abnormal process is occurring in an application. This error is called a DLL error. This dll process is linked to an specific trojan. So, if you can identify the dll, you can identify the trojan. There a tons a places on the net that will help you identify the dll process. Just copy and paste the error dll error into one of the websites like www.processlibrary.com. It will then give you all the info you its a malware or normal process. If its a trojan it will give you the name of exe file.

Step 2: Display Hidden Files

Hidden files can make manual trojan horse removal impossible. It is often necessary to search the hidden contents of your computer to unearth malware. Most good anti-spyware programs can search through your hidden files automatically. You will need to need take a few steps to display all hidden files and folders.

In XP

  • Close all programs
  • Click on the My Computer icon.
  • Select the Tools menu and click Folder Options.
  • Select the View tab in the new window.
  • Check Display the contents of system folders.
  • Under the Hidden files and folders, select Show hidden files and folders.
  • Uncheck Hide file extensions for known file types and Hide protected operating system files.
  • Click Apply button and Restart

In Vista

  • Close all programs so that you are at your desktop.
  • Click Start button.
  • Click Control Panel.
  • In the control panel, Click on the Appearance and Personalization.
  • Click on Show Hidden Files or Folders.
  • Under the Hidden files and folders section select Show hidden files and folders.
  • Uncheck Hide extensions for known file types and Hide protected operating system files.
  • Click Apply button and restart.

Delete Computer History

Step 3: Stop the Trojan’s Processes

Before attempting to purge your system of a trojan, the first step is to Load your PC into SAFE MODE and stop all processes related to the trojan.

  • In Safe Mode, open up the task manager by pressing CTRL-ALT-DELETE.
  • Highlight the process by clicking it.
  • Click the End Process

Delete Computer History

Step 4: Edit the Registry

In order for the trojan to be completely removed from your system, you need to remove its registry entries. This way it will not be able to re-install itself. The Trojan is a “exe” process so you can find int the RUN folder of your registry. The registry key: HKEY_LOCAL_MACHINE> SOFTWARE>Microsoft>Windows>CurrentVersion>RUN

This action will help you eliminate and chance of it reinstalling itself. Here is how:

  • Click Start
  • Click Run
  • Type regedit
  • Find this registry key:

    HKEY_LOCAL_MACHINE/
    SOFTWARE/
    Microsoft/
    Windows/
    CurrentVersion/
    RUN/

  • In the right section click the process. For example is the trojan is “rusvdgpo”. Delete all exe and dlls associated with the trojan names.
  • Delete the value.

Delete Computer History

Step 5: Check your Startups

  • Open your Start menu.
  • Click Run
  • In the command screen type “msconfig.exe”
  • In the “system configuration utility”,click “startup” tab
  • Uncheck any process that is associate with the trojan.
  • Click “OK”
  • Restart

Delete Computer History
If you have tried all these steps in trojan horse removal and still failed to remove the trojan from your drive, you may need to check out other advanced techniques and malware removal programs. For a list of the BEST ANTISPYWARE PROGRAMS, Click Here

RELATED ARTICLES:

REMOVE ZLOB TROJAN VIRUS
REMOVE VIRTUMONDE TROJAN VIRUS
REMOVE Trojan.Brisv.A

YOUR Trojan Horse Virus Story?

Tell us what trojans you have. What website gave you the trojan? Have you taken any steps to remove the trojan. Help us and others eliminate these nasty bugs for good! We will publish your tips on this site!

How to Defrag a Computer

Posted by | Uncategorized | One Comment
How to Defrag a Computer

Learning how to defrag a computer will save your computer’s life. This task should be a part of your routine computer maintenance schedule. Why?- Because performing this action can extend the life of your PC for years. Also it can exponentially increase your PC performance. Follow these easy how to steps to defrag a computer with a few simple clicks.

One of the more important reasons to defrag a computer is to extend the life of your hard drive. Just remember the more jumbled and fragmented your hard drive is the the longer it will take to find and access specific files. So, it only make sense that you keep your computer filing system in order.

How to defragment your computer hard drive in Windows

In XP/Vista

  • Open the Start Menu
  • Click on My Computer
  • Right Click your C: drive or your hard drive image.
  • Scroll down to the “Properties” Click
  • In the Properties Menus, Open the “Tools” menu.
  • Choose Defragment Now.
  • In the Disk Deframenter menu. Click on “Defragment”

In Windows 7

  • Click Start.
  • Choose All Programs.
  • Click Accessories then System Tools.
  • Click Defragmenter

To eliminate the clutter of useless files and errors that cause slowdown, you may want to use a Registry Cleaner, Read More.
Delete Computer History

The image displays a computer that is suffering from a large amount of fragmented data. This is demonstrated by the collection of broken bars. Each color indicates different data fields, files, and blocks of data. In “healthy” computer, one with very little fragmentation, the disk defragmenter would display a collection of large continuous blocks consisting of one color. After you defrag a computer you should see these results

Delete Computer History
Performing an “Analysis” after to see to the overall improvement in organizing your data. Your PC speed should significantly improve. Learning how to defrag a computer is just one of the steps in speed up your PC.

Click Here to learn how to Speed Up Your Hard Drive.

Enable Write Caching

If you have Windows Vista or Window 7 & 8 you can use an advanced feature such as Write Caching. This helps to speed up your hard drive performance and free up CPU resources. Check out the video to learn more.


New SSD Hard Drives

There’s is a lot of debate about whether you should defrag a SSD hard drive. SSD stands for standard state drives that means there are no moving parts. HDD which stands for hard disk drives have moving disk and parts. SSD are similar technology to your flash drives. The reason for this is that every time SSD hard drives are written on they are damaged as opposed to regular HDD which allow for constant writing and rewriting. So theoretically, the act of deffragging will actually damage your SSD permanently. So with the current set of SSD, you should not defrag your SSDs. Sadly all hard drives get slower over time. However, SSD seem to degrade a bit faster.

RELATED TUTORIALS:

Speed Up Windows 7
Speed Up Slow Internet Connection
Stop Buffering Problems

Find Duplicate Files

Posted by | Uncategorized | No Comments
How to Find Duplicate Files – Eliminate Duplicate Files Easily

Do you need to find duplicate files? Yes, Its also important that you eliminate duplicate files. If you want to eliminate duplicate files, can be done with easily for small problems. However, some may need a Duplicate File Finder Software if you have a ton of duplicates. However, duplication of files is a normal occurrence on your PC. However, they can be a nuisance. It’s important to remove duplicate files in order to keep your PC running efficiently. Sometimes your computer may be filled with duplicate files or in other words with several copies of the original files exist.

These additions can cause conflicts in the form of taking up memory and hard drive space. Duplicate files can occur due to your on negligence or because of spyware and or a virus which may duplicate files into thousands of .

A good anti-spyware program will root these out. However, often these files occur from the user simply saving and downloading multiple versions of the same file. You can easily find duplicate files and eliminate duplicate files with duplicate file finder software if you need to clean up your computer. Or if you suspect you have one or two duplicate files, you can follow the instructions below or click here to learn more about duplicate file finder software.

Find Duplicate Files with a Duplicate File Finder Software,

How to Search For Duplicate Files

  • In Windows, Click the Start Button or you can Press F with Windows key. This will bring up a search box.
  • Enter the file you believed to have multiples. This can be a program file or a file extensions. Hit Enter. Depend on Your version of Windows, your toolbar may located at the top or bottom.

    Delete Computer History

  • In Windows 7, simply click the toolbar icon and choose Details. In previous versions, you may to click Views and then Click Details from the toolbar.
  • From the list, you will be able to see if there are multiples of the same file. In the date modified column, if the files display the same date modified, you are looking at duplicates.
  • Select one or more duplicate files and press Delete key from your keyboard. This you can do for several files.

Delete Computer History
This is the simplest method in case you do not want to use any third party application to i find duplicate files.

RELATED TUTORIALS:

Best Registry Cleaners
Speed Up Slow Internet Connection
Stop Buffering Problems

Game Lag

Posted by | Uncategorized | No Comments
How to Stop Game Lag

End Lag Kills, Kills Steals and Getting Kicked – Stop Game Lag!

Spending countless hours playing my favorite PC game is the closest thing to heaven as I can imagine. LOL, DOTA 2, and Call of Duty have given my life new meaning.. However, lag can spoil your fun and can turn hours of joy in an exercise in frustration. To stop your game from lagging begins with evaluating your computer’s hardware. Every game has a specific hard ware requirements to run smoothly and another set of requirements for optimal performance. If your computer does not meet minimum requirements, you will see game lag, crashes, and poor frames per second ratio resulting in complete entertainment mess.

Stop game lag – Do it yourself:

Some simple tips will help you to stop game lag and improve gaming experience. The mission begins with:

Problem 1: The Holy Trinity: CPU, Graphics Card and RAM

Check the configuration of your hardware. Make sure you have supported graphics card. Poor or under rated graphics card results in mal-performance and effectively offers higher frequency of game lag. Check if your random access memory or RAM is as desired. You need adequately sized RAM and the main processor, or your gaming experience will not deliver optimum results. You can instruct your graphics card to concentrate on performance rather than graphical flare.

Video Tip: Improve Frame Rate Instantly


Problem 2: The Little Helpers: Drivers

Get the latest version of drivers for your graphics card. This ensures a superior visual delivery. Timely updating of graphics drivers can be directly linked disturbed frames per second ratio. All these hardware related actions will help to stop game lag. You can also delete cache, cookies, and temporary files to improve the hard disk performance. To see More about How to update drivers, Click Here

Problem 3: Your Hard Drive

Defragmenting your computer’s hard disk can also help you to stop laggy game play You can use the built in disk defragmenter tool in Windows or try professional tools too. Try using Write Caching or DMA Mode to speed up your hard Drive. You can even turn on high performance power modes to improve your power usage. Read more about optimizing your hard drive for games, click here.
Delete Computer History

Problem 4: Your Filing System: Registry Files

Show some mercy to your computer’s registry. Your computer’s registry stores the most vital information related to the performance of your computer. Many registry entries are often found which leftover of uninstalled programs. Cleaning registry offers substantial help in improving the gaming experience. As during the game play, hundreds of settings are activated in the registry and it needs to be fit to handle the extra load. However, playing with registry without knowledge and reciprocation of the action is dangerous. It is best to download and install registry cleaner tools and get your registry repaired with their help.

Problem 5: Resources Hogs: Excess Software, Malware, and Services

Viruses can also slow down your computer’s performance. Make sure to get rid of them using a good quality antivirus program. In addition to this, you can also install reliable anti-malware and anti-spyware tools to keep the security level of your computer optimum.

Your task manager comes handy during game play. Make sure to terminate all unnecessary services running in the background to make some more room for the game engine to perform well. You can also try lowering the RAM usage of Windows by cutting out graphicals flares such as fading windows, smooth edges and Aero interface Try the option for best performance and eliminating the Aero setting. Check your resource monitor to see if you getting award more RAM. Many times this trick works great if you are using Win 7 Home of Pro OS.

Video Tip: Use High Performance Options in Windows 7

Every single step out of this recipe should make gaming better. The trick is to provide more resources which will provide a long term benefit in improving the overall performance of your PC.

Problem 6: Your Internet Connection

if your are playing online game and you are experiencing lag. This could be attributed to your internet connection or the games servers. There are ways to optimize your internet such as clearing the web cache, channel your router channel, improving cabling, locking down your connection. Learn How to Optimize your Internet Connection, Click Here to Read More.

Windows Services

Posted by | Uncategorized | No Comments
Stopping Windows Services

There are a literally scores of windows services running on your PC. Some of these task are necessary. However, many eat away at you system resources and memory. There are many reason you should be actively managing windows these task. The main reason is that these services will download and install program without your permission. This additional software adds to your CPU use workload and will eventually lead to a sluggish PC, slow start up and shutdown. You can use a registry cleaner to speed up your PC startup and limit needless services.

How to Stop Windows Services

Step 1: Open the Service Console

The service console is an application that allows you to define, manage windows services. The easiest way to activate this console is by using the command services.msc. Here is how to pull up your service console.

  • Open the Run console
  • Type services.msc.

Delete Computer History

In Vista

You can call enter the services.msc command in your Quick Search bar. Simply press the start button and enter the the command.
Delete Computer History
Once the service console appears, you will be able to a list of all the services that are set up on your computer. By click the name of the service you will be able to see a detailed description of the task. You need to hit the extended option at the bottom of the page to display the full description after selecting the service.
Delete Computer History

Step 2: Check the Dependencies

Before stopping any services, its important to see what other services depended on the particular services. Sometimes by deactivating a services you can cause a change reaction to occur and disrupt other services and application.

  • Right Click the service
  • Click Properties
  • In the service properties menu, click Dependencies tab

Delete Computer History

Step 3: Deactivate the Service

All these services are programmed to load when the application that depends on it is loaded. However, windows loads most of these task at startup. Therefore you need to change the status of the services. There are three status options in the startup type: Automatic, Manual, and Disable. Automatic starts when the computer loads windows. Manual startup occurs when and application is loaded. To stop a services you must choose Disable.

  • Right Click the service
  • Click Properties
  • In the service properties menu, Under Startup Type, click Disable tab

Delete Computer History
Remember that you should be careful what services you disable. Three unnecessary services that you can easily disable are:

Indexing servies
Superfetch
Remote Deskstop

Windows services cause slow startup, Click here for a list of programs that cause slow startup

Popular Articles

Best Registry Cleaner
Slow Internet Videos
PC Speed Killers

Make My Computer Faster

Posted by | Uncategorized | No Comments
How to Make My Computer Faster in 5 minutes?

One of the most researched phrases on the internet is how to make my computer faster. Obviously many people are suffering from this problem. However, the problem can be solved by performing a few maintenance task. Yes, its inevitable that longer you have your PC, the more programs and application will be added. This will caused your computer to perform slower So often peforming a simple cleanup will propel you into the speed zone.

If you’re lazy like me. This is how I make my computer faster with one click. Read More.

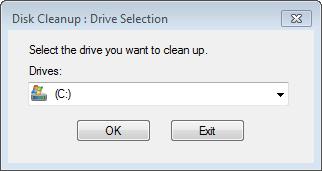
1. Perform a Cleanup

Disk Cleanup is a powerful application that will eliminate a lot of junk files on your computer. You can easily perform this task by following these instructions: Click Start > Programs > Accessories > System Tools > Disk Cleanup.

For more help check out Increasing Disk Space and Clean up a Slow Computer
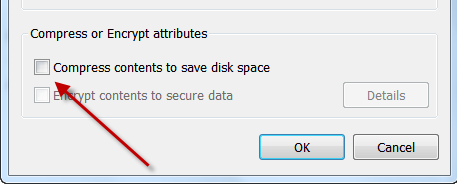
Delete Computer History

2. File Compression

Without a doubt your computer is affected by the amount of space on your hard drive. You have learned the beauty of using Disk Cleanup. We can take it a step further by compressing files this make files smaller thus creating more space for our own use. Here is how: Right Click the File or Folder > Click Properties > Click Advanced> Click Compress Contents..> Click OK > Confirm.
Delete Computer History

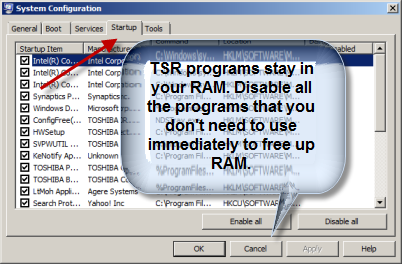
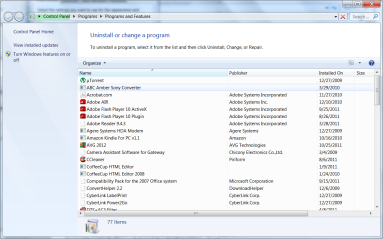
3. Remove Unwanted Software

Can I make my computer faster by removing unwanted programs? Yes of course…Programs take a huge amout of hard disk space. By removing your unwanted and unused software, you free up resources to be used for your computer performance. Here is how: Click Start > Control Panel > Add and Remove.. or Programs > Select Program to be Uninstalled
Delete Computer History

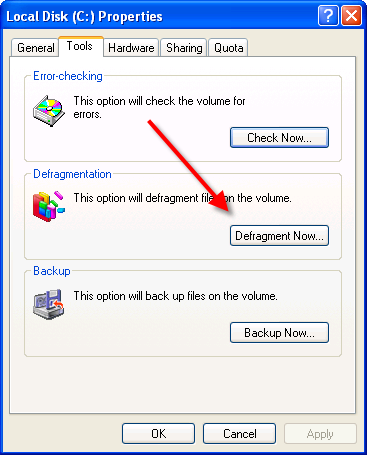
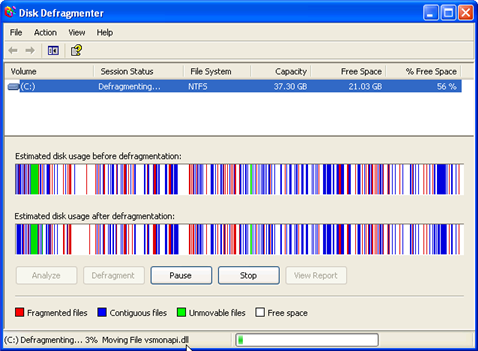
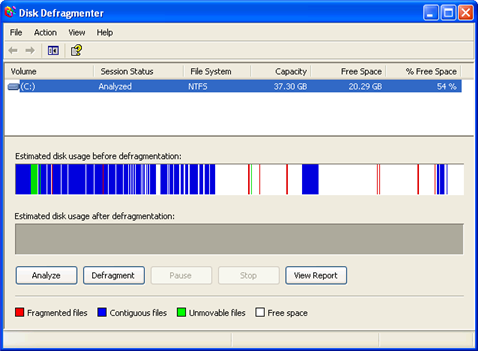
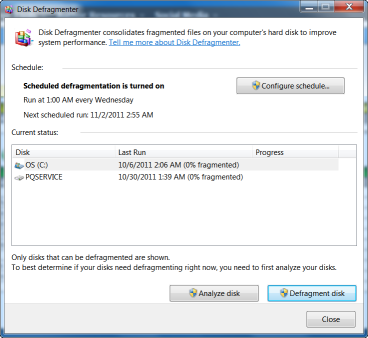
4. Defrag your Hard Drive

One of the best tools to get your computer faster is windows defragment tool. Defrag helps to organize your hard drive file structure which cuts down on the time your computer needs to search through files. In orders making the search and hard drive access more efficient. You can perform this task with ease. Here is how: Click Start > Click Computer > Right Click your hard drive > Click Properties > Choose Tools > Click Defragment Now.
Delete Computer History

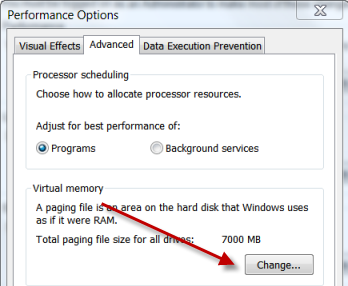
5. Increase Virtual Memory

Virtual memory provide your computer with extra space to temporarily store data when needed. Acting in place of RAM This can give you programs and operating system a boost by giving them a extra resource pool. The more resources available the better your computer will run. You can access your virtual memory by using the following steps: Start > Control Panel > System and Maintenance > System > Advanced System Settings > Settings > Under Vitrual Memory > Change > Custom > Set the Amount of Virtual Memory.

For Visual Detail
Delete Computer History

6. Use an Good Antivirus/Anti-Spyware Program

This is a no brainer. If your computer is riddled with malware, it will run extremely slow. You should download a good program and run it regularly to enusre that your PC is clean. Good Spyware Program Reviews

7. Organize your Desktop

Yes the more icons and folders you have on your desktop, the more resources are required to load and display them. Keep these at a minimum for an instant boost in performance.

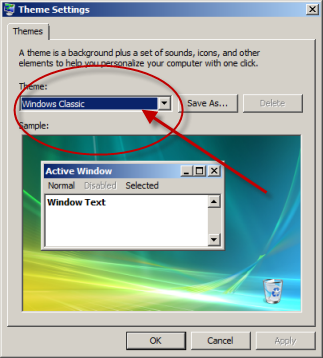
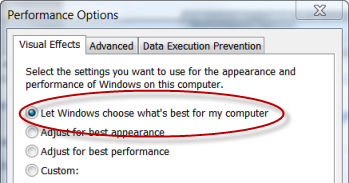
8. Set Performance Options

Windows looks beautiful with all the graphical settings up. But this actions slow down your system and eats up RAM that can be used for other functions. Set your option for best performance. Here is how: Start > Control Panel > System > Advanced > Performance > Settings > Visuals Effects > Adjust for best performance.
Delete Computer History

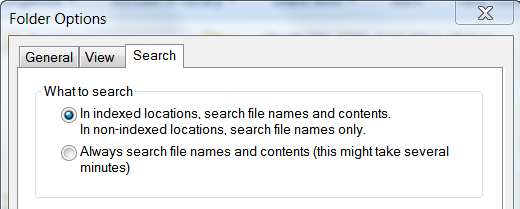
9. Disable Printer and Folder Searching

Each time when you browse a folder, your PC takes some time to detect printers and network files. Disabling that can increase faster browsing of folders and as a result faster computer. All you have to do is: Start > My Computer > Tools or Organize > Folder Options > Remove the check mark for “Automatically search network folders and printers” > OK > Restart
Delete Computer History

10. Use an Optimizer

Having a onclick solution to all your software troubles can save tons of time and energy. Most Windows cleaners will allow you to clean up your PC so it runs smoothly. There are a ton of different ones on the market. Best Windows Optimizer Reviews

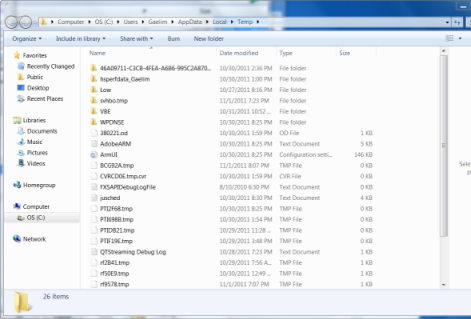
11.Clear Temporary Files

Here is a quick and easy solution to the question how to make my computer faster. The temp folder holds all data that needed to be temporarily stored on your PC. You can access these files by typing “%tmp%” in Windows Search bar or RUN function. Simply Click Start > Type %tmp% > Select and Delete files.
Delete Computer History

RELATED TUTORIALS:

Speed Up Windows 7
Speed Up Slow Internet Connection
Stop Buffering Problems

Enable ReadyBoost

Posted by | Uncategorized | No Comments
Enable ReadyBoost to Speed Up Your PC

Should you enable ReadyBoost? The answer is simple yes. Everyone’s PC eventually slows down. Using all the Windows 7 maintenance tricks and tips will alleviate your pain. ReadyBoost is not a magic bullet but it will award you with an extra speed boost. If you are using a computer with only 2 MB of RAM, this is a necessary boost in performance.

What happens when you enable ReadyBoost? You’ll get a much needed boost of memory especially if you are running RAM heavy applications. Windows 7 allows you to use more than one device, such as a SD card with and USB drive. This can be an excellent way to extend the life of your PC. The best thing about this speed boosting application can be set up in 5 minutes.

Before you enable ReadyBoost, make sure you are using a storage device that has specifications such as 2.5MB/sec throughput for 4K random reads and 1.75MB/sec throughput for 512K random writes. If the device is 12MB/sec , it will be too slow to benefit your PC.

Step 1: Insert your USB or SD card.

Insert your USB or SD card into the computer. Your AutoPlay feature will load. A window will appear, choose Speed up my system using of Windows ReadyBoost.
Delete Computer History

Step 2: Dedicate the Device.

You can use the device in multiple ways. You can use the device as completely dedicated device for ReadyBoost. This will award you the most speed. The other option allows you to specify how much space you want to allocate when you set up ReadyBoost. The more space you dedicate the better your performance will be.
Delete Computer History

Step 3: Prepare the Device.

Click OK and the device will be prepared for use by your system. Please note that every time you remove and add this device, your computer will have been updated with ReadyBoost.

Delete Computer History

Your computer should be faster and more responsive. Check your Performance Monitor, to see lower CPU usage and more free RAM. This is a great way to increase your PC’s performance and speed. There are a lot of ways quick ways to boost your PC speed. You should try the following tutorial: Speed Up Your PC with these 5 minute tricks!

Free Up RAM

Posted by | Uncategorized | No Comments
How to Free Up RAM

You need RAM to run programs smoothly. To Free up Ram is a simple process. However, your computer programs eat up tons of Ram. There are several ways to free up memory but basically you need to limit the amount of applications being loading into your RAM. If you seen a insufficient memory error. Click Here to learn more

Step 1: Eliminate TSR programs

Free up RAM by eliminating TSR programs. TSR is terminate and stay resident program. This is an application that is loaded into your RAM and stays there even if you are not using it. You don’t need a lot of TSR programs. You can free up memory by simply stopping TSRs from loading here is how:

  • Click Start button and load the Control Panel
  • Under the Control Panel menu, click Programs.
  • Under the Windows Defender heading choose View currently running programs
  • Choose Startup Programs from the Category option
  • Remove Programs that you feel unnecessary for startup

OR

  • Open your Start menu.
  • Click Run
  • In the command screen type msconfig.exe
  • In the system configuration utility,click either service or startup tab.
  • Uncheck all programs that your are no longer want to run in the background.
  • Click OK

Delete Computer History
Registry Cleaner can speed up your PC, click here to read more.

Step 2: Turn Off your Anti-virus program

Turn off your Anti-virus program. These programs kill unwanted malware. However, they are resource heavy and can eat of tons of RAM. If you need to play games or use a resource heavy program, try turning off your antivirus software to get a quick boost in RAM.

Step 3: Stop Programs in Task Manager

Programs that you loaded are running in your task manager. By simply shutting down the process you can instantly be awarded more RAM. To do this simply press Crtl-Alt-Delete at the same time to pull up the task manager. Then right click the program to terminate it. For more detail on stopping services, Check out Stop Windows Services Page

Microsoft has a deeper task manager that will give you a lot more detail on the process running. Click Here to Learn More.

Delete Computer History

Step 4: Eliminate Your Background

By turning of your wall paper make your desktop may look bland but it will free up vital resources and speed up your desktop and make more available memory for other applications to run.

How to:

  • Right-click on the desktop
  • Choose Properties
  • Click on the Desktop tab
  • Under “Background” choose None

Step 5: Switch to Windows Classic

The Windows Classic interface is very simple and efficient. It will eat up a lot less RAM than say a fancy out-the-box Windows Vista AERO interface. That classic interface can free up ram for use by other applications.

  • Right-click on the desktop
  • Select Personalize
  • Click on the Theme tab
  • Under “Theme” choose Windows Classic

Delete Computer History

Step 6: Update Memory Drivers

Up to date software drivers are essential for fluid communication between software and hardware. For your RAM to function, you need to update your drivers to optimize RAM properly. If the drivers are not functioning chances are you memory is not functioning.

  • Type devmgmt.msc into the run command line.
  • Expand the Memory section by clicking the + symbol.
  • Right click your memory and choose update driver.

Delete Computer History

Popular Articles

Best Registry Cleaner
Slow Internet Videos
PC Speed Killers