admin, Author at Delete Computer History - Page 12 of 15

Trouble Shooting a Slow Computer

Posted by | Uncategorized | No Comments
Guide to Trouble Shooting a Slow Computer

Trouble shooting a slow computer is a lot easier than you think. Most of the tips below will give you an immediate increase in PC performance. This tips are design for Windows OS.

PROJECT #1: Increase Your Hard Drive Speed


Switch FAT to NTFS

You can increase your hard drive speed by switching FAT to NTFS. The NTFS configurations provides increased security, file–by–file compression, quotas, and even encryption. The default setting for XP may be set to FAT which is slower system. However if you have already converted to the NTFS16 to NTFS32


How To:

  • Click Start
  • Click Run
  • Type cmd press Enter.
  • At the command prompt Type convert X:/FS:NTFS(X is your hard drive letter)
  • Hit Enter

Disable the Indexing Service

The indexing service scans your hard drive and indexes files to help speed up searching. It runs silently in the background using up RAM, free space and CPU access time. It is generally thought to be unnecessary by most.


How to disable this indexing service

  • Click on Start
  • Click Run
  • Type services.msc
  • Select Indexing Service and Double click on it.Select Manual under Startup Type.
  • Click Stop
  • Click OK

PROJECT #2: Speed Up Windows.

Clean Your Registry–Organizing and cleaning Windows registry is one of the best ways to trouble shoot a slow computer. Usually this action alone will reward you with significant increase in PC performance.


Speed Up Windows menu loading time

Cutting down on the load time it takes for menus is one the best ways to trouble shooting a slow computer in Windows.


How To make menus load faster

  • Start
  • Click Run
  • Type Regedit then click Ok
  • Find HKEY_CURRENT_USERcontrol PanelDesktop
  • Select MenuShowDelay
  • Right click and select Modify
  • Reduce the number to around 100

Speed up Application load times

Trouble shooting a slow computer can be done by cutting down on Application load time by using a faster access variable.

  • Click Start
  • Click Run
  • Type regedit
  • Find this registry key:
    HKEY_LOCAL_MACHINE> SYSTEM >CurrentControlSet>Control>Session Manager>Memory Management> PrefetchParameters
  • Change the value of EnablePrefetcher, from its default setting of which is 3 to 5,and then restart your computer.

Trouble shooting a slow computer by using the Top 4 Ways to Speed Up Your Computer

Helpful Tutorials

Best Registry Cleaner
Speed Up Windows 7
5 Minute Tips for a Faster Computer

Slow CPU

Posted by | Uncategorized | No Comments
How to Speed Up a Slow CPU!

he CPU is the beating heart of your PC. A slow CPU doesn’t always indicate a mechanical failure. Your CPU speed and processor power rarely change during the life of your system. However, how you use your computer constantly changes. The trick is to instruct your CPU on how to use it processing power. This page will help you achieve the goal of eliminating sluggish CPU problems. If you don’t have a dual core processor you can’t set core affinity.

Special Note: Slow CPU problems can be often linked to registry errors which slow down your PC, Click here to learn more.

STEP 1: Set CPU Affinity

A slow CPU means that your CPU is working overtime to provide resources to your computer. Most people force their CPU to constantly run multiple decathlons without taking a break. However, your CPU is not a single athlete. It’s a team a athletes. The athletes are the multiple cores of your CPU. You have ability to use Windows to assign different jobs for different cores of your CPU. A slow CPU usually has all the cores working on a single application. You can lighten the load of your a slow CPU by assigning CPU affinity. For example, assigning an single CPU core affinity for your firewall and Anti-virus hogs unnecessary power. It doesn’t need multiple cores to run perfectly.

  • Open your Task Manager by pressing CRTL+ALT+DELETE

Once you have pulled up the Task Manager. You should choose the application that you would like to assign to a particular CPU core. In most cases its best to group applications based on functions. A slow CPU will use both cores to process one application of similar function. Try grouping security software and internet software on one core. You can also stop slow processor problems by choosing resource hungry applications to work on one core. For example, Firefox and Internet Explorer should be kept on one core.

  • In the Task Manager, choose the application
  • Right the application
  • Click Set Affinity.

    If you are unable to set the core affinity, you may want to try to reduce the amount of back ground programs using msconfig. Or you can cut down on the CPU processor requirement by using a registry cleaner
  • In most slow CPU cases, the Processor Affinity settings will have both CPU processor cores checked. Choose one of the cores and click OK

STEP 2: Stop Hardware Interruptions

Hardware interrupts can account for more that 20% of your CPU processor loss. This is often one of the biggest culprits of a overworked CPU. Hardware problems can because caused by several sources. The problem could be a simple as a loose cable, a resources heavy USB device or an problematic driver. The first two require that you physically repair the problem with the repositioning or removal. However, you will need to perform a few more steps to fix a sluggish CPU problem caused by an erroneous driver. Here is how:

  • Click Start
  • Click Control Panel
  • Click System
  • In the System menu, click the Hardware tab
  • Click Device Manager to bring up a full list of installed hardware drivers.
  • Right click and choose Properties to evaluate the status and troubleshoot the hardware device.

In Vista you can reach the the device manager the following method:

  • Click Start
  • Click Control Panel
  • Click Hardware and Sound
  • Click Device Manager
  • Right click and choose Properties to evaluate the status and troubleshoot the hardware device


STEP 3: Use Write Caching

Giving your CPU less work is obviously going to free it up for other work. Luckily, you have the option of doing this in Windows 7. Remember that the CPU is a part of your computer’s complex integrated system. So one of it’s job is to regulate hard drive activities. For example telling it when to write data to the physical hard drive. You can use the write-caching function to free your CPU from this process. This works by allowing your data in a temporary folder instead of the CPU constantly telling the hard drive to write the data. Check out this link to see how to enable write caching on Windows 7

POPULAR TUTORIALS

Fix a Rundll Error
FIX REGISTRY PROBLEMS

Causes of a Slow Computer

Posted by | Uncategorized | No Comments
Top Causes of a Slow Computer

Although your computer slowness can be attributed to many factors, Check out the top causes of a slow computer:

1. Low on disk capacity

This can be nightmare for your computer. Your computer needs ample amounts of free space to function. Everything from your RAM to your CPU thrives of free space. Here are some effective ways to free up disk space.

Use a registry cleaner
Clean Windows Cache and Internet History

2. Viruses

Virus are one of the common reasons for a slow computer. They can replicate a computer process or program thus killing your computer’s speed and resources. You can use many good free programs like Grisoft’s AVG antivirus

3. Spyware

This can be one of the biggest causes of a slow computer. Spyware mimics programs and processes on your PC, often silently. Spyware can also be used to steal data and personal information. Check out Spyware Removoal

4. Low Memory

Your computer’s RAM and how you use it very important. However, buying more RAM is not always the best answer. If you are using your PC for surfing the web, downloading videos and such, you may be able to use your current RAM more efficiently by increasing your Virtual Memory

However, if your are new applications such as high end games or graphical software, you may need to add more RAM. You can scan your computer RAM performance at Crucial.com

5. A Slow Hard Drive

Your hard drive is a major resource in your PC. If your hard drive has errors or its filing system is fragmented. You are going to have a very slow PC. Luckily, Windows has quite a few tune-up utilities to keep your hard drive running beautifully.

General PC Performance Tips

Posted by | Uncategorized | No Comments
General PC Performance Tips

Windows’s general PC performance tips can free up your computer’s resources which will inherently make your PC a faster and smoother running machine. To identify more errors that you made need to extra tweaks or to use software to optimize you PC, you may want to try using a Registry Cleaners, Click Here!.

Adjust Visual Effect

By simply adjusting your visual effects your computer will perform better and allow faster desktop speed. Its one of the simplest and best general PC performance tips. Click here for step by step instructions

Better Performance Effect: Excellent

Remove Old Restore Points

If you are using the system restore function you will have a backup of various restore points. Clear the old ones to free up disks pace.

How to:

  • Start
  • Programs
  • Accessories
  • System Tools
  • Disk Cleanup
  • select the drive XP is installed
  • Click the More Options tab
  • Under the System Restore section, click the Clean Up

Better Performance Effect: Mild

Turn Off Remote Assistance

Windows XP/Vista/Win7 lets you share control of your computer with someone else over a network or the Internet. This feature eats up your free space and resources turn it off for better performance. Check out Manage your Startup to turn this feature off.

Better Performance Effect: Good

Turn off Windows Indexing

The Indexing service uses the Cidaemon.exe process to index files this can eat up tons of CPU resources and free space.

How to:

  • Double-click My Computer, point to Explorer Bar on the View menu, and then click Search.
  • Click Change preferences, and then click Without Indexing Service.
  • Click No, do not enable Indexing Service, and then click OK.

Better Performance Effect: Excellent

Increase Virtual Memory

By increase your virtual memory you can use more resource for your RAM to work more efficiently. Click here to learn how increase Virtual Memory

Turn Off wall paper

This will make your desktop look bland but it will free up vital resources and speed up your desktop

How to:

  • Right-click on the desktop
  • Choose Properties
  • Click on the Desktop tab
  • Under “Background” choose “None”

Better Performance Effect: Good
Click here for best general pc performance tips for computer speed

RELATED TUTORIALS:

Best Registry Cleaners
Speed Up Slow Internet Connection
Stop Buffering Problems

Get Rid of Porn

Posted by | Uncategorized | No Comments
How to Get Rid of Porn

Can you get rid of porn? Yes. However, porn is all over the internet and probably all over your computer. Some may have gotten on your computer intentionally. However, if porn is not one of your online hobbies. It may have landed on your PC via a virus or friend. Whatever the case you may want to get rid of it. There are a few ways to make sure you completely remove porn. This tutorial will help you do just that.

Get Rid of Porn your Browsers

How does porn get on your PC. The number way it gets on your computer is through your browser. You will need to clear your browser history. Here is how:

Manually Clear URL History with Internet Explorer

Deleting Internet Explorer’s entire History listHere’s how to delete Internet Explorer’s entire History list:

  • Open Internet Explorer.
  • Choose Internet Options from the Tools menu.
  • Click the “Clear History” button.

Deleting Firefox’s entire History list

  • Open Firefox.
  • Choose Internet Options from the Tools.
  • Click the Privacy button
    Clear History.

Firefox immediately “forgets” the sites and pages you’ve visited.

Removing Porn From Your Temp Folders

The second place you clear to get rid of porn is your temp folder or what is known as the web cache. This is a resource folder used to store downloads unless you have specifically change your default download location.

  • Quit Internet Explorer, Firefox, or any other web browser
  • Click Start, click “Control Panel”, and then double-click “Internet Options”.
  • On the General tab, click “Delete Files” under Temporary Internet Files.
  • In the Delete Files dialog box, click to select the “Delete all offline content” check box , and then click OK.
  • Click OK.


Get Rid of Porn using Parental Controls

Once you have gotten rid of porn on your PC. You may want to ensure that no more gets on it. You can set up Windows Parental Controls to block out certain content and sites. Here is how:

  • Click the Windows button and the click the Control Panel.
  • Under User accounts and Family Safety, click the Parental Controls.
  • Choose account you would would like to restrict.
  • Select the option labeled “On” for enforce current settings under “Parental Controls”
  • Click Windows Vista Web Filter link
  • Select the option Block some websites and content.
  • You can set up a list of allowed websites and use custom restrictions.


Popular Articles

Best Registry Cleaner
4 WAYS TO SPEED UP YOUR PC
Fix a Slow Internet Connection
Speed Up Internet Videos

Internet Connection Drops

Posted by | Uncategorized | No Comments
Internet Connection Drops Out

There are many reasons why your internet connection drops so the first step is to diagnose the problem to see what can be done to rectify the issue. The your internet connection problem can be associated with hardware or software. There is a lot involved when connecting to the internet. Modems, routers, cables and your operating system play a part in keeping you connection. In addition, your environment also affects the reliability of your connection. The first thing you should do make sure the hardware is actually plugged in and functional. Check your cables to make sure they aren’t damaged. If you are able to log on with your portable device, your know it’s your computer’s issues.

Solution 1: Turn The Hardware Off and Turn It On

Tons of people never turn off their modem or routers..EVER. Heat alone can make your internet connection drop. So you should definitely turn off your hardware periodically. Leave all devices off for 5 minutes and turn them back on.

Solution 2: Check Your Power Settings.

Windows will periodically turn off hardware in order conserve power. So if you your internet connection drops constantly when your PC seems to be inactive, this setting might be the cause. You can alter your power settings in order to allow your modem and network adapters to remain on permanently.

  • Click Start
  • Type Device Manager into your search bar and double click it.
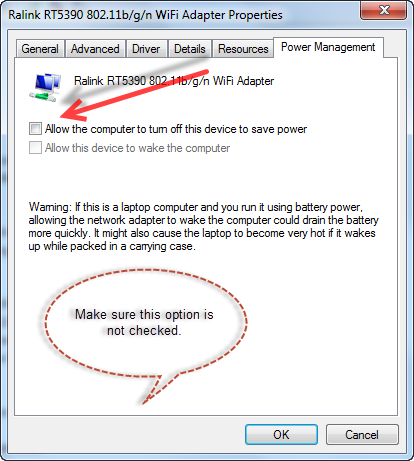
  • Scroll down to your Wifi adapter and choose Power Management.
  • Make sure that you have the box is unchecked for Allow the computer to turn off this device to save power.


Solution 3: Test Your Modem.

You can test to make sure your modem is working by making sure the modem is functional . To do this you just need to use the command prompt.

  • Type CMD into the search bar
  • Choose the command prompt
  • Type ping 192.168.1.1

You should see the results of the test that show your router’s response.

Solution 4: Change Your Location.

Wireless does not work well and will constantly drop if there is a lot of interference. Everything thing from microwaves, radio and even other wireless networks can disrupt your connection. Move you PC closer to the router. Move away from the microwave and speakers, change the channel on your wireless network.

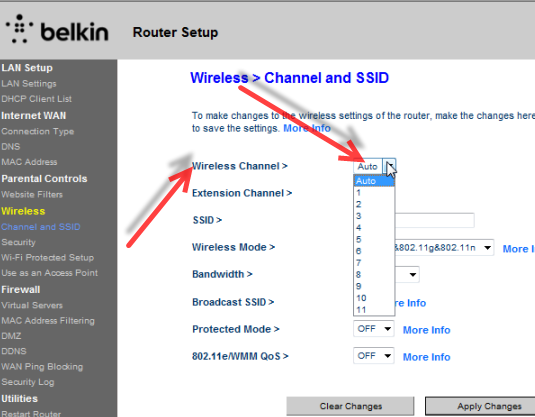
Solution 5: Change Your Wireless Channel

This is another interference related issue and prime reason why internet connection drops out. Your wireless router can be trying to connect to an extremely crowded channel. You should switch to a new channel so your router does not compete with other routers.

Solution 6: Turn Off Your Firewall

Your firewall plays a big part in your internet connectivity. You should switch of any firewalls that control inbound and outbound traffic on the internet. Remember that your internet security program may also have a firewall that prevents your browser from getting online.

Solution 7: Change Browsers

Microsoft does an excellent job of making sure it’s browser does not conflict with other software. This issue might be related to your firewall. If you can connect the internet with one particular browser, say Internet Explorer but can’;t with Firefox. That means that your security software firewall is blocking your browser from connecting. You can again turn off the firewall or try to add it to your firewall acceptance list. If you’ve attempted the above solution, you may need to alter your browser settings. Simply go into to your Chrome or Firefox

Solution 9: Change your DNS and Port Settings.

This may award you with a serious boost in internet browsing speed and connectivity. To learn more about DNS click here. You can eliminate some of the ports that your computer uses to access the internet. The connection could drop on one device due to they way your browser uses the DNS settings. To read more about setting up DNS settings

Solution 10: IP Release and Renew

If your internet connection drops constantly with allowing you anytime to actually be on the net. You should restart your network adapters configuration. You can read more about network adapters below. But this action will allow your network adapters to abort and receive an IP address.

  • Type CMD into the search bar
  • Choose the command prompt
  • Type ipconfig/release
  • At this point you need to restart the IP address. Type ipconfig/renew

Solution 11: Check/Restart Your Network Adapters.

Your network adapter is used to connect to your wireless or any internet access point. You should check the status of the device in the the device manager. For more on troubleshooting network adapters,click here. You can do this with the following instructions.

  • Click Start
  • Click Control Panel
  • Choose Hardware and Sound
  • Click the Device Manager listed under the Devices and Printers
  • Scroll down to Network Adapter and click the [+] symbol

Take a look at the adapters to make sure they are no errors listed.

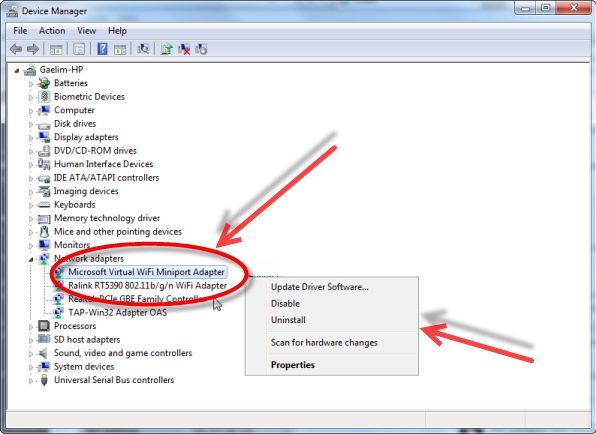
If you have tried to repair your problem with the above and your still your internet connection drops. You should consider uninstalling your network adapters and reinstalling them. This is an easy procedure in modern Windows operating system because of the Plug and Play feature which will automatically reinstall the the network adapters after you’ve uninstalled them. Here is how

  • Simply right click the network adapter and choose uninstall.
  • After you’ve done this, click the Action tab at the top of your device manager
  • Choose to Scan for hardware changes.
    The scan will detect your network adapters and reinstall them.


Hopefully you were able to find the answer to your connection problem with the above tips. If you were unable to stop your internet connection from dropping. You may need to contact your ISP.

Related Tutorial

Speed Up Your Internet Connection

slow chrome

Posted by | Uncategorized | No Comments
Stop Slow Chrome Problems How to make Chrome Faster?

Chrome is a great browser. It’s sleek and easy to use. .However, slow Chrome browsing is not uncommon. With excessive add-ons, the browser can become very resource intensive. There are often conflicts with third party applications and extensions. This will ultimately makes browsing extremely slow.
There are tons of tools in Chrome and your computer to improve browsing history. This can be down with little effort and give you a huge boost in speed when it comes to browsing the net. Loading online videos and web graphics can be can be handled clumsily in Chrome if the browser is not optimized correctly. Chrome is a complex browser that offers a lot of advanced options. These options allow you to tweak the browser for better performance and speed.
Try Speeding Up Slow Chrome Browsing by Cleaning out your Registry

Enable GPU Performance

Websites have a lot more graphical elements and video, this also requires more of your browser’s resources and operating power. Chrome allows you the ability to integrate your graphics card to help with these task. Here is how to link your computer’s GPU and Chrome for better performance which leads to faster loading and browsing speeds. You can watch the video below to perform these steps or do it yourself in with the following steps.

  • Open Chrome
  • Type Chrome://flags and press Enter.
  • In this advanced option screen, select GPU Composting of All Pages.
  • Enable this option.
  • Restart the browser.

This will speed up your browsing with Chrome by allowing videos and graphics to be loaded with the aid of your hardware such as graphics card

Watch the video:


Set High Priority of Google Chrome

You can set Windows to give a high priority status to Google Chrome processes. Usually windows delegates resources according the priorities of programs. Of course, Windows and Microsoft process take precedence over 3rd party processes. However, you can set the priority for Google Chrome.

  • PressCtrl+Shift+ESC
  • In the Task Manager, press the process tab.
  • Right click the Chrome.exe *32, Choose Set Priority
  • Choose High Priority


You can use the High Priority setting to speed up any program.

Other Useful Tips to Stop Slow Chrome Problems.

Generally, you should clear your web cache. The browser naturally slows down when you have excess information stored in the temporary cache. This happens because virtual space is limited and data has to be held in RAM. Less RAM equals slower performance. Limit the amount of add-ons that you have running on Chrome. Third party extensions can conflict with other apps and Chrome itself which leads to slow down and crashes.

Clear your Web Cache

1. Press CTRL+ SHIFT+DELETE to remove the web cache data.

Remove Extensions

Chrome will definitely slow down and even crash if it has conflicting extensions. You should limit your extension or uninstall the ones that you are not actively using.

  • Load Chrome
  • Click the “Stacks” icon in the top right of the browser.
  • Choose Settings
  • Choose Extensions
  • Disable or uninstall extensions.

For More tips to Speed Up Your Internet Connection, Click Here

Delete Junk Files

Posted by | Uncategorized | No Comments
How to Delete Junk Files

Delete junk Files to speed up your PC. Junk files accumulate anytime you download or even actively use your computer. Files upon files are collected in the form of logs and data that Windows saves in order to adequately function. Some of these unnecessary files are stored and RAM and then flushed when your computer shuts down. However, the majority of those files fill up your hard drive and other storage areas. Special Note: You can delete junk files, speed up your computer and repair errors with a registry cleaner, click here to learn more.

Where do you Find Junk Files?

There are several areas that store junk files. Here is a list of areas where these files are saved. Here are the areas that collect junk over time.

Recycle Bin:

These are all the files that you’ve used the delete key to remove they are stored in this area.

System Error Memory Dumps:

Files that have saved during errors and shutdowns

Crash Data Dumps:

Crash data files can be huge and these are similar to error reports

Error Report:

These are archived reports that have saved.

Recycle Bin:

All your deleted information.

Temp Files:

This data can anything programs choose to dump in a temporary space.

Download Program Files:

This can be anything from updates to downloads that you’ve initiated

Temporary Internet Files:

Mostly browser downloads and data from web pages.

Offline Webpage Copies:

Sometimes your browsers save webpages to make sure they load quickly.

Download Folder:

Keep this folder maintained because there can be gigs of data stored here.

How to Remove Junk Files

Disk Cleanup is a system tool that comes standard with all Windows operating systems. This should be used routinely to ensure that your have enough disk space and to keep your computer running smoothly. You can easily access your system tools by following the instructions below.

  • Click Start
  • Choose All Programs
  • Choose Accesories
  • Click the System Tools folder
  • Choose Disk Cleanup and Choose your hard drive.
  • Once the Disk Cleanup has finished calculating how much space is occupied by the files. You can check which files you want to delete. All are pretty much safe to delete.


Select the Drive that you would like to delete junk files

Disk Cleanup will take time to calculate how much space will be freed after you delete junk files.

What software is used to delete junk files.. CCleaner aka Crap Cleaner is pretty much becoming a standard tool for maintaining your computer performance. You can check the tool here.

For more ways to clean up a slow computer check out this System Maintenance Tutorial.

Read more about how to find duplicate files, click here.

Improve FPS

Posted by | Uncategorized | No Comments
Easy Ways to Improve FPS

There’s no doubt that games look awesome at high frame rates. Smooth movement gives the game a hyper realism that is awesome to watch. Unless you have an amazing perfectly tweaked gaming machine, there’s always going be a delicate balance between performance and quality. The best you can do to tweak the in game settings to give you those extra frame rates that you want. But before killing off your favorite visual effects, it might be better to try and optimize your current video card , boost hard drive performance and improve your VRam to improve FPS

Solution 1: Tweak Your Video Card Settings to Improve FPS.

To Access AMD Control Center

  • Right Click your desktop and select your AMD control center.
  • In the Control center, you will see the option for gaming.
  • Click the option for 3D Settings, Then slide the bar over to Performance.

This option will place all resources to boosting the game performance and thus smoothing out your frame rate. The downside is that less resources will be dedicated to the visual flares like blurring and shadows.

You can optimize the 3D settings on your Graphics card in order to be awarded with a better frame rate.

To Access Nvida Control Center

  • Right Click your desktop and select your Nvidia control center.
  • In the Control center, click the tab for 3D settings.
  • Click options for Adjust image settings with preview
  • Click the option for Use my preference emphasizing: and move the bar over to Performance

When you move the bar you will see the emphasis on quality decrease as you move it towards performance.

You can also use a system optimizer like to help you free up RAM and increase gaming quality Use Advance System Care Pro to improve FPS click here to learn more.

Solution 2: Tweaking your VRam to improve FPS

RAM is extremely important for gaming. The more RAM you have, the more components of the game can be loaded into your RAM instead of having to pull them off your hard drive during for constant loading. This also puts a huge strain on your CPU. Outside of adding more RAM to your system, virtual memory is your best option. Luckily Windows allows your to use virtual memory to act as virtual RAM. VRam acts the same as RAM. So the more, you have the better. I would increase the VRam to 1 gig. Remember this means that you need more than a gig of free space open just for the paging file for Vram. To read more about virtual memory click here. Here’s how to set that up.

  • Click Start
  • Click the Control Panel
  • In the control panel, choose System and Security
  • Search for the in the System heading, choose Advanced System Settings.
  • Choose the Performance heading, and select Settings.
  • Then choose Advanced, under the Virtual Memory heading, click Change
  • Set the max and minimum to 1000 megabytes for both minimum and maximum. This will stop the paging file from fluctuating and take your CPU out having to regulate your paging file

Solution 3: Improve FPS by freeing up RAM

We mentioned more RAM. There are certainly ways to free up more RAM for your computer. Windows 7 interface eats up loads and loads of RAM. You can free up RAM by configuring Windows to use an interface for best performance

Another way to free up RAM is reducing TSR programs aka background programs you can do this by instructing them not to load when your computer boots.

Disable your active settings on your antivirus especially if you are using system killers like Norton.

You Disk Cleanup to make sure no other data is loading into your Cache or RAM. You can see how to perform these tweaks, click to read more.

Special note: What should you change in In game graphics settings to get a better FPS. The first thing is resolution. The higher your resolution the more resources are used. I do like lower resolution so I try to reduce character shadows and blur effects first. This are too effects that don’t add much to some games. However, what you choose to sacrifice for higher FPS will be dependent on the game itself.

This Tutorial May Help:

Stop Startup Programs

Posted by | Uncategorized | No Comments
How to Stop Startup Programs

To Stop Startup programs from loading on your PC only takes a few steps. It’s important to remove programs from startup in order to save your vital resources. Startup programs are loaded into your RAM space when Windows is loading. Thus, using vital resources that could be used for other more important applications.
For Ways to Stop Windows Services, Click Here.

In XP, Vista and Windows 7

  • Open your Start menu.
  • Click Run
  • In the command screen type msconfig.exe
  • In the system configuration utility,click either service or startup tab.
  • Uncheck all programs that your are no longer want to run in the background.
  • Click OK


In Vista

  • Click Start button and load the Control Panel
  • Under the Control Panel menu, click Programs.
  • Under the Windows Defender heading choose View currently running programs
  • Choose Startup Programs from the Category option
  • Remove Programs that you feel unnecessary for startup

OR

In Windows 7

  • Click Start
  • Click All Programs
  • Click Startup
  • Delete the Program


Learn how to Boot Up in 30 seconds, Click Here to Learn how make your PC Start Up Fast!

REMOVE REGISTRY KEYS

The above describes the traditional method to stop startup programs. You may need to take it a few steps further to remove startup programs. Some programs burrow deeper in your setup than normally. For these you may have to edit your registry. This is a dangerous task because mistakes can sometimes yield your computer inoperable. Stop Startup Programs safely and Speed Up Your PC with a Registry Cleaner. Click Here to Learn More!

How to Remove Startup Programs from the Registry

Open the registry by simply typing “regedit” into the RUN command line. Follow the instructions below:

  • Click Start
  • Click Run
  • Type Regedit into the command line and press enter. The registry should load for your review.

HKLM\SOFTWARE\Microsoft\Shared Tools\MSConfig\startupfolder

You will find the programs location in key under this heading.

Also try this area for programs opening from the registry:

HKLM\SOFTWARE\Microsoft\Shared Tools\MSConfig\startupreg

Popular Articles