Uncategorized Archives - Page 5 of 15 - Delete Computer History

Delete Browsing History

Posted by | Uncategorized | No Comments
Delete Browsing History

Delete browsing history in your web browsers to maintain privacy and increase PC speed. One of the main steps in keep your online data safe is clearing your browser history. All the information that you type while surfing the net is collected in your browser. So, when you type in passwords or any information into your forms. This information is logged in the browser’s cache. Yes that includes passwords. Most are encrypted however a tech savvy person can easily figure out how to extract this data.

Yes, your download history is logged in your browser’s temporary folder. This data will eventually clog your browser and cause significant slowdown issues. This occurs because the browser uses its free space to load data while other data is being processed. If there is no available space on the browsers, it must process all the data that it downloads.

What type of data does your browser save?

Cookies
Download Hisotry
Form Data
Temporary Internet Files
Website History
Download History
Active X data

Each browser has a slightly different way to delete browsing history. So lets start out with the Grandaddy of all web browsers which is internet explorer.

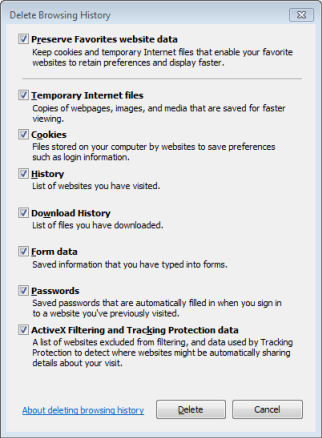
How to delete Internet Explorer Internet History?

CTRL+ SHIFT+ DELETE
You can delete the browsing history internet explorer by simply pressing Shift+Delete. This will bring up the internet history options. You will have the options of delete your history based on the particular area. You will have the option of selecting what type of data that you would like to be removed.
Delete Computer History

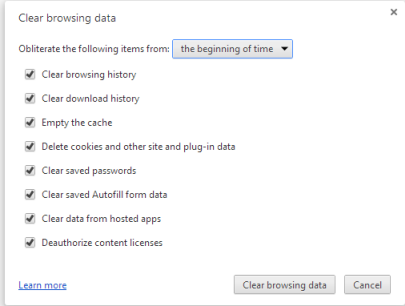
How to Delete Internet History in Google Chrome?

CTRL+H to view and delete individual items by date.

CTRL+SHIFT+DELETE to delete all internet history in the browser.

When you press this button combination the first thing will load a tab that will list your internet history by date. You can go line by line to each item or just simply clear all the history by clicking the option.
Delete Computer History

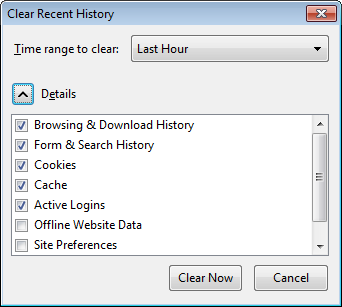
How to delete Browsing History in Firefox?

CTRL+SHIFT+DELETE

You can delete browsing history with this simple combo. It will allow you to sweep out all your internet history. You can instruct Firefox to delete your browsing info each time you shut the browser down. You can select the date range in which you would like to apply the delete function.
Delete Computer History

What programs delete browsing history?

THere are a lot of good programs that clean out your browsing history. These programs can clean out the browsing history of all browsing with a single click. Here are a few. There are also add-ons that allow you to do the same. Here are a few

1. CCleaner- comes with a windows cleaning sofware and few other optimization tools
2. Click and Clean- You can download this add-on that does a great job
3. Decrapifier- Also an all-in -one windows cleaner that will help you to delete your internet history with ease.

For more tips on how to clean up a slow computer, Click Here.

Clear Chrome Cookies

Posted by | Uncategorized | No Comments
How to Clear Chrome Cookies

You can easily delete Chrome cookies with just a few steps. Chrome hold its cookies in the browser. Chrome gives you the ability to manage or delete cookies with ease. Before you delete your cookie history. Realize that these are not necessarily bad files.

Cookies are stored in order to track your browsing history or to remember where you’ve been on the net. Cookies could be simply remembering your preferences for to be easily loaded into when you revisit the website.

Other cookies maybe used to track you browsing habits in order to target advertisement. Yes, some hackers, spammers and spyware also use cookies. So, it may be safer to just simply delete your cookies.

To delete your cookies you will have to go into your Chrome history set up. To do this you can follow the instructions below.

  • Click the “Stacks” Icon.
  • Choose Settings
  • Go down to the Advanced Settings option at the bottom.
  • Click Content Settings, located under the Privacy heading.
  • Under the Content heading, choose all Cookies and Site Data
  • At this point you can easily delete all the cookies that have been installed in the browser.

Delete Computer History

The Content Settings will hold all the cookie from the websites that visited. You can delete all of them or select the one’s that you want erase. Remember erasing some cookies may.

Delete Computer History

You may also chose to make exception for certain websites. This will allow you to log-in easier and the system will remember who you are. People you play games in the browser or use an application that requires previous data should be careful. Clear Chrome cookies only if you want all the data flushed. To manage your cookie exceptions. Simply go back to the Content settings and Choose Manage Exceptions. At this point you will be able to make exceptions based on a particular website. After you clear Chrome cookies, you may want delete other internet history. Click here to learn more.

Msconfig Startup

Posted by | Uncategorized | No Comments
How To Use Msconfig Startup Utility

What is the Msconfig Startup Utilty? Its an application that allow for control over the way Windows loads. Removing application and installing them can cause your computer to become sluggish. Mscofig can be used to help you cleanup your startup configuration. One of the main cause of computer slowdown is having too many application loading at startup.

Fortunately, using the Msconfig Utility is a breeze and can lead you to a leaner and more efficient startup procedure. This configuration lets you control exactly what will load on your computer once Windows loads.

How to Run the Msconfig Startup Utility

  • Open your Start menu.
  • Click Run
  • In the command screen type mscofig
  • Hit Enter

Delete Computer History

OR

  • Click the Start Button/Image
  • Write msconfig in the search bar
  • Choose the Msconfig Program from the list

Delete Computer History

Choose a Startup Selection

There are three options available to you. Standard Starup Diagnostic Startup and Selective Startup

Standard Startup – Loads all the defualt device drivers, services and programs without any discrimination.

Diagnostic Startup – Loads only the most basic services and drivers. This is usually used when you are having startup problems or trouble with Windows.

Selective Startup – Loads as a result of you changing the device drivers, services and programs startup configuration.
Delete Computer History

To Speed UP Your PC with Altering your Startup, Try a Registry Cleaner. Click Here to Learn More

How to Disable Services and Programs

  • In the System Configuration Utility Window,click Services/Startup tab.
  • Uncheck all programs/services that your are no longer using.
  • Click “OK”

If you are having difficulty stopping the service, check out this page: Stopping Windows Services
Delete Computer History

Delete Computer History

In Vista, Windows Defender options allow you to easily cut down on unnecessary programs that are loading on your PC. You can also use the Disk Cleanup options to before this task.

Using the Tools

The tools option allows you to easily access commonly used tools such as the Event Viewer and System Restore. There is also acess to your Registry Editor

  • Click the Tools tab.
  • Choose the utility that you wish to launch.
  • Click Launch

Delete Computer History

If you are still experiencing a slow startup check out
Speed A Slow Boot

Popular Articles

Best Registry Cleaner
Fix a Slow Internet Connection
Speed Up Internet Videos

In addition to using msconfig startup utility, try using a registry cleaner to speed overall PC performance

Remove Startup Programs

Posted by | Uncategorized | No Comments
How to Remove Startup Programs

Windows loads tons of programs when your computer startups. Remove startup programs in in Vista, Windows XP and Windows 7 with ease. You will instantly rewarded with a smoother and faster startup. In addition, You computer will benefit from a lighter resource load thus getting a boost in overall performance.

How to Remove Startup Programs in Windows XP

Method 1: System Configuration Utility (MSCONFIG)

  • Click Start and then click Run.
    Delete Computer History
  • Type msconfig in the text box and click OK.
  • Delete Computer History

  • Under the Startup tab, deselect the programs that you like to remove from startup, and click OK.
    Delete Computer History
  • Click Restart to reboot your computer, and the changes will take effect.
    Delete Computer History

Method 2: Registry

  • Click Start and then click Run.
    Delete Computer History
  • Type regedit in the text box and click OK.
    Delete Computer History
  • In the left pane of the Registry Editor, browse to the following location: HKEY_LOCAL_MACHINE>SOFTWARE>Microsoft>Windows>CurrentVersion>Run. In the right pane, right click on any startup programs that you would like to remove, and click Delete.
    Delete Computer History
  • Click Yes in the confirmation box.
    Delete Computer History

Method 3: Startup folder

  • Click Start and then click My Computer.
    Delete Computer History
  • Browse to the following location: C:\Documents and Settings\All Users\Start Menu\Programs\Startup.
    Delete Computer History
  • Delete the shortcuts of the startup programs that you would like to remove.

Method 4: From within the program

1. Check if the program in question gives you the option of disabling the autostart feature – via a right-click on the System Tray icon or maybe an “options” menu from within the program.

How to Remove Startup Programs in Windows Vista / Windows 7

Method 1: System Configuration Utility (MSCONFIG)

  • Click Start, type msconfig in the Search box, and then press Enter.
    Delete Computer History
  • Under the Startup tab, deselect the programs that you like to remove from startup, and click OK.
    Delete Computer History
  • Click Restart to reboot your computer, and the changes will take effect.
    Delete Computer History

Method 2: Registry

You can also use a registry cleaner to easily and quickly programs from your startup, Click here to learn more.

  • Click Start, type regedit in the Search box, and then press Enter.
    Delete Computer History
  • In the left pane of the Registry Editor, browse to the following location: HKEY_LOCAL_MACHINE>SOFTWARE>Microsoft>Windows>CurrentVersion>Run. In the right pane, right click on any startup programs that you would like to remove, and click Delete.
    Delete Computer History
  • Click Yes in the confirmation box.
    Delete Computer History

Method 3: From within the program

1. Check if the program in question gives you the option of disabling the autostart feature – via a right-click on the System Tray icon or maybe an “options” menu from within the program.

Popular Articles

Best Registry Cleaner
4 WAYS TO SPEED UP YOUR PC
Fix a Slow Internet Connection
Speed Up Internet Videos

Remove Programs from Start Up

Posted by | Uncategorized | No Comments
Remove Programs from Start Up

Wondering how to remove programs from start up? Don’t worry it’s not difficult process. When your computer’s operating system loads, it loads a whole host of other programs that you designed or have been automatically configured to load when Windows starts. Eventually, this list will grows to a massive size and kills your computer’s speed and lengthens your startup time considerably. So, if you don’t remove programs from start up, you will kill your PC speed.

How do programs get added to the start up configuration?

Any program that is installed usually wants to start when your operating system. Programmers design them this way so that you will have them ready-to-use at anytime. They believe if the program is loaded quickly, you will use it more often. This is why you see the program sitting in your startup menu or taskbar.

How do you remove programs from the start up menu?

This is not a hard process. It can be done in multiple ways. If you are done with the program you can simply remove it completely using add and remove function. However if you want to remove it from the start up menu only, simply right click and choose remove from the list.

Delete Computer History

How to remove programs from starting when your computer loads?

You might want to do this if the program is starting up when the computer starts. you can do this by altering your start-up configuration. Simply type msconfig into the start menu search bar. This will bring up your start up configuration. Click the Startup tab. At this point , you can simply remove the program from the star up list.
Delete Computer History

Use the Application Settings to Remove a Program From Startup

You can also when you install a program, it will prompt you to ask whether you want the program to be loaded when Windows starts. Make sure if you don’t want it added to the start up configuration that you choose no.

Also you can go into the program’s settings menu and instruct it not to load during start up. Most programs have this option.
Delete Computer History

You can remove start up programs by using programs like CCleaner to conrol the start up configuration. Click here to learn more

For more help on this subject. Check out:

Speed Up Your Booting Time.

Internet Filter For Home

Posted by | Uncategorized | No Comments
An internet filter for home PC can keep your children safe online

Why you need an Internet Filter for Home PCs?

The internet is becoming more integrated into our lives and the lives of our children. It now serves as the number one research tools used by children today. There is a wealth of information that can expand the minds. However, the internet is also the home to countless pornographic and violent images.

We shouldn’t ban the internet from our children lives. However we must monitor and restrict the online active to protect them from adult content. Without an internet filter for home PCs children are at risk. 76% of online victims sexual exploitation were contacted in chat rooms and other internet social networks

How does a internet filter work?

The software works by prohibiting access to sites with adult content such as specific keywords, images, files and IP addresses. Recently features have increased give more control of there children online content. Features such as:

  • Filter objectionable web content and record all websites that each child visits
  • Manage your child’s computer and Internet time
  • Schedule and limit chat, game playing or other programs
  • Receive email reports for all monitored activities
  • Lockdown access to Windows settings
  • Automatically log your child off at bedtime
  • Compatible with Windows Vista™

What is the best internet filter for Home PCs

Internet search filters have had a rocky start and have even been controversial. However improved software development and technology has improved these products greatly. Most improvement has come from the international community.

Windows Parental Controls — This filtering software has been the leader and on top of many PC Magazines Best List.Free application offers more control and features than it’s predecessors. This is partly due their proprietary technology.

System Surveillance Pro — This internet filter that is a popular industry tool. It has a lot features that are a indication to its endurance in the market place. However, You should be able to get a trial copy and test it out if fits your requirements. Check out the link above to get more details about this product on Cnet.

These products are not perfect, you must keep them updated to get the full protection and services. Also you may have to spend a few minutes customize the product to protect your children and still give you access to the net. However, an internet filter for home is a investment in your child safety.

Visit How to Setup Parental Controls to Read more about internet filter for home.

Parental Controls

Posted by | Uncategorized | No Comments
Windows Parental Controls will keep your children safe online.

Parental Controls have become a necessity for parents who don’t want to expose their children to the wealth of adult content on the internet. Without the use of parental controls features, your child has a key to unlock every door on the net. However, some of those door lead to pornography and extreme violence. These are obviously areas we would like to limit access to. So, by using the these features found in Vista, you can create a filter that will block porn, adult content, and other harmful material on the net. However, these restrictions can be beaten by a tech savvy child. monitoring software. Another great option is to use advanced controls in such as video playback and remote viewing found in advanced and comprehensive Web filters.

How to Get Started

The first step in setting up parental controls is to create individual account for each person that uses the computer. This give the administrator the ability to set separate restrictions for each user. Follow the instruction below to create a new user account.

  • Click the Windows button and the click the Control Panel
  • Under “User accounts and Family Safety”, click the “Add or remove user accounts”.
  • Click Create a new user account and name the user account.
  • Choose the “standard user” option and click Create Account

Delete Computer History

Once you have create the account, you will have to make some decision on the type of controls you would like for the newly created account. You can set up the parental controls a number of ways. If you have already exited the your new user account, follow the directions below to open up the parental controls menu. Or simply click parental controls from your new user window.

  • Click the Windows button and the click the Control Panel.
  • Under User accounts and Family Safety, click the Parental Controls

Delete Computer History

Now, from the this window you will able to set a host of restriction on each account. Features such as website restriction, time restriction, game play limitations, program blocking and monitoring usage. Lets get started with website restriction

How to Block Websites

  • Click the Windows button and the click the Control Panel.
  • Under User accounts and Family Safety, click the Parental Controls.
  • Choose account you would would like to restrict.
  • Select the option labeled “On” for enforce current settings under “Parental Controls”
  • Click Windows Vista Web Filter link
  • Select the option Block some websites and content.
  • You can set up a list of allowed websites and use custom restrictions.

Delete Computer History

This options allows you to specifically choose which sites are accessed. You can also increase the global settings by blocking content categorically. You can do so by raising the web restrictions.

  • Load the User controls window by following step 1-3 above.
  • On the left hand side under the user account name, click the options next to Web Restrictions.
  • You can raise or lower the restriction settings.
  • Choose Custom to select which categories you would like to block automatically.

Set Internet Usage Time Limits

Its often terribly difficult to get your kids off the computer. But, Vista makes this job a bit easier by offering the administrator the ability to set net time limits. After the set time period is up, the user will no longer be able to access the net.

  • After loading the User Control window, click Time Limits.
  • In the grid, click on any of the white “time squares you wish to restrict.
  • Turn all the white “time squares” to blue in order to deactivate the Internet for those times.

Delete Computer History

Limit Gameplay

Vista’s also comes equipped with the to limit gameplay. So if your child is spend countless hours playing online games instead of doing his homework. This may be the fix you have been looking for.

  • At the user control window, click Games
  • This will bring to the Game Control window.
  • At this window you may choose to set the game ratings restriction or block specific game.
  • Click the set game rating and choose the restriction level.
  • Scroll down to restrict the in game content

To block a specific game by name.

  • Return to the Game Control window.
  • Select Block and Allow specific games.
  • At the Games Override window, Choose from the list of all games that are on your hard drive.
  • Click Always Block for the desired game.

Delete Computer History

Blocking Programs

  • To block specific programs you can select the Block and Allow specific programs from user controls window.
  • Select user can only use programs I allow
  • Simply tick the box next to any of the listed application that your children may use.

Delete Computer History

Activity Reporting

In addition to all the restriction available, activity reports are automatically generated. You can easily analyze these reports which further enables you to keep tabs on your children. These reports will detail attempts made by the user to get around your restrictions. However, these reports don’t have some of the advanced features such as video playback of internet usage.

To generate reports with Parental controls:

  • At the User Control Window, Click View Activity Reports
  • Click each cascade to show to reveal a detailed log of usage.

Delete Computer History

Whats Missing?

As mentioned previously, Vista Parental Controls lack a lot of advanced features that can be found in the third party monitoring software programs. One of the most popular new tools is a keylogger. These tools record all keystrokes typed on the computer specific user thus revealing all the contents of each message, email and chat. Also, the using video playback of the time someone uses the computer is a net feature. Its similar to watching a surveillance video of a given period of time. This video logs can also be saved. If you are interested in Advanced Parental Controls found in Windows 7, Click Here.

Internet Explorer Keyboard Shortcuts

Posted by | Uncategorized | No Comments
Ten Most Useful Internet Explorer Keyboard Shortcuts

One of the easiest ways to save time is to use Internet Explorer keyboard shortcuts. Also knowing these shortcuts can make you more efficient and tech savvy. Being able to quickly switch tabs and delete your history can save you loads of time. Also if you are working or giving a presentation is seems a lot cooler to quickly perform a task instead having to manually move the mouse around. Here are ten Internet Explorer keyboard shortcuts.

KEYS

ACTION

DESCRIPTION

  • Ctrl+Shift+Delete
  • Deletes History
  • This allows you to delete your internet history. The shortcut will bring you to your your browsing history window. You will have the option to delete all your temporary history, download history and all the history you’ve accumulated from browsing
  • CTRL+ENTER
  • www. and .com
  • This adds “www” to the front and “.com” to the end of any words that you type into the taskbar. This is a great internet explorer shortcut that saves you loads of time. You can escape the need to write these protocols next to the the word. For example if you type “money” into the taskbar and press CTRL+ ENTER. It will become “www.money.com”. Awesome.
  • Alt + D
  • Address bar text
  • You are able to select the text that is in the current address bar. This is one of the better internet explorer shortcuts because it allows you quickly select this text instead of taking the time to highlight it.
  • Ctrl+Shift+P
  • Private Browsing
  • This pulls up your InPrivate browsing option. This is a great feature that allows you to avoid leaving web tracks. All data collected is temporarily stored in memory and erased once your browser is closed.
  • Ctrl+ T
  • New Tab
  • This open a new tab in your browser. This is an easy to open a new tab in the browser.
  • Backspace
  • Go Back
  • This is a quick way to go back to the previous page in your browser. This slightly quicker than the move the mouse icon and clicking the back arrow.
  • ALT+H
  • Homepage
  • This option will return you the the homepage of the current website that you are on. This internet explorer keyboard shortcut may be obsolete in new computer because their is a HOME key.
  • Ctrl + [+ or -]
  • Font Size
  • This will allow you to increase and decrease the size of your font. This is an excellent tip to teach those you have trouble seeing the tiny font on the some pages.
  • F4
  • Displays previous addresses
  • This will display all the address that you’ve type into the search bar
  • Ctrl + 1-9
  • Cycles tabs
  • This can be a time saving for anyone. It allows you to quickly look at different tabs without having to move the mouse to select individual tabs.

Remove TrojanBrisvA

Posted by | Uncategorized | No Comments
How to Remove TrojanBrisvA (Trojan.Brisv.A)?

What is TrojanBrisvA?

Before you remove TrojanBrisvA, lets find out what it is. It’s a trojan that has been very aggressive in infecting PC this is due to it’s use of popular file formats. This trojan mask itself as a media file. The file formats that it is commonly associated with are .mp3, wma, .wmv, .mp4 and other popular media formats.

How does it infect your PC?

This trojan infects your PC when the infected media file is played. At this point, the file will cause your media player to send out a internet request to download malware associated with the trojan. The trojan makes changes to your registry and infects your PC. To Remove it, you need to edit the registry

Remove TrojanBrisvA Steps

Before we begin with the registry tweaks, you may want to use a Strong Antivirus Program to try and remove the trojan.

Step 1: Edit your Registry

  • Click Start
  • Click Run
  • Type regedit
  • Find this registry key:

    HKEY_CURRENT_USER\Software\Microsoft\PIMSRV

  • Delete this key

Delete Computer History

Step 2: Restore Registry Settings

This trojan makes changes to your registry settings. You need to restore these two keys to their original format. Use the same steps(1-4) from above then edit the keys by right clicking the values

HKEY_CURRENT_USER\
Software\
Microsoft\
MediaPlayer\
Preferences\
“URLAndExitCommandsEnabled” = “0”

and

HKEY_CURRENT_USER\
Software\
Microsoft\
MediaPlayer\
Player\
Extensions\
.mp3\
“Permissions” = “21”

Try using a Anti-Spyware programs to remove TrojanBrisvA

Remove Virtumonde

Posted by | Uncategorized | No Comments
How to Remove Virtumonde Trojan

This VirtuMonde trojan uses java software to load install itself in your computer. Three exe files are installed into your computer. You may see WindowsUpd1.exe, WindowsUpd2.exe, or WindowsUpd4.exe in your task manager. Follow the instructions below to remove VirtuMonde trojan or use a strong anti-spyware program

Mode of Infection

The trojan has become commonplace due to its infection through fake antispyware and antivirus programs. The is usually a warning message pop-up window with a message indicating a black worm virus or other virus attack. Click the link leads to an installation of the trojan.

Step 1: Edit the Registry

  • Click Start
  • Click Run
  • Type regedit
  • Find this registry key:

    HKEY_LOCAL_MACHINE\\
    SOFTWARE\\
    Microsoft\\
    Windows\\
    CurrentVersion\\
    Run\\

  • Locate the value: “WindowsUpd1, WindowsUpd2 and WindowsUpd4”
  • DELETE them.

Delete Computer History

Step 2: Stop Automatic Restarts

In order to not have to remove the trojan again, you need to make sure it is not automatically loading up again in your startup. Check your startup configuration to ensure that the trojan exe files are not running

  • Open your Start menu.
  • Click Run
  • In the command screen type msconfig.exe
  • In the system configuration utility,click startup tab
  • Uncheck the process
    WindowsUpd1.exe
    WindowsUpd2.exe
    WindowsUpd4.exe
  • Click OK

Delete Computer History

Step 3: Delete VirtuMonde EXE files.

You may need to delete the exe files. The best way to do this is from the DOS directory and or Windows explorer.

  • Open Windows Explorer
  • Search for VirtuMonde processes
  • Delete the processes.

You may want to remove Virtumonde trojan files with a good anti-spyware programs.