admin, Author at Delete Computer History - Page 3 of 15

How to Speed Up a Slow Mac Computer

Posted by | Uncategorized | No Comments
How to Speed Up a Slow Mac Computer

Wondering why you have slow Mac performance? Use this extensive tutorial to speed up your slow Mac. There are a lot of reasons that Mac users are so committed to Apple products, some purely emotional and subjective, other reasons are more logical. One of the biggest and most sensible reasons is that they do “just work”. Except when they don’t. Sometimes they slow down or get hung up, with that spinning beach ball, when you need them most.

Fortunately, there are a few simple tricks and basic maintenance activities that you can use to speed up your Mac. In any case, if your machine is running slowly there is most likely something that you can do about it.

You can Speed Up your Slow MAC computer with a few clicks. Click here to learn more.

7 Ways to Speed Up Your Slow Mac

Step 1: Do Some House Cleaning

Before you get into the nitty-gritty of changing settings and moving files around you really should take the time to backup your system now.

  • Use Time Machine to backup your files to an external hard disk.
  • Sign up to a service in the cloud such as Carbonite or Mozy that will backup your files to the cloud. You have to pay a fee for such services but consider that it’s insurance.
  • Apple’s iCloud service does backup some files but it’s limited and not there specifically to recover documents. So, it’s wise to invest either in an external drive or a backup service.

Get the latest updates for your operating system. this may be a little time consuming depending on what Apple happens to be releasing at the moment. It is always best to have the latest versions and patches for your system. Lack of updates will give you slow MAC performance
Delete Computer History

How often do you normally reboot your Mac? If you’re like me, you may not actually restart it too often and just rely on putting it to sleep when you’re not using it. Get into the habit of rebooting your Mac every couple of weeks because it will help keep things running a little faster by cleaning up and organizing your files.

+ Simplify Your Desktop Dock & Widgets

  • Remove all files from your desktop, leave them in a folder on the desktop if you really need to have them close.
  • Only have icons for applications that you use every day in the dock. Use Launchpad to get to everything else almost as quickly.
  • Delete all of the widgets from Dashboard. How often does anyone actually use the Apple Widgets anyway?

Delete Computer History

Step 2: Check Your System Preferences

You can open up the System Preference pane from the Apple Menu and make sure that there’s nothing running that you don’t need.

On the Personal Settings List go into Universal Access and make sure all special features that you don’t actually need are turned off.

  • Likewise, go into Bluetooth, Speech and Sharing to switch off the parts of those functions that you don’t use.
  • Remove unnecessary Login Items from the Users & Groups list. A word of warning here! Do not remove anything that you do not know for certain isn’t vital to the normal operation of your computer.
  • Minimizing the active items in System Preference will save some space in your RAM if they were previously active.

Delete Computer History

Step 3: Be More Mindful With Activity Monitor

This tip will not directly speed up your slow MaC but it will give you some insight into what’s going on inside it. Activity Monitor can be found by going to Application Folder or on Launchpad, then click on the Utilities Folder. The pane for this app has a list of running applications and information about how your system’s resources are being used below that.

Delete Computer History

Step 4: Clear Your Web Browser Cache

The amount of memory that a browser uses depends on a few things such as how many tabs you have open and If your browser cache is nearly full you’ll start to see a deterioration of performance. Clear the cache and restart the browser.

Delete Computer History

Step 5: Consider Changing Browsers

If you use Firefox you’ll be able to see in the Activity Monitor that it uses more memory than either Chrome or Safari. If your system is slow when you are using the World Wide Web it may be time to consider switching to Chrome or Safari. There are other considerations, such as plugins and other add-ons but if it’s a critical situation, such the middle of a Skype session with a client, the last thing you want to see is that spinning beach ball.
Delete Computer History

Step 6: Clean Out Your Hard Disk

OS X needs about 20-30% of the hard disk space as virtual memory. This enables apps that are open to have files on standby but not taking up actual RAM. Less free HD space will make your system work harder to find places to store this virtual memory and that will slow MAC performance down.

  • Have a careful look through your files in Finder. Review each folder looking for large files which you don’t need or that are duplicated elsewhere. Video files are one type that takes up huge amounts of space. If you have been using your computer for any significant length of time there are going to be files that you don’t need. Send them to the Trash.
  • Empty the Trash once you’ve dumped all the files you’ve decided to get rid of. This is another of those things that you may not have thought to do too often, so the act of just flushing out your trash folder may free up gigabytes of space.

Some Free Apps That Will Help

No Mac tutorial would be complete without talking about some free software. Better yet, free software that’s actually useful! Some of the free apps that will help you speed up your slow Mac really do the same things that have already been discussed here. What makes them worth looking at is when they help you do it better.

  • You can use Disk Inventory X to get a clearer picture of what is taking up the space on your hard disk Delete Computer History
  • Use Monolingual to clear out all of the language files that you never use. This could free up as much as 2Gb of additional hard disk space
  • Finally, Appzapper will let you uninstall up to five applications before you have to buy it. This will help you make space because just deleting the app from the Applications Folder won’t completely remove it and, unlike Windows, there’s uninstall function built into OS X. Use this wisely and get rid of the five largest applications you never use.

Step 7: More Memory Is Better Memory

You can never have too much memory, unless you try to buy it from Apple. Memory has become something of a commodity, so shop around. You can get all of your memory slots filled for less than the price of the minimum amount you can buy from Apple directly.

Speed Up Your PC

Posted by | Uncategorized | No Comments
“Want to Speed-Up Your PC?”

Manage our Startup Programs. Read on to find out how…

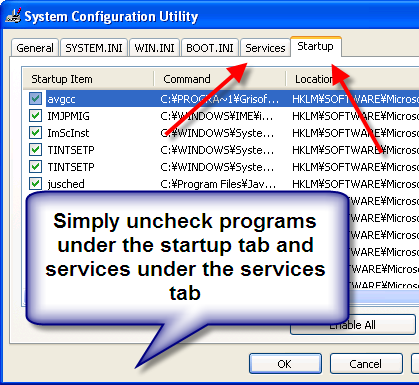
By simply managing your start up programs and services, you can speed up your PC performance considerably. This adjustment should affect boot your CPU access time and your internet speed. Following the steps below to speed up computer access time by micromanaging your start up programs and services.

If you want a hard drive defragment software tool. A registry cleaner is a great piece of software that will perform a defrag regularly and optimize your PC for performance and speed. Click here for a free scan.

However be careful to not uncheck any vital programs that could halt your PC startup. If this happens just simply restart your computer in “Safe Mode” and re-enable the program and services. Also remember to close all applications. Open applications are will not get defragmented.

  • Open your Start menu.
  • Click Run
  • In the command screen type “msconfig.exe”
  • In the “system configuration utility”,
    click either “service” or “startup” tab
  • Uncheck all programs that your are no longer using.
  • Click “OK”

Delete Computer History

Confused??

Dont know which process or program do what? To find out more about the what each process and program does on your PC. Visit the Processlibrary.com

Here is a list of programs and services you dont need unless your are running a network. They are safe to remove from your startup configuration. The removal of these features will speed up your PC during the startup

Unnecessary for Startup

Alerter
Clipbook
Computer Browser
Fast User Switching
Human Interface Access Devices
Indexing Service (Slows the hard drive down)
Messenger
Net Logon (unnecessary unless networked on a Domain)
Netmeeting Remote Desktop Sharing (disabled for extra security)
Remote Desktop Help Session Manager (disabled for extra security)
Remote Procedure Call Locater
Remote Registry (disabled for extra security)
Routing & Remote Access (disabled for extra security)
Server
SSDP Discovery Service (this is for the utterly pointless
“Universal P’n’P”, & leaves TCP Port 5000 wide open)
TCP/IP NetBIOS Helper
Telnet (disabled for extra security)
Universal Plug and Play Device Host
Upload Manager
Windows Time
Wireless Zero Configuration (for wireless networks)
Workstation

Click here to return to the Top 4 ways to speed up your PC article

Popular Articles

Best Registry Cleaner
Fix a Slow Internet Connection
Speed Up Internet Videos

Stealing WiFi

Posted by | Uncategorized | No Comments
Who is Stealing WiFi from You?

How to see if someone is stealing WiFi from you. This is a real annoyance. You pay for an awesome connection only to have someone poach your signal. Don’t worry there are ways to determine who is stealing WiFi from you. The reason you are able to do this is because all devices leave a calling card in the form of a IP address or a MAC address. An IP address in a nutshell is address of a computer while the MAC address represents the Network Card address.

Think about why someone is able to log on on to your connection in the first place. The main reason is your security. Your security settings are not properly configured to prevent this. This problem can easily be rectified but before that let’s stick to the issue at hand. This might require some guess work but the procedure is rather straightforward. We are going to see what devices and MACs, and IPs have logged on to your signal. Here is how.

View your Router Logs.

Yes, your router keeps a history of everyone who has gained access to your computer. This includes all the devices that have been logged onto it. Depending on the specific router, the directions may vary. However, generally you can view the log in the security section of the router. First you need to access your router’s settings. Here are the general instruction on how to get to his point.

You can access your router log by typing in your IP address. It is different for each router. You might need to check out to find your router’s address.

  • Load your browser and type 192.168.2.1 (your router’s specific IP). This is the router addresss for Belkin. Also, you can click the router icon in your system tray and choose router settings
  • In your router, choose Security Log, view the list of IPs and MAC addresses

Delete Computer History

How to Stop People from Stealing WiFi.

This is an easy measure that will require you to lock down your connection using the proper protocol. It’s not a mystery why people are able to leach your connection. You have improper security. If you are using the WEP, protocol, tech savvy people may be able to guess your WEP password because its a simple string of number. Hackers can use a program that simply guesses the number combination.

The best thing to do is switch your router’s protocol to WAP which is a stronger protocol. In addition, the password is made up of both letters and numbers.

To Switch the Router Security Protocol.

  • Open the Router Settings Center.
  • Click Security from the options.
  • Change the Security Mode to WPA/WPA2
  • Also make sure you specify that WPA is also your Authentication.
  • Finally, create a password that a collection of letters and numbers for your pre-shared key.

Delete Computer History

Go one step further and disable the option that allows your to broadcast your signal. This advertises that you have a WiFi signal. This makes you an easier target for thieves. It’s like walking around a nasty neighborhood with a platinum gold Rolex. You’re asking to be robbed.

This tutorial may help:

To read about ways to speed up your internet connection, click here!

Registry Easy Review

Posted by | Uncategorized | No Comments
Registry Easy Review

This is a no-nonsense Registry Easy review. There are literally hundreds if not thousands of registry cleaners on the market. Some suck and some are awesome. So where does Registry Easy fall in this scale of extremes. Well, Registry happens to be one of the best registry cleaners on the market. To see how Registry Easy compares to other Registry Cleaners, Click Here

Why is Registry Easy so Popular?

The simple answer is because it works well. Unlike most registry cleaners, this one does what it advertises. It’s easy to use, light, effective and fast.

The reason why this product excels in popularity and performance is because it’s a full service application that cleans up DLL files, registry keys and uninstall pesky products. It also have a pretty good internet evidence cleaner also. We assume the makers of this product heard the rumblings from users about shelling out 50 dollars in a recession is not easy task. So, they decided to give ups a bang for our buck.

Does Registry Easy Speed Up PC Performance?

The most common reason for buying a registry cleaner is to speed up your PC performance. We perform test on Windows Vista, Windows XP and a Windows 7 machine. All PCs showed shorter load times, less hard drive access and a lot less registry clutter. According to most Registry Easy Reviews, it seems the product excels in speeding up PCs. There reports of up to 65% better performance after using this product.

Fixes Error Checking and Other PC Problems?

Unless your are hacker or advance programmer, Registry Easy can usually locate, identify and offer a recommended repair to most PC errors. Dlls and damage done by malware can be eliminated with the software’s one click maintenance system.Here is a list of problems that software has proven to solve. Most Registry Easy review site confirm this.

ActiveX Errors
ActiveX Control problems
Windows Startup Errors
Windows Explorer Errors
Windows Media player Errors
l sass.exe , svchost.exe &other exe Errors
Windows Operating System Problems
Registry Errors
DLL Errors
Runtime Errors
IExplore and System32 Errors
System Crashes
Slow PC Performance
Chkdsk Issues
Computer Freezing
Internet Explorer Errors
Javascript Errors

Is it Worth Your Money?

Yes, if you going to buy a registry cleanes, this is the one to get.

  • Performance 96%
  • Ease of Use 97.3%
  • Features 98%
  • Magazine Average 96.5%

Final Score……..97%

Finished with this Registry Easy Review, Visit the Website to see more, Click Here!

Msimg32 dll

Posted by | Uncategorized | No Comments
Msimg32.dll not found: How to Repair

Delete Computer History

To Use a Registry Cleaner to Scan and Fix a Msimg32.dll error, Click Here

If you are missing the Msimg32.dll file or if it is corrupted, you will see error messages like the one given above. The error text might be different depending upon the application that is looking for the DLL.

What is this process? It’s an CPU intensive process that is absolutely essential fro Windows to operate function. It essentially improves the performance of Windows GDI programs which are used to by graphic related programs and to produce formatted text. So, anything from video games to word my require this dll. A host of programs are dependent on this process.

Here is how to fix the error:

  • Restore msimg32.dll. In case you accidently deleted it, it would be in the recycle bin. Or you can download it from the internet. But make sure you get a trusted website for it. Or Try restoring the Missing Dll with these instructions. Fix a Missing Dll
  • Run a virus scan. There are chances that the the file is actually present in the system, but a virus is causing the error message to appear.
  • Do System Restore. If you think that the DLL file has gone missing because of some changes that you made, then you can do a System Restore to solve the problem.
  • Reinstall the program. If a particular program is showing the error of a this missing dll file, then you can try installing that program again.
  • Update your drivers. For example, if you are getting the this error when you play a video game, you should update your video card drivers.
  • Use a registry cleaner. If the error is coming due to registry problems, then using a registry cleaner will solve it. Registry cleaners are easily available on the internet.

If your are using Windows XP, Vista, or Win7, try award Winning Registry Cleaner and Optimizer that will allow you to automatically fix pc registry problems, Click Here to learn more!

Popular Articles

Best Registry Cleaner
Fix a Registry Errors
How to do System Restore

Dll File Missing

Posted by | Uncategorized | No Comments
Repair Dll File Missing Messages

How to fix dll file missing error. The dll files can easily be corrupted or deleted for a number of reasons. However fixing this problem is fairly easy. You will need to find the file from a website that allows you to download the dll file. Discovering which dll file is missing is also just as easy. If you have a Windows Service or Windows System Error, your missing dll will part of the System32 directory on your PC. If you have an error when trying to launch a software application,you will have to search for that specific folder.
Delete Computer History
Before we begin. Simply use Google or a popular dll database to find the missing dll. You can also use a missing dll finder software. There are many available. Repair files and errow with a Registry Cleaner, click here to learn more.

Dll file missing in a specific program ie. Yahoo messenger

  • Click the Windows Start Button
  • Choose Computer
  • Select the Drive which your Windows is installed.
  • Choose Program Files, Select the program folder with the missing dll in this Case Yahoo Messenger Folder
  • Simply paste the downloaded dll such as nspr4.dll into the directoy or replace it
  • Relaunch the program

Missing Dll in Windows ServicesYou will need to search for this file in your system32 directory. You can open the directory by doing the following.

How to find a missing System32dll:

  • Click Windows Start button
  • Choose Computers
  • Select Windows folder and double click System32
  • Within the System32 directly, you can find the dll and replace it.
  • If the missing dll, is not listed, you can simply paste the the downloaded dll.
  • Restart your Computer or Relaunch the Windows program

RELATED TUTORIALS:

Best Registry Cleaners
Fix Rundll Error
Msimg32.dll is missing

Rundll Error

Posted by | Uncategorized | No Comments
Stop a Rundll Error From Wreaking Havoc on Your PC.

What is a rundll error?

Rundll.exe files are systems process directly related to your computer’s Windows Registry. All Dll files are a part of vast library that contains code and data that is shared by many programs. This helps to produce speed and memory efficiency in your operating system by reusing the same code or file to run many functions by various programs. An error occurs when program aren’t allowed to access this code.

Why do you have Rundll Errors?

Windows uses rundll files to load programs, files and applications. If the dll file is missing or corrupted, any application using that file cannot be loaded. This will produce a rundll error. The reason why the file has gone missing is often linked to spyware or a virus. This kind of malware often tries to hijack the files being shared by the rundll file. The other programs sharing the file then do not operate efficiently or wont load at all.

A rundll error can often be fix by simply using a good Registry Cleaner. Click here to use a free scan to find and repair the problem.

How to Find and Delete Rundll Errors

STEP 1: IDENTIFY

The first thing you must do is to identify the specific rundll process. This is not a difficult task; there is a vast online process library in which you can evaluate the validity of the process that is running. When the error dialog box opens, it displays the the process name. For example, if the dialog pops up and shows you the dll error:

Error loading C:WINDOWS\ system32\ usvdgpo.dll

Visit www.processlibrary.com or simply google the dll by copying and Pasting the dll or simply type it into the search box. The results will indicate that the program is a part of trojan spyware. You can use Microsoft Process Explorer also to identify the process.

If you already know the program that the dll is attached to, you can simply go into the program folder to find the dll in question.

  • Click Start
  • Click All Programs
  • Find the Program, Right Click
  • Choose Open File Location
  • Locate the dll

Delete Computer History

It’s possible to locate the dll in the System32. You will have to open the task manager to do this. Here is how to locate the dll in the System32 folder.

  • Click CTRL-ALT-DELETE to Open the task manager
  • Click the Process tab, scroll down to Rundll32.exe
  • Right Click Open File Location.
  • Search for the dll
  • When you find it, Click Properties
  • Click Details to see what program runs the dll.

If the dll windows pops up saying your that its missing, Check out this these Fix Missing Rundll Message tutorial. When you find the dll. If should have a normal Windows icon. If there’s no icon, this means the dll is corrupted by malware.
Delete Computer History

STEP 2: STOP THE PROCESS (Optional)

Often you can locate the dll services in the services configuration. Find the identified service and disable it. If you only know the program attached to the dll, follow the steps for removing the program from start up. You can open up your services configuration by following instructions below:

  • Open your Start menu.
  • Click Run
  • In the command screen type: services.msc
  • This will bring up the Services Management window. If you drag the mouse to one of the services. It will give you a detailed explanation of the service in question. By right clicking the individual service, you can view properties or stop it.
  • Stop the “dll”service immediately.

Delete Computer History

NOTE: Sometimes the dll process can not be stopped by the above method. In this case, remove the program from the startup configuration.

  • Click Start > Programs> Accessories
  • Click Run
  • Type Msconfig
  • Click the Service or Start up, locate the service, program or app
  • Remove it from your computer start up by deselecting it.

STEP 3: LOCATE, DELETE OR REPLACE

Now you know the application connected to the rundll. You can uninstall the program, download a new dll or delete it from the registry. This is the most certain way is to delete the error. You can use the Program CD to replace the dll after you delete it or simply re-download the dll or copy and past it.

To remove it from the registry, you will have to open your Windows Registry File System. This is an extremely delicate process. You may want to use a repair program to find the file. These may be specific to the particular program. This will often fix the rundll error in question, eliminate other errors and also speed up your computer. The registry key: HKEY_LOCAL_MACHINE> SOFTWARE> Microsoft> Windows> CurrentVersion> RUN

This action will help you speed up your applications load times considerable. Here is how:

  • Click Start
  • Click Run
  • Type regedit
  • Find this registry key:
    HKEY_LOCAL_MACHINE> SOFTWARE> Microsoft> Windows> CurrentVersion> RUN
  • In the right section click:”rusvdgpo” = “%System% rundll32.exe %System% usvdgpo.dll, [RANDOM LETTERS]”
  • Delete the value and Restart.

Delete Computer History

What is RUNDLL32?

The difference between these rundll and rundll32 is 16bit and 32bit. The most important thing to remember is the Windows operating system uses 32bit dll. So when you see RUNDLL32, its an indication that it maybe a system file.

REPLACE DLL WITH WINDOWS CD

System32 files belong to Windows System files. So, you will need your Windows CD or the Windows Service Pack to replace these files. Using the Windows CD can easily fix the rundll error. If you have the Windows CD, you wont need the name of the specific System32 dll. All the corrupted or missing files will be replaced with ease. Before you perform this process, you should run your antispyware program.

  • After inserting the Windows CD, Click the CMD Prompt
    You reach the comand prompt by typing CMD into the search bar.
  • Type in your CD Drive:( D: is my CD drive)
    expand D:\i386\rundll32.ex_ C:\windows\system32\rundll32.exe
  • This will copy the files that were corrupted or missing with the original files. Hopefully these tips help you fix your RUNDLL error.

Delete Computer History

SPECIAL NOTES

rundll.exe is an essential system process. However, it has a large back door vulnerability which makes it prone to malicious purposes by an attacker allowing access to your computer from remote locations, stealing passwords, Internet banking and personal data.

Trojans are usually use this method of attack to share a process that invites other malware either more trojans or other forms of spyware. The best defense is to keep your security software up to date and account for the rundll processes on your computer.

RELATED TUTORIALS:

Repair Missing Dll Messages

Popular Articles

Best Registry Cleaner
Fix a Slow Internet Connection
Speed Up Internet Videos

How to Clean Registry

Posted by | Uncategorized | No Comments
How to Clean Registry Clutter

How to clean registry clutter can be a simple task. However, it can also be an extremely dangerous act if you don’t know what you’re doing.

To understand the precarious act of cleaning the registry, you first must get an idea of what the registry is. The registry provides vital information to your operating system from task as simple as remembering your passwords to how Windows itself will load.

With that said, if you make a mistake when you clean the registry, you can disable your operating system from loading. So you must be extremely careful and have a specific idea for what registry keys you would like to clean

Cleaning the registry refers to eliminating registry keys that have be left when you change your computer configuration or uninstalled some software. Follow the steps below to learning to clean registry clutter and problems.

Learn How to Clean Registry Clutter with One Click Software, Click Here to Learn More!

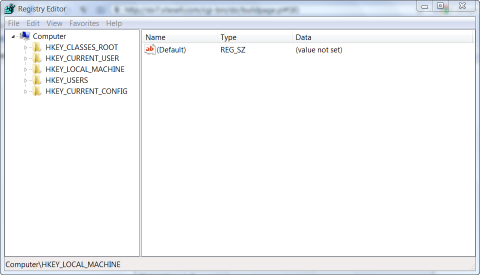
First the thing you need to know about how to clean registry clutter is that you will be removing registry keys that have caused your errors or slowdown in your PC. Here is a a look at a registry key.

Delete Computer History

Here is a a look at a registry key.

  • Click Start
  • Click Run
  • Type regedit
  • Find this registry key:

Delete Computer History

Once the registry editor is open you can expand the contents of each registry folder by clicking it. It will make a tree of information. In the left hand side of the registry editor, you can delete individual registry keys that have been causing you difficulty.

If you have a trojan, virus or some unwanted application loading when your computer is running, you would choose the folder that governs running program registry keys. One trick on how to clean registry clutter is knowing what to

HKEY_LOCAL_MACHINE> SOFTWARE>Microsoft>Windows>CurrentVersion>Policies>Explorer>RUN

Look for the keys that you wish to eliminate and simply delete them. For example locate an “exe” files such as nvctrl.exe. Which is linked to a trojan known as zlob to help to permanently disable it.

You can do a search for all the registry keys associated with the program you would like eliminate. But the Best thing to do to remove clutter is to just find programs you have deleted and remove their registry Keys For More Information on Removing Registry Errors, Click Here!

RELATED TUTORIALS:

Best Registry Cleaners
Speed Up Slow Internet Connection

Cant Connect to Public WiFi

Posted by | Uncategorized | No Comments
Cant Connect to Public WiFi

If you cant connect to public WiFi? There are a number of areas you may want to check. A lot of times, this is not a problem that can be linked to your computer. This may be a router related issue in the cafe or free WiFi hot spot. In that case there is not much you can do. However you can perform a few steps that can eliminate this problem quickly.

Why you cant connect to public WiFi?

Log-in credentials:First, makes sure that there isn’t a requirement for log-in passwords and IDs. You can ask the staff to share this information with you if that’s the case. Also large public networks require you to sign up for their service before continuing. You will not be able to log on without first creating an account.

Terms of Service is also required by some public wifi networks. If you don’t agree to their terms of service. You will not be able to connect to the WiFi system.

Bandwidth Caps: Many free public networks and hot spots are capping their bandwidth so during peak hours it may be impossible to log on due to the ISP or public service blocking new users.

What can you do to connect?

Solution 1

Restart your hardware: at times your router may have be turned off and turned back on by yourself or Windows. Make sure your modem is functioning by looking for a green a blue light your laptop.

Solution 2:

Try another network to ensure that particular Wifi isn’t preventing your specific device from logging on. If this is the case you make need check your security settings and software configuration.

Solution 3:

Eliminate IP Conflicts: When you log on to a public network you must obtain a new computer IP address that is assigned by the public WiFi DHCP servers. Sometimes your IP address configuration get messed up due changes in your network settings. In addition, you can’t log on a public WiFi if the server’s assigned you the same address as another device logged on the the same WiFi network The way to avoid IP conflicts is to get assigned a new IP.

Try to renew your IP . You can do this two ways address

  • Renew your IP by shutting off all your hardware for 30 secondss and turning it back on.
  • Renew the IP with the command prompt. Follow the instruction below to do this

Go to Command Prompt> Type ipconfig /release > Type ipconfig renew>

For more on this command Click Here.

This action will eliminate your IP and bring it back onto the system within seconds You can also watch a Renew IP Video

For more help with connectivity issues, read more about cant connect to public WiFi solutions.

Laptop Battery Life

Posted by | Uncategorized | No Comments
Extend Laptop Battery Life

Laptops are more powerful than ever. However, this power comes with a downside, short laptop battery life. The average life of a rechargeable battery is 78 minutes. This short time is based on low to mid range processing activity. If you are a gamer or movie lover, your laptop battery life will be significantly shorter unplugged. Even wireless internet modems will drain your battery by 20% per hour. Never the less, there are simple tweaks that will extend your battery life and provide your PC with better power usage. Remember that the more streamline and efficient your operating system the better your laptop battery life. To improve your computer’s performance checkout Ways to Speed UP PC and Clean UP PC tutorial pages. HOT TIP: If you feel that you need to upgrade your laptop battery to a longer lasting one, check out, Laptop Battery Replacements

Step 1: Configure Power Plans

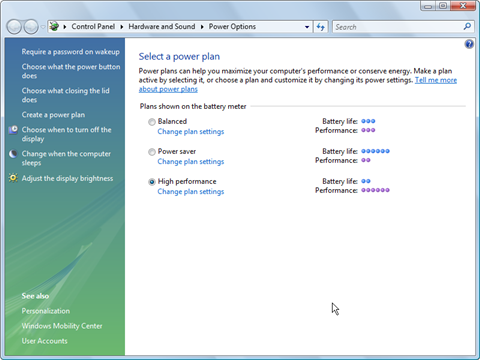
Vista has three pre-set power plans. This a simple step that allows you to control your power options in Windows. Depending on which plan you choose may help you maximize your battery power.

  • In Control Panel; click Power Options
  • Choose a Power Plan.
  • Adjust: Display, Sleep and Brightness
  • OR

  • In the Task Bar, right click the battery icon.
  • Click Power Options
  • Choose a Power Plan.
  • Adjust: Display, Sleep and Brightness

Delete Computer History

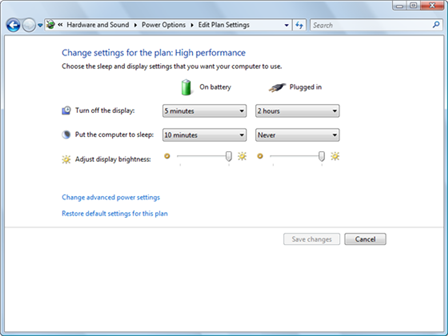
Three defined power plans can be further edited to maximize your laptop battery life by clicking Change plan settings located under your plan title. You can manage how your laptop power usage while on battery and plugged in. Try to strike a balance between your usage and the power plans.

Delete Computer History

Step 2: Control Hardware Power Usage

Your laptop hardware will drastically drain your laptop battery life if not configured correctly. Screens, wireless adapters and USB devices can wreak havoc on your power reserves. However toggling the advance settings of your power plan will allow you to significantly extend your battery life. Here is how:

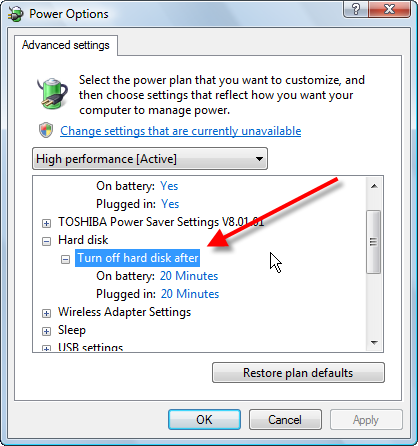
Tweak Hard Drive Shutdown Times

  • In the Edit Plans Settings window menu(previous steps 1-3), Choose change advanced settings.
  • Click the Hard Disk to expand the settings tree. Choose when the hard drive will shut off

Delete Computer History

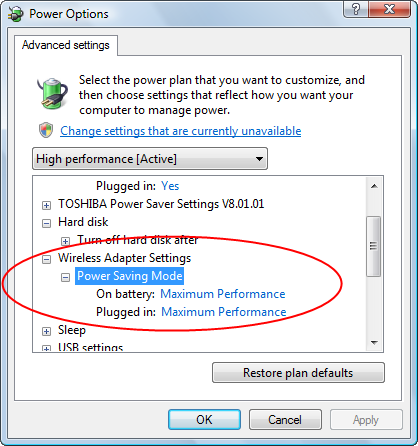
Alter Wireless Adapter Performance

  • In the Edit Plans Settings window menu(previous steps 1-3), Choose change advanced settings.
  • Click Wireless to expand the settings tree. Choose the power plan that suits you

Delete Computer History

Step 3: Cut Down on Background Programs

When you start your computer many unnecessary processes are loaded. All these program require your hard drive to be active thus killing your laptop battery life You can eliminate this by managing your msconfig.

Here is how:

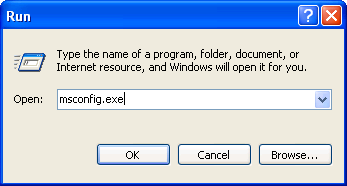
  • Open your Start menu.
  • Click Run
  • In the command screen type “msconfig.exe”
  • In the system configuration utility,click either service or startup tab.
  • Uncheck all programs that your are no longer want to run in the background.
  • Click OK

For a list of programs that you don’t need and tips on speed up your startup, click this link

Cleaning your Registry- A corrupted registry can have thousand of registry keys that your hard drive will have to keep active. You should perform a Scan Of Your Registry. If you receive more than 30 errors, this is the reason why you have slowdown. Extend laptop battery life by using Registry Cleaners to eliminate useless keys that keep hard drives active.

Step 4: Use Hybrid Sleep

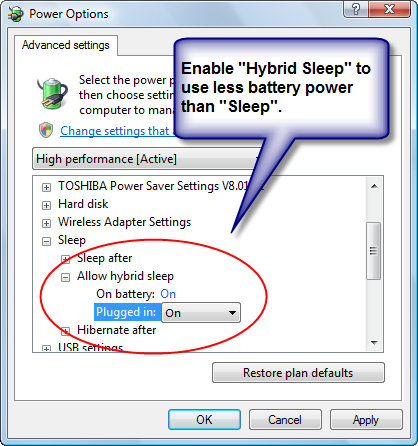
Hybrid sleep acts as a combination of hibernation and sleep. This feature was originally designed for desktops. However, this option can also be very beneficial in laptops. It works by making a snap shot copy of all the programs that are open on your PC. This image is sent to the hard drive. This is a better option than sleep because it drains less of your battery than Sleep option. This works by putting a hold on activity of the programs that are opened. Here is how:

  • In the Edit Plans Settings window menu(previous steps 1-3), Choose change advanced settings.
  • Click Sleep to expand the settings tree. Choose the Hybrid Sleep
  • Enable Hybrid Sleep options

Delete Computer History

Popular Pages

Speed UP your PC
FIX PC PROBLEMS!