admin, Author at Delete Computer History - Page 13 of 15

Slow Boot Up

Posted by | Uncategorized | No Comments
No more Slow Boot Up… Guide to a fast startup!

Suffering from a slow boot up in your new or old computer? Don’t worry most people’s computers take forever to startup. However, the way you go about repairing this problem can cost you very little or a whole lot. Most people quickly start looking for affordable hardware solution such as faster hard drives, more RAM, or even a new processor. However, if you have hundreds of dollars of spare cash laying around, be my guest. However, you can perform a few tweaks to make your boot process more efficient.

No, if your computer’s slow boot up is in response to errors located in your registry, you will have to individually search them out or using a registry cleaner. Your registry is your computer’s largest filing system. During startup your computer must search through the thousand of registry files. If you have errors, it may check and attempt to repair the problem during startup. This creates a delay and adds immensely to your slow boot up problem.

Lean how to use one-click software to Speed Up Your Slow Boot Up, Click to Learn More.

Solution 1: Remove Start-up Programs

One of the easiest and fastest ways to decrease the time it takes for you PC to boot up is to remove the start-up programs. The more programs required to load on start up, the longer it will take Windows to finalize it’s boot up procedure. Do you really need 12 messenger programs loading? Removal can be done with MSCONFIG, this process is detailed further down the page. Also you can check out this quick tutorial Click Here to Remove Start-up Programs

Solution 2: TWEAK YOUR BIOS

When your computer has slow boot, it may have nothing to do with Windows. There is a Basic Input/Output System known as the BIOS. The BIOS runs at the startup sequence where it configures devices and then boots the operating system. However, if the configuration is messy and has some obscure commands, this will cause a slow boot up. Depending on your mother board manufacturer, you may have the access the BIOS differently.

  • Turn on your computer, and hold down delete
  • In the BIOS window, look for the Boot Menu option.
  • Choose the QUICK BOOT to turn off memory test
  • Make sure the hard drive comes first in the BOOT ORDER
  • Turn off any logo displays.
  • Restart

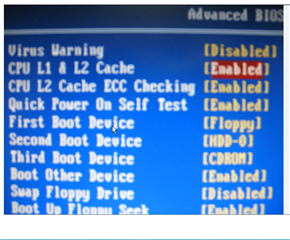
bios

This is an example of a BIOS that will cause a very slow boot up. Follow the advice above to streamline your BIOS to load your configuration a quick as possible.

Disable ON BOARD sound and GRAPHICS

Only do this if you have an third party sound and graphic card already installed.

  • In the BIOS menu, select Onboard Device or Integrated peripherals
  • Disable the onboard chips and turn off unused network adapters.
  • Restart

Solution 3: BOOT MENU Default Settings

If you are using XP, Vista or Win7 you have a this. You can access the boot menu by loading your MSCONFIG. During the boot up your computer issues a timeout to find new hardware and software. You can shorten this time to boost your startup speed.

  • Open your Start menu
  • Click Run
  • In the command screen type msconfig
  • In the system configuration utility, click either BOOT tab.
  • In the boot menu, change the default setting for Time Out from 30 to 5 seconds.
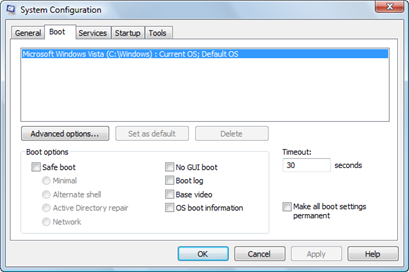
bootmenu

Solution 4: Eliminate Boot Up Passwords.

Having a password lock computer can add to your slow boot up. The operating system must completely halt the boot up to allow you to type in your text based password. Eliminating this boot password option will give you a welcome speed boost.

  • Click the Start button.
  • In the Start Search bar, type control userpasswords2
  • Load the User Accounts window
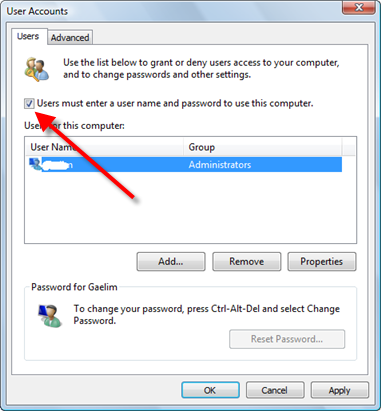
  • Uncheck User must enter user name passwords…
  • Click Apply

nopassword

Solution 5: No GUI Boot

When your computer starts up Windows logo is displayed indicating that your computer is booting up. This is called a Graphical User Interface also known as a GUI. This process takes about 5 seconds . However it is unnecessary and can add to a slow boot up process.

  • Load the System Configuration utility by typing msconfig in the the search bar.
  • In the System Configuration Menu, choose Boot
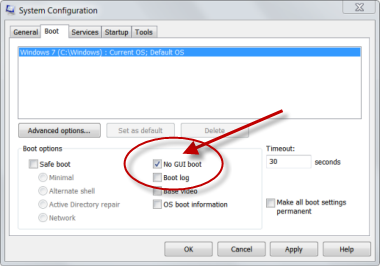
  • Click the check box for No GUI Boot

noguiboot

Solution 6: Kill Resources HOGS.

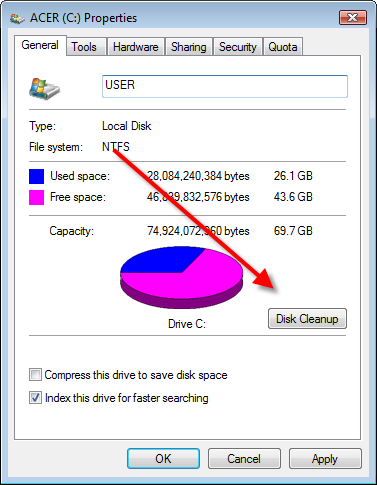
The Windows Defender options and MSCONFIG configuration allow you to easily cut down on unnecessary programs that are loading on your PC. You can also use the Disk Cleanup
options to before this task.

For Windows Defender:

  • Click Start button and load the Control Panel
  • Under the Control Panel menu, click Programs.
  • Under the Windows Defender heading choose View currently running programs
  • Choose Startup Programs from the Category option
  • Remove Programs that you feel unnecessary for startup
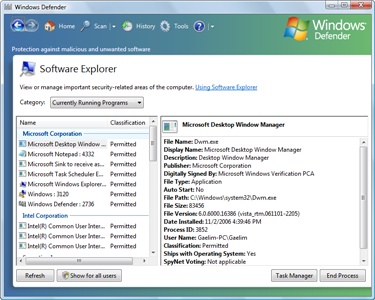
windowsdefender

MSCONFIG Startup Utility

Here is how:

  • Open your Start menu.
  • Click Run
  • In the command screen type “msconfig.exe”
  • In the system configuration utility,click either service or startup tab.
  • Uncheck all programs that your are no longer want to run in the background.
  • Click OK

For more on MSCONFIG

Solution 7: Advanced Registry Tweaks

Once you have streamlined your startup program process, you should turn your attention to your computer’s registry. Windows Registry needs to operate efficiently. If it is not organized and cleaned regularly, it will cause slow startup and shutdown problems. In addition, it will slow your computer performance down considerably. This occurs because you computer needs to search the registry constantly for software entries to know how to configure them for loading.

An error will cause you to ask why my computer is slow opening. To slim down your registry for better computer performance, Click here to see the leaders in registry cleaner field

Advance registry tweaks can stop slow boot up problems. But they are very dangerous. By stopping the index service from hunting files you get an added boost by shorting file names. However, only do this if you are always actively searching for files.

  • Click Start
  • Click Run
  • Type regedit
  • Find this registry key: HKEY_LOCAL_MACHINE>SYSTEM>CurrentControl>SetControl>FileSystem
  • Set the NtfsDisable8dot3NameCreation to 1 to eliminate the extra creation of short version for DOS names.

For more advanced registry tweaks check out this link
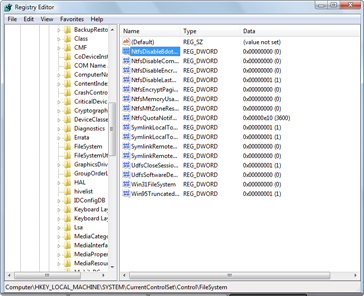
registrytweak2small

This tweak gives you an added speed boost by preventing your computer from making DOS style shorten version of the file names. This leaves less data in your registry. However, this may cause slowdown during searches.

Solution 8: Improve Your Hard Drive

A Slow Hard Drive equals A Slow Boot Up

Without a doubt, a fragmented error, filled hard drive will cause computer slow down. Windows has to search through a ton of data during boot up. The more messed up your hard drive is, the longer the process. You should definitely
Defrag your hard drive Also it’s important that you keep your hard drive free of errors in running efficiently. Learn How to reduce errors, decrease fragmentation and speed up a slow hard drive, Click Here

For older hard drives, switch FAT to NTFS — You can increase your hard drive speed by switching FAT to NTFS. The NTFS configurations provides increased security, file–by–file compression, quotas, and even encryption. The default setting for XP may be set to FAT which is slower system. However if you have already converted to the NTFS16 to NTFS32
How To:

  • Click Start
  • Click Run
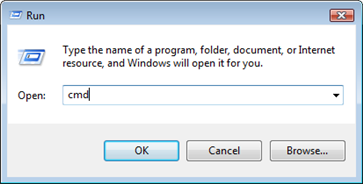
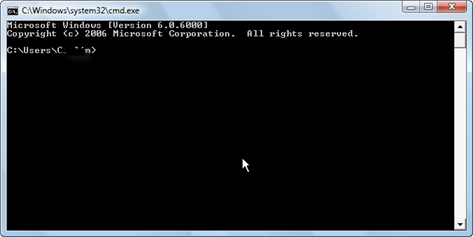
  • Type cmdpress Enter.
  • At the command prompt
    Type convert X:/FS:NTFS (X is your hard drive letter)
  • Hit Enter
    • runcmd

      cmdpromptblack

      Newer hard drives don’t need to be converted. However, the way the perform can be optimize to give you a better performance. You can use windows Write Caching and DMA Modes to allow more information to be stored in memory instead of utilizing hard ware like the CPU.To read more about write caching click here.
      For hard drives from the previous generation and earlier version of Windows.

      Solution 9: Disable the Indexing Service for faster booting

      The indexing service scans your hard drive and indexes files to help speed up searching. It runs silently in the background using up RAM, free space and CPU access time. It is generally thought to be unnecessary by most.
      How to disable this indexing service
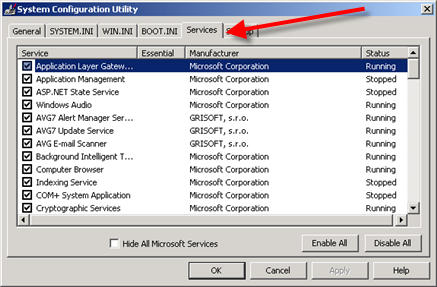
      • Click on Start
      • Click Run
      • Type services.msc
      • Select Indexing Service and Double click on it.
        Select Manual under Startup Type.
      • Click Stop
      • Click OK

      servicessmall

      Solution 10: Use ReadyBoost in Windows 7

      ReadyBoost actually works. However, you need to get a flash flash media device like an SD card or USB drive. With the right specs these devices can act a temporary cache storage that will allow your computer to dump information quickly. It essential acts like RAM storage. To use ready boost.

      • Insert the flash storage device.
      • Windows will produce a Auto Play Window with your flash media. Choose Speed up my system option.
      • Choose Dedicate the Device to ReadyBoost
      • Use the slide bar to set how much memory you want to use
      • Click OK

      To see the visual steps of how to speed up a slow boot up with ReadyBoost, Click Here.

      Related Articles

      Read more about Speeding up Shutdown Process
      Read more on How to Improve Internet Speed
      Read more about PC Speed Killers

How to Speed Up My Computer

Posted by | Uncategorized | No Comments
How to Speed Up My Computer?

The are many ways to answer the question ” How to speed up my computer?” However, its only normal that your PC becomes a bit sluggish if you failed to run routine maintenance task. This is the cause of about 80% of cases of slow computer performance. By performing a few task to tune up your PC, you will be rewarded with a computer that runs smoothly and at its original factory speed. Check out Registry Cleaner Reviews

PC SPEED KILLERS

  • Corrupted registry–A corrupted registry will eat up your resources and bog your computer down with errors and conflicts. Remedy this by cleaning the registry.
  • Low Free Space on Your Hard Drive— No free space can be caused by a your Windows cache files becoming full. Cleaning them out to make more space. Duplicate registry files also slow your PC down and eat up valuable disk space. Also visit our Clean up a Slow Computer tutorial
  • Insufficient RAM— RAM is important for your PC speed. However, depending on your activity. You may need to upgrade or you may benefit by increasing your Virtual Memory to get more mileage out your existing RAM.
  • Slow Hard Drive— The hard drive is cornerstone of your system. It must be kept in lean and run efficiently. However without the proper maintenance it is nothing more than a hulking lethargic monster. Visit this page to keep your hard drive healthy. Slow Hard Drive Fixes

Speed Up My Computer with Windows 7

If you have Windows 7, there are a host of things you can do to speed it up. I love Windows 7 but it’s very resource intensive. The graphical elements can eat up tons of RAM and CPU processing power.

Windows 7 Speed Killer

Aero Theme–One of the easiest ways to speed up Windows 7 is to disable Aero. This is a graphical option that include glass effects, fading windows, translucency, 3D windows.. etc. This takes up tons of RAM and processing power Watch the video to see how to disable Aero. For More on How to Speed Up Windows 7, Click Here.

If the you have tried all the tune up tips and still haven’t been able to harvest your PC speed, you may need to perform a few advanced tips or even splurge for a new PC. Or the you just want more answers to the “how to speed up my computer?” question. Check this out I Still Don’t Know How to Speed Up My PC.

How to Increase Virtual Memory

Posted by | Uncategorized | No Comments
How to Increase Virtual Memory?

You can easily increase virtual memory by following the steps below. Your virtual memory is important but before you alter your settings it’s best to find out more about virtual memory.

What is Virtual Memory?

Virtual memory is simulated RAM. When you have used up all your RAM, your computer will shift data to an empty space on the hard drive. The computer swaps data to the hard disk and back to your RAM as needed. When you increase your virtual memory you are increasing the empty space that is reserved for your RAM overflow.

Also having enough available space is absolutely necessary for your virtual memory and RAM to function properly.

You can increase Virtual Memory performance automatically by freeing up resources in your registry. You may want to use a Registry Cleaner. Click Here to learn more!

How to increase Virtual Memory?

In Windows XP

  • Click Start, and then click Control Panel.
  • Click Performance and Maintenance, and then click System.
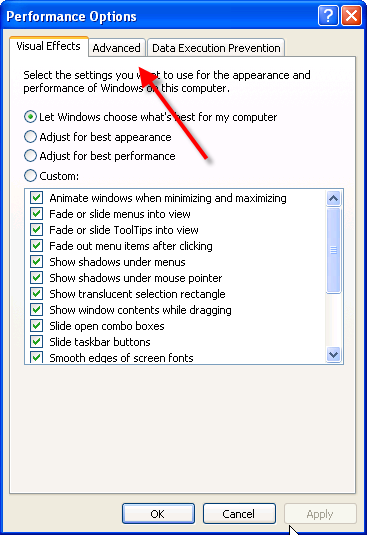
  • On the Advanced tab, under Performance, click Settings.
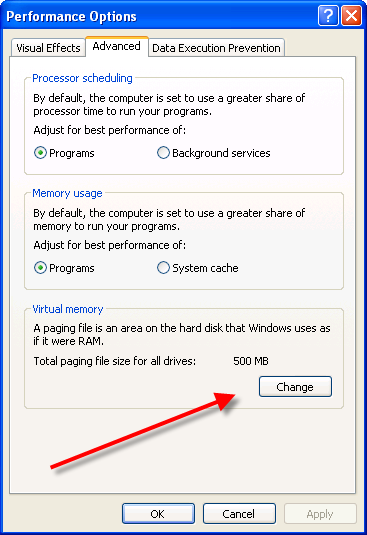
  • On the Advanced tab, under Virtual memory, click Change.
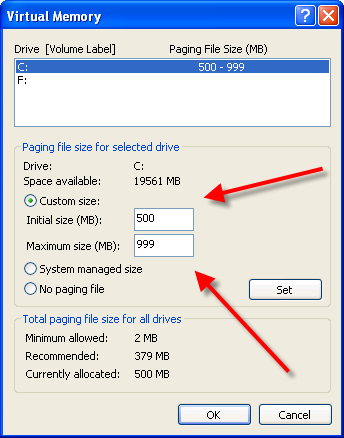
  • Under Drive [Volume Label], click the drive that contains the paging file that you want to change.
  • Under Paging file size for selected drive, click to Custom size check box. You can enter the amount of memory you would like to reserve for Virtual memory by entering the initial and maximum size.
  • Click Set
    When you are prompted to restart the computer, click Yes.
    Special Note: You should choose the same amount for the initial size and maximum size. This will Stop your CPU from constantly changing the paging file.

HOT TIP: To stop your CPU from constantly changing the paging file, set the initial and maximum size to the same value. For example, 500 and 500. The value should be at least 1.5 times more than your physical RAM. If your computer has 512MB of RAM increase the virtual memory paging file to 1.5*512= 768

In Vista/Win 7

  • Click Start button Picture of the Start button
  • Click Control Panel
  • Choose System and Maintenance and then click System.
  • In the left pane, click Advanced system settings.
  • On the Advanced tab, under Performance, click Settings.
  • Click the Advanced tab, and then, under Virtual memory, choose Change.
  • Click Customto change the Initial size (MB) and Maximum size. See the hot tip above.


Remember to choose the drive you would like to use to increase the virtual memory. In most cases it usually your C: Drive. You can set the initial size and maximum size after clicking the Custom size check box.Remember its better to keep the Virtual memory values the same.

Also having enough available space is absolutely necessary for your virtual memory and RAM to function properly.

Popular Articles

Computer Help Videos

Posted by | Uncategorized | No Comments

Computer help videos are one of the best ways for people to get information quickly. The birth of HD videos has given us the ability to provide clear step by step video instructions that you can see with incredible detail.

All the pages will give you more detail than just a simple video. you can will also see recommended pages that will give you more detail. So you have the opportunity to follow these steps and watch the videos. For more help tutorials. Check out our tutorials page
disable_Aero-Video_tile

How to Disable Aero

You can significantly speed up your Windows 7 operating system by removing Aero options from your system settings. Aero is a beautiful interface that adds glass effects and transparencies. However it’s resource
boost_wireless_connection_signal_tile

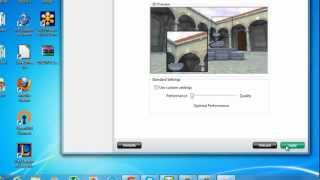
Improve Frame Rate in Games

You can improve your FPS with these steps. Your graphics card can be tweak for performance with just a few steps.Everyone hates when their favorite video game lags. One of the components that produces lag is your graphics cards inability to process frame rates. Boost frames with this video.
improve_FPS_video_tile

Boost your Wireless Connection

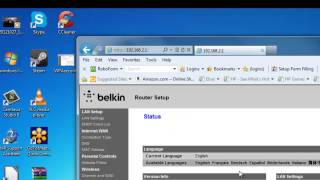
Follow these easy video to see how to change your router channel. This is one of the easiest ways to boost signal strength
enable_write_caching_video_tile

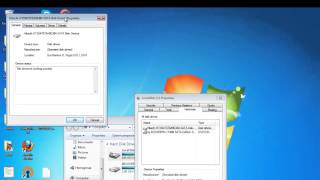
Enable Write Caching to Improve Performance

This Windows 7 feature will give you a significant boost by freeing up your hard drive and increase CPU performance.
blockwebsite_tile

Blocking Websites

Learn how to restrict a website in all browsers with this video
100percentCPUvideotile

Stop 100% CPU Usage

Learn how to limit your CPU usage and cut down on programs eating your CPU resources.
All the computer repair videos are hosted on Youtbe.com. You can easily subscribe to our channel to get the latest videos. Click here to check out our videos on Youtube.com If these computer help videos don’t provide you with exactly what you are looking for, please feel free to ask any question or leave up tutorial suggestion or videos you would like to see on this site. If your experiencing video problems check out the tutorials below:

Read more about fixing streaming problems

To solve computer video issues

Delete PC Internet History

Posted by | Uncategorized | No Comments
How many times do you have to delete PC internet history files?

The answer is six. In order to delete PC internet history, these five major memory dumps must be purged. The five internet history folders are your internet browser history, your computer’s web cache, Autocomplete, browser history and cookies. The secret index.dat file makes the sixth.

All six internet history data hogs remember every web page viewed, every article read, every movie, every pictures and any little file that may have caught our attention. This information is easily accessible to all who use your computer. So the first thing we need to categorically delete PC internet history.

If you think your PC may be slow due to your internet history, it may be another reason. Click here to learn how to speed it up.


“Know Thy Enemy, and Thou shall triumph”
Learn how to delete your PC internet history so it doesn’t become your enemy.

SELECT THE AREA YOU WOULD LIKE TO DELETE

DOWNLOAD HISTORY

Web Cache- is also known as the temporary internet folder. It contains your temporary internet files.The web cache is the primary folder that holds your previously viewed web pages and images.
Click here to learn how to manually delete the webcache

WEBSITE HISTORY

Browser History-This folder contains every url you have typed in the address bar or visited over a given period of time. This information leaves the biggest web tracks. So, you want to immediately eliminate it.

To Manually Clear Your Url and Browser History Click This Link

AutoComplete-This is an extension of your browser history. When you type in URLs in your web browser, previously entered urls will appear in the drop down box. This feature shows every place you’ve been on the net. You can delete individual entries or fully disable it using an auto erase history feature. I recommend the latter.

Learn How to Manually Clear Autocomplete. Click Here

Forms and Passwords-This is a great time saver, but it eradicates any sense of PC security. Choose the remember the password option and beware that anyone can see this from your browser.By learning how to delete PC internet files, you will become aware that passwords should be stored elsewhere not on your computer. You can protect them with a password in Firefox and Netscape, but IE and Chrome don’t offer this. Hmm…I wonder why?

Click Here to Learn How to Manually Delete Forms and Passwords

COOKIES AND SECRET FILES

Cookies-there is certainly nothing sweet and tasty about this little fellow. Cookies identify you on certain web sites. Although some cookies can be useful, They majority act as tiny little covert spies, secretly watching your browsing activity. Declare war on this bastards as soon as possible.

Click Here to Learn How to Manually Delete Cookies

Index.dat– Is an active folder used by Microsoft Window’s Internet Explorer. This data in this secret human-unreadable file keeps an active log of all the websites you have visited. This log contains urls and web quires recently opened files. This file is very difficult to delete. Performing standard Windows’ history delete will not eliminate this file. It is a secret file designed to avoid traditional cleaning methods. Index.dat also keeps a record of all email you have received through Outlook Express.

To Learn How to Manually Delete Your Index.dat. Click this Link

Select which area you would like to manually clean from the from above and left menu. You may want to keep some information so take precautions and backup any sensitive data if you are planning to fully delete PC internet history files. If you are interesting in “tricking out” your PC to automatically delete PC internet history check out.

Slow Browser

Posted by | Uncategorized | No Comments
Speed Up a Slow Browser with Public DNS Servers

You can speed up a slow browser by switching your DNS server. Google and others provide excellent public DNS servers. Why should you switch DNS servers? When you sign up for an internet service, your Internet Service Provider(ISP) assign a DNS server to your computer. The ISP’s DNS server may restrict you from viewing some websites and may be considerably slower than public DNS servers.
Special Note: Eliminating errors and registry tags can significantly speed up your browser. Click Here to Learn How!

What is a DNS server?

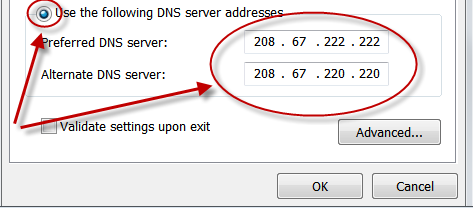
DNS stands for Domain Name Server. The DNS houses a list of numerical addresses that your computer uses to locate websites. These addresses are known as Internet Protocol addresses or IPs. Each DNS server houses a list IP addresses. It goes without saying that Google houses a lot of IP addresses and has a lot of servers. So this will make your browsing faster.GOOGLE’S DNS servers are 8.8.8.8 and 8.8.8.4.4 Another great public DNS server is OPEN DNS.OPEN DNS’s servers: 208.67.222.222 and 208.67.220.220

How to change your DNS server?

In this case, you are going to speed up a slow browser, by changing the DNS. The method to change your DNS server varies depending on which version of Windows you are using. But the result is the same.

    In XP

  • Click Start
  • Choose Control Panel
  • Choose Network Connections
  • Right Click Network Connections
  • Double Click Internet Protocol(TCP/IP)
  • Select Use the following DNS server addresses
  • Enter Google DNS or Open DNS and the alternate: 8.8.8.8 and 8.8.8.4.4 or 208.67.222.222 and 208.67.220.220

For more DNS address, you can check out thislink
In Vista and Win7

  • Click Start
  • Choose Control Panel
  • Choose Network and Internet
  • Right Click Network and Sharing Center
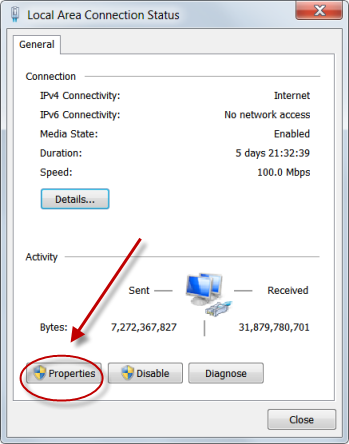
  • Click on your connection
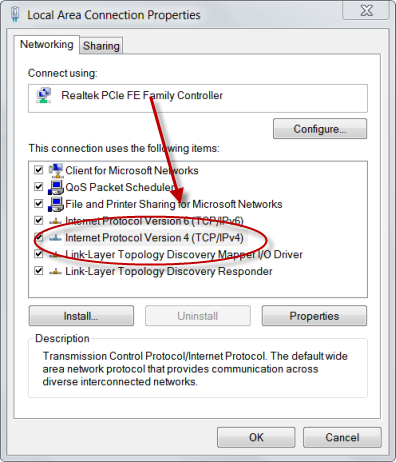
  • Double Click Internet Protocol(TCP/IP)
  • Select Use the following DNS server addresses
  • Enter Google DNS or Open DNS and the alternate: 8.8.8.8 and 8.8.8.4.4 or 208.67.222.222 and 208.67.220.220

public-dns-server-step1
public-dns-server-step2
public-dns-server-step3


Part 2 Video Tip: Google Chrome Speed Trick

RELATED TUTORIALS:

Speed Up Windows 7

Posted by | Uncategorized | No Comments
How to Speed Up Windows 7

Can You speed up Windows 7? Of course! Windows 7 is a great operating system. Its fast and light. But there are ways to make it better. You can make Windows 7 faster with just a few simple tweaks. Learn how to speed up Windows by eliminating errors and registry problems, click here!

Step 1: Enable Prefetcher

Prefetcher is a function that allows Windows 7 to preload data used to run in start application. With this option enabled, you will see a significant boost in performance of application. Here is how to use it:

  • Click Start
  • Click Run
  • Type Regedit into the command line and press enter. The registry should load for your review.
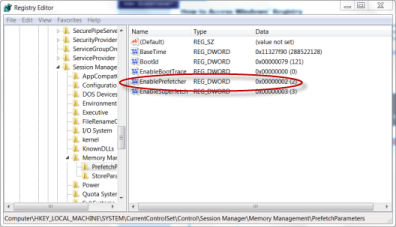
  • Locte registry key:
    HKEY_LOCAL_MACHINE>SYSTEM>
    CUrrentControlSet>Control>SessionManager>
    MemoryManagement>PrefectParameters
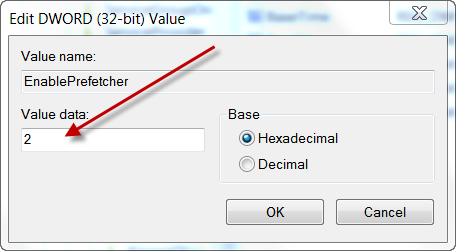
  • Double Click EnablePrefectrer on the right pane of the window
  • Change the Value to 2
  • Click Ok and Restart


Step 2: Increase CPU Cores

You can improve Windows 7 speed by increases the amount of CPU cores that are used during boot time and other functions.This will significantly cut down on the boot time. Here is how:

  • Open your Start menu.
  • Click Run
  • In the command screen type mscofig
  • Hit Enter
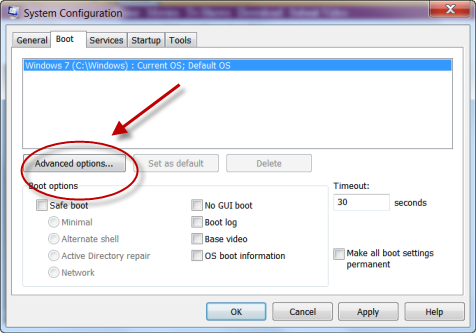
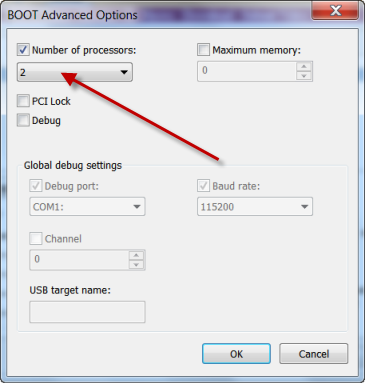
  • Click the Boot Tab and Choose Advance options..
  • Under Number of Processor, enter the number of processor your computer has: 2 for dual core and 4 for quad core.
  • Restart.
    You can increase your CPU Speed with a number of easy tweaks.To read more about speeding up your CPU, Click Here


Step 3: Turn off Aero

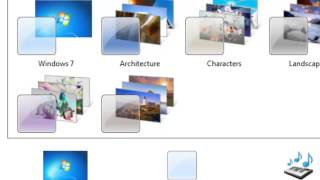
Aero is an beautiful visual feature. It allows you to display has animations, gloss and transparency to Windows. However, it a resource hog. You can turn it off to free up a ton of RAM that can be used to speed up Windows.

  • Right Click the Desktop
  • Choose Personalize
  • Choose Windows Color at the bottom, then unchecked Enable Transparency
  • Click Apply Basic Theme

Step 4: Power Options(Great for Laptop Users)

Windows 7 has an awesome power management plan. It shifts power to essential hardware components and application depending on the power level or option that you’ve designated. The beauty of this feature is that you can increase Windows 7 performance by choosing the high performance feature. This option will ensure that all your application and hardware are receiving maximum amount of power. Here’s how:

  • Click Start
  • Click Control Panel
  • Choose System and Security
  • Click Power Options
  • Click Show Additional Plans, Choose High Performance

Step 5: Use ReadyBoost

Yes, this Windows 7 feature actually works. However, you do need a fast flash storage device such as a high quality SD card or USB drive. Readyboost can speed up Windows 7 boot by using your the temporary storage device as virtual RAM. Boost Your RAM by tweaking your Virtual Memory. This feature works best for low end system with limited RAM and resources because it adds an extra bit of RAM. So, if you have a higher end system, you might not notice the results. However, net books and computer with low RAM should be happy with the results. To Set Up ReadyBoost, click here!

Step 6: Enable Write Caching

You can speed up both your hard drive and CPU with one click. Write caching is a Windows 7 feature that allows your computer to delay data slated to be written to the hard drive. The Data is instead held in a temp space which frees up your hard drive for other tasks. Your CPU is also removed from the constant need to instruct your hard drive to write data to the hard disk. This action is slated for a time when your computer less active. This will definitely speed up Windows 7 by freeing up a ton of resources. To enable Write caching, follow the instructions below or watch the video:

  • Click Start
  • Choose Computer
  • Right click your hard drive and choose Properties.
  • In the Local Disk Drive Properties, choose Properties.
  • Select Settings and click the Policies Tab
  • Finally choose the option to Enable Write Caching

There are a few more traditional ways to speed up Windows 7. Such as eliminating excess resources and start ups for more ways to speed up Windows 7 check out: Stop Start up Programs

These May Also Help

Delete Computer History

Slow Hard Drive

Posted by | Uncategorized | No Comments
How to Speed Up a Slow Hard Drive

Constant read-write noise, a buzzing fan, and freezing are all symptoms of a slow hard drive. A big, fast, hard drive is a must for any modern PC. The hard drive acts as the primary storage unit for all of your data. Further, your productivity hinges on the speed with which you can retrieve your files and access your programs. Each new generation of PCs offers bigger hard drives. However, an oversized, cluttered drive is just a bigger, slower drive. Nevertheless, you can easily maintain the quality of your hard drive and learn how to avoid experiencing slow hard drive problems.
Special note: One of the easiest ways to clean up your hard drive’s clutter is to use a registry cleaner. Click here to learn more!

STEP #1: Scan Your Hard Drive

One of the major causes of a slow hard drive is errors. Some hard drives errors can be caused by the bumping your PC. This can actually cause physical damage to the hard drive. The damage is known as a bad sector. A very slow hard drive is usually the result of this phenomenon. Bad sector cause your hard drive to constantly try to read inaccessible information. Running Check Disk will help you determine if your hard drives has bad sectors.

  • Click the Windows button and open the Computer folder.
  • Find and Select your hard drive, right click the hard drive icon.
  • Choose Properties from the drop down list.
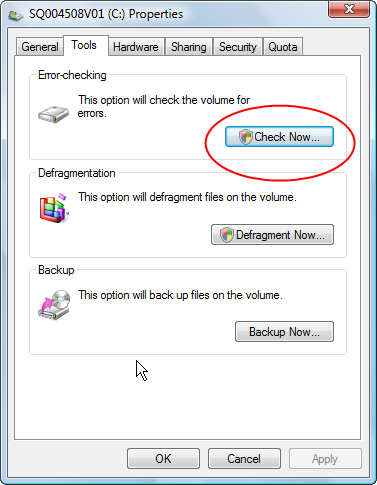
  • In the Local Disk Properties dialog box, click the Tools tab.
  • Click the Check Now button.
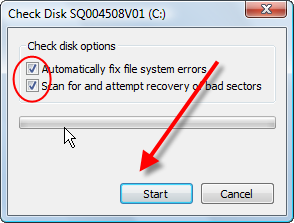
  • For maximum cleanup click “Automatically fix…” and “Scan for …”
  • If you see new dialog window, click Schedule disk check to start.

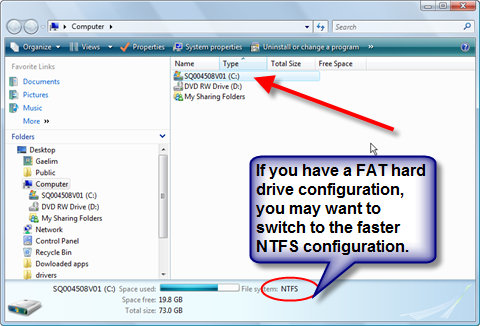
Switch FAT to NTFS— You can increase your hard drive speed by switching FAT to NTFS. The NTFS configurations provides increased security, file–by–file compression, quotas, and even encryption. The default setting for XP may be set to FAT which is slower system. However if you have Vista converted to the NTFS16 or NTFS32. Older hard disk also may suffer from PIO mode. You may be able to switch your settings to DMA which is a faster protocal. To learn more about PIO/DMA Modes, visit Microsoft Help Page


Unfortunately, current Windows version don’t pack in a Registry Cleaner to check errors in your registry you have to hunt and seek them manually if you don’t have a cleaner.

STEP #2: Clean Up Your Hard Drive

Each file on your computer is stored in more than one place. A slow hard drive has useless and abandoned files stored in multiple places on your computer. This is similar to having a very messy room. When you are in a rush and need to find your keys. It will take forever to find them. Same goes for finding files in your hard drive.

  • Click the Windows button and open the Computer folder.
  • Find and Select your hard drive, right click the hard drive icon.
  • Choose Properties from the drop down list.
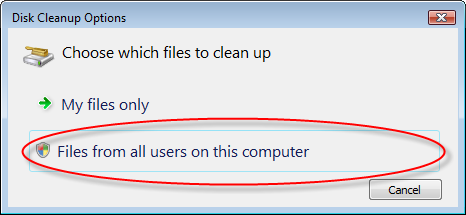
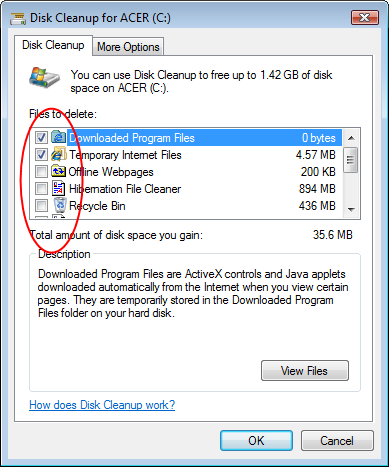
  • In the Local Disk Properties dialog box, click the Disk Cleanup tab.
  • Choose Files from all users on this computer.
  • Click OK after the check box for all the files you want to delete.


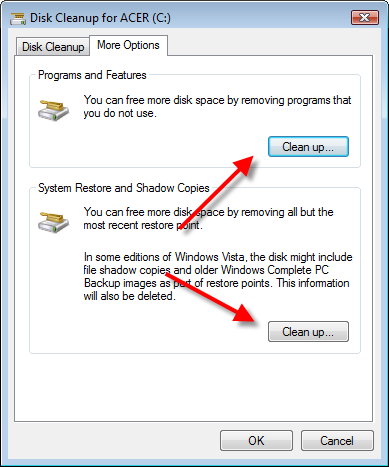
Choosing More Options will give you the chance clean up your slow hard drive from programs and shadow copies. Note that shadow copies are used as system of back up that can save your files once deleted. This makes data recovery easier but causes slow hard drive problems. So, proceed with caution.

The Registry is your hard drives largest filing system. Any errors or corrupted files can cause everything from hard drive problems to sluggish startup and shutdowns. Slow hard drive problems occur because the CPU will constantly access the hard drive for information that has to be immediately delivered. If the registry is fragmented and unorganized your CPU will stall and your hard drive constantly cycles through your registry system.

STEP #3: Defragment Your Hard Drives

  • Open the Start Menu
  • Click on Computer
  • Right Click your hard drive icon.
  • Scroll down to the Properties.
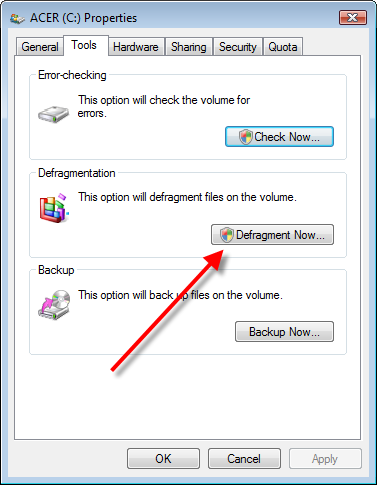
  • In the Properties Menus, Open the Tools menu.
  • Choose Defragment Now.
  • In the Disk Deframenter menu. Click on Defragment


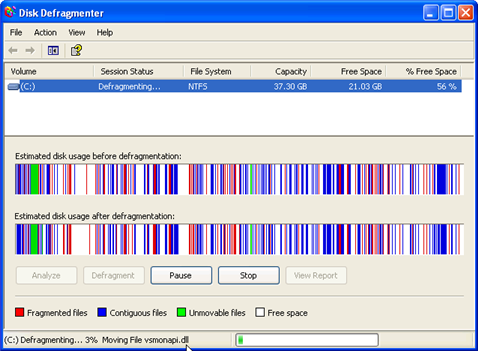
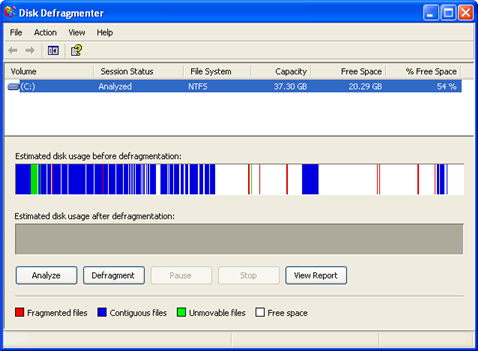
The image displays a hard drive with a large amount of fragmented data. This is demonstrated by the collection of broken bars. Each color indicates different data fields, files, and blocks of data. In “healthy” computer, one with little fragmentation, the disk defragmenter would display a collection of large continuous blocks consisting of one color.

The result of the defragmentation process demonstrates a collection of large contiguous colors fields. This is an indication that large amounts of similar data have been group in specific locations on the hard drives thus making the data easily accessible and eliminating one of the major causes of fragmented hard drive syndrome.
For more tips to improve your PC, click here

STEP #4: Enable Write-Caching

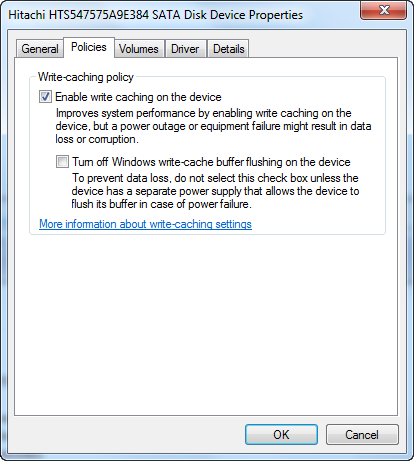
One of the features that you can find in Windows 7 and Vista is called Write-Caching. This allows your hard drive to work at high performance by allow information to be written in a temporary fast storage cache before its written on your hard drive. It takes time to write info to your hard drive but the temporary cache hold it until later. This is a high performance measure which puts speed before safety because if your system suddenly shuts off you may lose the data in the temporary cache. Here is how to enable write caching. If you need a visuals step by step, click here

  • Click Start
  • Right Click Computer and Choose Manage and Choose Device Manager. Or Simply type Device Manager in to your Windows Search Bar
  • In the device manager, click Disk Drives and choose your hard drive.
  • Right Click and Choose Properties
  • Click the Policies tab, under Policies, choose enable write caching on device.


This is an easy to use high performance tweak that gives your hard disk performance a extra boost .There are many reasons why you have a slow hard drive.

Video Tip: Enable High Performance Mode


To learn more about speed up a slow hard drive with a registry cleaner, Click here.

This May Help:

Buffering Problems

Posted by | Uncategorized | No Comments
Video Buffering Problems

For the most part, slow video buffering problems can be fixed with just a simple steps. Rarely are these problems are hardware related. So these problems can easily solved. The first step is to understand what video buffering is, how and when to use tweaks to speed up video buffering.

What is buffering?

When you actively stream a video, it is being downloaded and played at the same time. This requires a significant amount of resources to play smoothly. The more detailed the video the more resources you will need. HD videos can eat resources like a whale eating krill. This page will help you free up more resources to play the video. Buffering is your computer downloading the video faster than it plays. If it cant downloaded the and played the video at the same time, it will stop and create a buffer between the play time and download time. Special Note: Removing errors and registry keys can help speed up your computer and buffering performance, Click Here.

For More Advanced Tips on Eliminating Video Buffering

How to Stop Video Buffering Problems

Step 1: Cut Down on Background Downloads

One of the most important resources for streaming video is bandwidth. If you have other active downloads, it will greatly affect your ability to stream video thus creating a buffering.

Step 2: Create a Larger Buffer

You can simply pause the video to give the software enough space to stream the video smoothly. A few seconds can do wonders for the video performance.

Step 3: Select Access Time

The streaming videos are hosted on servers that are available to scores of other users. If the video is popular, you can bet that it’s being simultaneous streamed by multiple users. This will make streaming slow thus making buffering necessary. Try to access the site and video you want at time when the server is not been hit by many users. Such as early morning.

Step 4: Check Internet Speed

If you are constantly have buffering problems and your internet surfing is overall slow, you may have some connection difficulty. You can test your internet speed by using an online speed test. A good example is: http://www.speedtest.net

Also check out this tutorial on How to Increase Internet Speed

Step 5: Alter Buffering Options in Media Players

  • Press Start button in the bottom left hand corner.
  • Select Run and type: mplayer2
  • Select View and then click Options
  • Choose Advanced
  • Select the Streaming Media option.
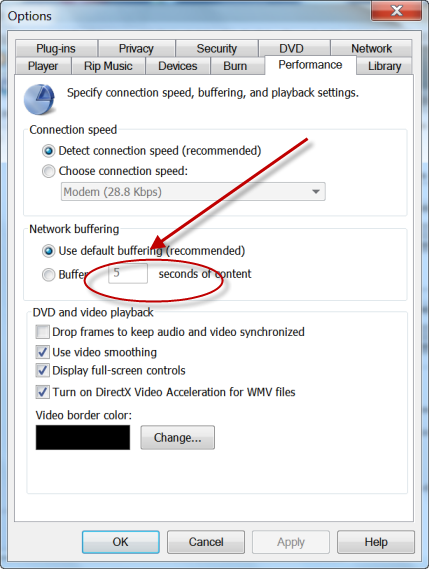
  • Click Change and Set the Buffer to 0

mediaplayer

Quick Tips to Cut Buffering Problems

There are reason you are experience long buffer can choppy playback, non-synced audio and video. Increasing web cache, RAM issues, and hardware conflict. Check the video below for some quit tips to cut down on buffering times.


This May Also Help

Fix a Slow Internet Connection
PC Speed Killers
Troubleshooting Streaming Video

Windows registry cleaner tools

Posted by | Uncategorized | One Comment
Is your PC slow and on its last leg? Before you spend $2500 for a faster PC try using Windows registry cleaner tools.
Why should you invest in top quality Windows registry cleaner tools? Because it will give your PC new life. So lets start at the beginning:

What is Window’s Registry?

Windows registry is a database repository for information about a computer’s configuration. The registry keeps growing when you use Windows. As it does so, it attracts obsolete and unnecessary information, and gradually becomes cluttered and fragmented. With the growing of the registry, it can degrade the performance of the whole computer system. Windows registry tools can prevent these software problems before they kill your PC speed.

To keep your computer in top performance, it is recommended to periodically clean your Windows registry with one of the reliable and efficient Windows registry cleaner tools. This year, RegCure Pro, 2013 #1 Top Registry Cleaner, is a budget price registry cleaner. However, there is a large selection of Windows registry cleaner tools available. Check the benefits graphic to make sure you get your money’s worth.

To Visit Regcure Pro website one of 2012’s Most Popular Windows Registry Cleaner Tools Website. Click This link

regben2

In the course of 1 year of daily use of your computer, it’s overall PC performance decreases an amazing 35% to 52.5%.
This is usually linked to the overall fragmentation of data on your hard drive. The normal course to repair such a problem is to systematically eliminate programs that you have deemed useless. So, you follow the uninstall procedures, complete the task and feel confident that you have freed up disk space and resources for your computer to function properly. Sadly, this is not the case.

Fragmented data as much as 90% of the totally uninstalled program can remain in your registry. In most cases, you have only eliminated the surface drivers, graphical user interfaces, and superficial software tags. The only way to eliminate the software install is by using aggressive software such as a Windows registry cleaner tools. These tools have multi-tier level checks to eliminate the fragmented parts of the uninstalled program. So, you will have the ability to to completely abolish the program from your computer’s memory. However if you would like to manually clean your registry, you can do so by typing “regedit.exe” into your Run command line.

WARNING Manually deleting the windows registry cause serious damage to your PC operating system.Vista registry has made some slight alteration compared to its predecessors.Click here to learn more about Vista Registry

Read our reviews of Top Industry Registry Cleaners
Should I Get A Registry Cleaner? Yes or No