admin, Author at Delete Computer History - Page 11 of 15

Increasing Disk Space

Posted by | Uncategorized | No Comments
Increasing Disk Space

Have you gotten a error claiming you have insufficient disk space? Not to worry, increasing disk space can be done with just a few clicks of the mouse. Your computer’s hard drive has a limited amount of usable space. So, you must maintain and monitor it to avoid low disk space errors. This is an easy task and Windows offers some quick an easy tools to fix this problem.

Try increasing disk space by using a registry cleaner. Click Here!

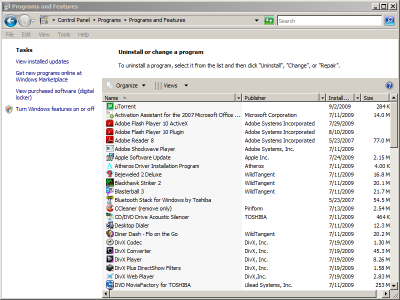
Step 1: Uninstall Programs

Installed programs will take up the bulk of your disk space. We usually add programs and leave them on a hard drive without concern until we get a low disk space error. Increasing disk space can be done in a flash by uninstalling programs you are no longer using.

  • Click Start
  • Select Control Panel
  • Choose Add/Remove Program. In Vista Choose Uninstall Programs, under Programs heading.
  • Select the Programs you want to unistall and click Remove
    Delete Computer History

Removing a Program often leaves registry entries that can pile up and create a low disk space environment. Sometimes the program itself has an uninstaller that will sweep your registry clean of these left over registry files but you may have to do it manually or use a registry cleaner.

Step 2: Use Disk Cleanup

Disk Cleanup–This tool allows you to clean up compressed and unnecessary files collected during Windows operations. Windows has deemed these files safe to delete. This files can be anything from your temporary internet files to programs no longer in use.

HOW TO:

In XP and Vista

  • Click Start
  • Choose Programs
  • Select Accessories
  • Open System Tools
  • Click Disk Cleanup.
  • Click the check boxes of files for deletion.

Delete Computer History

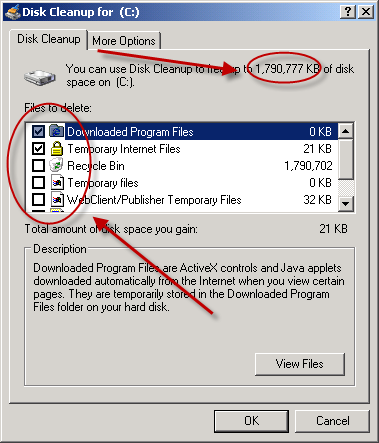
There are a lot of files to be deleted using this application. Temp files and your recycle bin can eat loads of disk space so try to eliminate them on a weekly basis.

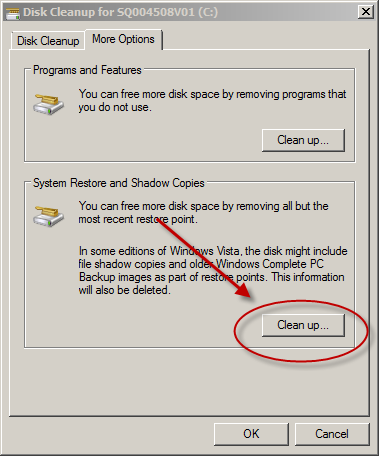
Step 3: Remove Old Restore Points

Increasing Disk Space can be achieved by eliminating old restore points that Windows has made. System restore runs about every 24 hours. It can take up as much as 300mb for each restore point. You can remove these restore points to stop low disk space problems. Here is how.

  • Open Disk Cleanup
  • Choose “Files from all users on this computer”
  • Select More Options
  • Under System Restore and Shadow Copies, click Clean up
  • Choose The option to delete all but most recent restore point

Delete Computer History

Step 4: Clear Your Web Cache

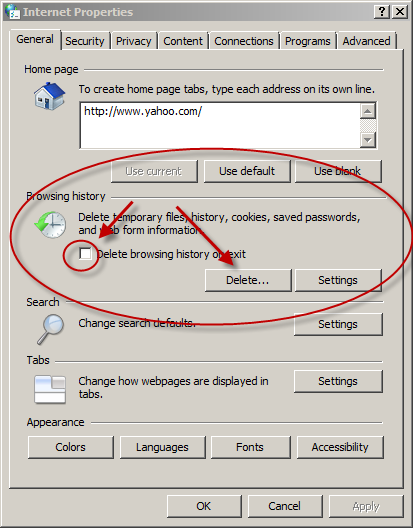
The web cache holds your temporary files that have been collected via the internet. Try increasing disk space by eliminating the you temp online data. If you download large files you should clear this daily. You can also increase your privacy by clearing the browser history. Here is a Delete Your Internet Tracks page.

  • Quit Internet Explorer, Firefox, or any other web browser
  • Click Start, click “Control Panel”, and then double-click “Internet Options”.
  • On the General tab, click “Delete Files” under Temporary Internet Files.
  • In the Delete Files dialog box, click to select the “Delete all offline content” check box , and then click OK.
  • Click OK.

Delete Computer History

Popular Articles

Best Registry Cleaner
Slow Internet Videos
PC Speed Killers

Recover Files

Posted by | Uncategorized | No Comments
Recover Files After Your PC Crashes

What Cause Computer Crashes?

  • Has your computer crashed and you are wondering how you will get recover? There are many reasons that may be the cause of it. Some of the most common are:
  • Operating Systems Failure: When the OS crushes, then, most probably you will get the blue screen of death shown below. This means that you will no longer have access to your computer system.
  • Computer Viruses: Viruses interfere with normal computer functioning and may lead to the crush of a computer system. There are many viruses and their ability to prevent computer functioning are different and unique for each virus.
  • Computer Memory Problems: When the computer’s memory has failed, it is most likely that it will crush.

To read more about ways to prevent computer crashes, Click Here.

Computer Hard Disk Drive (HDD)

When a computer crashes, it is most likely the HDD that has crashed. The HDD stores your files and is the home of your computer’s operating system. The HDD may fail because of the above said reasons or because of damages. Here is an image of the Hard Disk Drive:

What do you do when your computer crashes?

There is still hope for getting your files when a computer crashes. It is highly advisable that once your computer crashes and you wish to retrieve any files from the computer, you should stop using the said hard drive immediately. This will prevent you from overwriting any data in the hard drive before you are able to perform data recovery. There are three main ways you can use to recover your files when your computer crashes:

Option 1: Recover Files with an External HDD Installation

  • Remove the crashed HDD from the computer in which it was installed.
  • Insert the crashed HDD into the external HDD case
    Delete Computer History
  • Switch on the external HDD and it will automatically be detected by the computer.
  • From My Computer screen, you will be able to open the crashed drive. Hard Disk Drive C in My Computer is the main drive of the computer while your external HDD will either be F, H, E, I and G as shown:
    Delete Computer History
  • 5. Once you open your crashed HDD, copy the files you want from the folders and paste them in the main internal disk of the computer you are using or on a USB flash disk. You can even burn the files in a CD or DVD.

Note: If you cannot get an external HDD case to use, you can install the crushed hard disk drive as a new primary drive in another computer and follow the steps outlined above to copy and paste the needed data into another drive.

Option 2: Recover Files with Backup Utility.

Another way of recovering your files is through your backup utility. This will only be successful however if you had earlier on created a backup utility for your files. Here is how to recover your files from the backup utility when your computer crashes:
Delete Computer History

  • Open the backup utility: You will do this by clicking on the start button then on the programs, then accessories, and then on the system tools and finally the backup button. You can do it as shown below:
  • Open the advanced mode: When you click the backup button, the restore wizard will open and once that happens, click on the advanced mode link written writing within the body of the dialogue box.
  • Click on Restore: On the appearing welcome dialogue box, click on the restore button. Once that opens the relevant dialogue box, choose the backup files you wish to restore.
  • Restore your files accordingly: This will depend on your options whether you want to restore them to their original location or whether you want your files to overwrite existing files. You can also restore your files to your specified desired location.

Option 3: Recover Files Using Recovery Utility Software

Aside from copying and saving your files from a crushed disk, you may decide to use disk recovery utilities softwares for your recovery plans. For instance, utility software such as SpinRite that are sold and others such as Recuva which can be downloaded and used freely can be used for recovering files from a crashed computer. Such software are able scan your HDD for files that were either deleted or lost and recover such files.

RELATED TUTORIALS:

Best Registry Cleaners
Speed Up Slow Internet Connection
Stop Buffering Problems

Hard Drive Light Stays On

Posted by | Uncategorized | No Comments
Hard Drive Light Stays On

When your hard drive light stays on, its a indication that your hard drive is working. What I mean by the term working is that your hard drive is either being accessed your operating system or the hard drive is write data to the physical hard disk plates. At any rate, if the hard drive is flashing non stop, it means there is a problem. Below you will reason of why the hard drive light stays on.

1. Actively Defragging

Your computer’s hard make be defragging. This is an labor intensive process that accesses your hard drive constantly. You will need to set your defrag schedule when you are not actively using the PC. Early in the morning is best. To access your defragemnter schedule. Start > All Programs > Accessories > System Tools > Defragment > Set the time schedule.
Delete Computer History

2. Spyware or Virus

Both these are hideous killer of your hard drive because some replicate constantly which using hard drive resources. Spyware of any kind is one the the reasons your hard drive light stays on. You can use a program like Microsoft Security Essentials which is low load anti-virus.

3. Constant Updates

If your computer is updating its software, this will require a hefty install. You schedule Windows updates and your other software updates at a time when your computer is not going to be accessed. This goes for all programs especially those that constant update like security software. Start > Control Panel > System and Security > Windows Update > Change the schedule.

4. Hard Drive Errors and Bad Sectors

When your hard drive has errors or bad sectors, the hard drive stays on because your operating system is attempting to read data from them or at least repair them. However, this can be a futile process or it can take forever in some cases. Here is how to stop this from occurring. Start > Computer > Right Click Your Hard Drive > Choose Properties> Tools > Check Now> Scan for Errors

For More Ways to Speed Up a Hard Drive, Click Here!

Hard Disk Drive Problems

Posted by | Uncategorized | No Comments
Hard Disk Drive Problems

There are many hard disk drive problems. The hard drive is a physical device with moving parts. So eventually you are going to have some serious breakdown. New solid state drives are a bit different. There are no moving parts however the media does degrade over time.

Easy to Follow How-To Tutorials

Fix Slow Hard Drive Problems: Your hard drive can be slowing down for many reasons. one the of the biggest reasons is fragmentation. You may need to de-fragmenting your hard drive. Another reason you might be experience slow hard drive performance is errors. You might need to scan your hard drive for errors in order to get it back to the previous speed. This tutorial will give you tons of tips on how to speed up a slow hard drive.

Defrag Your Hard Drive: This is an important feature for HDD because the data can become fragmented over time. The more fragmented the data is the longer it will take your hard drive to sort through it when it need to find something. Routinely scheduling this step is an easy way to stop hard disk drive problems. This article details the steps to defrag your hard drive.

Use Write Caching : This feature helps to stop your hard drive from being constantly accessed. It allows data to be written to a temp space before being written to the hard disk drive. This allow your computer to use the hard drive for other operations. This tutorial will show you how to use the Windows 7 feature to speed up your CPU and Hard Drive and the same time.

Low Disk Space: Running out of disk space is still a problem for even big hard drives. Our appetites to download media files and movies grows at a much faster rate than the size of hard drives. This tutorial will show you how to free up more space on your hard drive.

For a step by step tutorial on speeding up your hard drive

Increase Upload Speed

Posted by | Uncategorized | No Comments
Simple Ways to Increase Upload Speed

There are ways to increase upload speed without changing your internet service contract. Your upload and download speeds should match what the . However, in reality, the download speed mostly matches your internet service provider’s description plan. However, there is a substantial gap in the actual upload speed.

There are some simple steps, which can help you gain better upload speed. The transfer of data into packets is measured in Kbps and often people get confused between KBps and Kbps. The reason is that both terms appear similar but there is a huge difference. Some online internet speed measuring websites offer speed tests where you can see your upload and download speed. Try speedtest.net.

To increase upload speed, we need some of your computer’s software and hardware configurations. However, no matter what technology you use, you cannot override this ISP upload speed cap by any means. In other words, if you want a upload speed higher than your ISP plan you will have to subscribe for a new internet plan.

Try using a registry repair software to stop errors that rob your PC speed and Internet Speed, Click Here to learn more.

Utilizing the entire available bandwidth is possible with some tweaks and fine-tuning of your computer. Here is the detailed recipe:

6 Ways to Increase Upload Speed

1. Use a Wired Connection

Yes, upload speed is generally faster on a wired connection. This happens due to you wireless connection QoS settings. This may interfere with your router bandwidth by giving some function bandwidth priority such as VOIP, like Skype. You can disable this in your router settings.

2. Eliminate Malware

A virus strand, a piece of malware, or a spyware can affect your upload speed. Make sure that good antivirus software is installed on your computer and is working properly. You have to update it to the latest definition and you and your computer are ready to deliver good upload speed. Also try to get a low resource using anti-spyware program.

3. Clear Your Temp Files

Getting rid of temporary files, cache, and cookies is crucial. You can manually do it or try some professional tools, which do it for you. Many of these resourceful tools are free and work on every single hidden aspect of your computer where it might store junk files. You can use CCleaner to remove junk files.

4. Update DNS Settings

Working on a DNS that is domain name servers is a reliable process to increase upload speed. This DNS change can be done manually or with the help of tools, which discover the fastest name servers across the world and let you enjoy the fastest speed possible. Google DNS and Open DNS are some reliable sources. Similarly, some professional programs are available, which help you to amass top Domain name servers. For step by step instruction on changes your DNS settings, click here.
Delete Computer History

5. Check Your Hardware

Get minimum hardware devices in line for fast online action. More devices might slow down the upload speed due to higher scales of inter-dependability. Being wired is also recommended if you are sharing the internet connection of wireless networks with other members.

6. Update Device Drivers

Lastly, get the latest drivers for your computer hardware; outdated drivers can slow down the computer performance and lead to slower upload speed.
Delete Computer History

When you are looking for ways to increase upload speed, there are some professional tools, which help you to camouflage your upload speed. Especially, these tools help you best while downloading and uploading using a torrent client. However, some router’s encrypt traffic also.

The simple remedies to increase upload speed will distinctly help you to enjoy the best of your bandwidth, if you need anything above that, talk to your ISP for further assistance.

Useful Tutorial:

Speed Up Your Slow Internet Connection

IP Renew

Posted by | Uncategorized | No Comments
How Use the IP Renew Command

There are many reason to use the IP renew command. One of the main reasons to do this is that your computer has lost connectivity with the internet. The lost the internet connection could be cause by your computer ability to automatically assign you an IP address. There are a couple of reason why this occurs however the problem is can be easily fixed. If you renew your IP you should fix this problem. Often you may need to renew your IP address when you see the error message limited or no connectivity.

Do you need to use IP Renew?

It’s not always necessary. Please remember that simply shutting off your computer and router for a few minutes will renew your IP. This is a simple step. However, if this doesn’t solve your problem, you can use the command line to renew your IP address. Make sure your modem and router are completely off for at least a two or three minutes.

Use the IP Release and Renew Command

To re-assigning the IP to your computer, you are going to have to use a few RUN commands. So from windows you will need to enter the command prompt. If the command prompt is located on your desktop. You will be able to get to eat by following the sequence below.

  • Click Start
  • Choose All Programs
  • Click Accesories
  • Choose the Command Prompt
  • Type ipconfig/release
  • Type ipconfig/renew

Delete Computer History
This will release the assigned IP address and then the renew command will reassign the IP address. To test to see if your IP has been assigned, simply type ipconfig into the command line. You should scroll through and look for you IP or IPv4 address. If the number is 0.0.0.0. Then you have no connection. If your IP address is a series of number usually beginning with 1. You should be fine.

For more tips on how to solve disconnect problems, click here.
To read about ways to speed up your internet connection, click here.

Limited or No Connectivity

Posted by | Uncategorized | No Comments
Repair Limited or No Connectivity Error Message

When you’re hit with limited or no connectivity error, your business, studies or whatever you do on the net is brought to a screeching halt. The most commonly found connectivity errors can usually be fixed with simple steps. So there’s no need to panic.

Step 1: Check Your Login Information

The limited or no connectivity problem may arise due to incorrect log-in information . If you are using a Wi-Fi router or modem, incorrect WEP key may cause the error. In such cases, the router gets connected but is unable to transmit the data due to conflicts. Re-registration of WEP key resolves the problem.

Step 2: Restarting Your Internet Protocol

Check if the DHCP or dynamic allocation of IP addresses service is working . This service helps your computer configure and find web addresses. If this this service is stopped, it could prevent you from adequately access the net.

  • Go to start menu navigation and click on the Run option.
  • Type “services.msc” and hit enter. In the pop up window find out the status of the DHCP service. It is always a better idea to keep the settings on automatic start and if the service is stopped, restart it by clicking on the start button. This should solve the problem forever.
    • In case still if you have limited or no connectivity, try to assign IP address manually. This should help

Step 3: Alter Your Firewall

In case the problem continues, check the configurations of the firewall. It is a powerful feature to keep unwanted intruders away, but may cause a conflict and induce the problem.If you still get the error message, it is time to check the hardware devices.
Delete Computer History

Step 4: Check Your Hardware

  • Click Start
  • Open Device Manager by right clicking Computer.
  • Click on Properties.
  • Search for the Ethernet adapters and right click to launch properties. If everything is fine and the menu of use this device is “enabled”, then close all popped up windows.
    • Disconnect your modem, router and all cables after switching off your computer and modem. Unplug all cables and check for broken terminals or loose pins. Check for a high degree of dust in the modem sockets and clean if necessary. Plug in all the cables, turn on the modem and computer, and wait for five minutes. If the problem persists, try to repair the connection by going into the connection dialog and then click on support tab. Here click on the repair button. Your Windows will disconnect the adapter, reconnect the adapter, and renew its IP address.
    • If the problem still repeats, check for the modem configurations. You can always reset the modem and re-install the modem settings as defined by your internet service provider. In the modem configuration dialog page, you have an option to check modem parameters. These parameters indicate how your modem is connected to the ISP and is transmitting the data, as it should. If it is working fine, restart the computer and get connected.
Last Resort

A common culprit is updates. Installing new software features can often erase old settings. So you may need to use system restore to reverse this problem. Finally you may need to call your ISP.

Setting Up Home Wireless Network

Posted by | Uncategorized | No Comments
Setting Up Home Wireless Network on Windows XP/Vista/7

Setting up home wireless network can be done in just a few steps. Setting up home wireless network can give your home the ability to be online from anywhere in the house. There isn’t a need to search for wires and long cord. You can attach your printer and other devices to your home wireless network after setting it up. The directions below will give you details on setting up home wireless network.

1. Ensure you have the following pieces of hardware:

  • A wireless router
  • A wireless network adapter for each computer
  • A cable or DSL broadband modem
  • Two ethernet cables

2. Connect an Ethernet cable between the WAN port of your wireless router and the Ethernet port of your modem.

3. Connect another Ethernet cable between the Ethernet port of your computer and one of the LAN ports on your router.

4. Turn on all hardware and ensure that you have internet access. If not, check the connections.

5. Open a web browser, and browse to your router’s default address to configure it. Check your router’s documentation to obtain this address. For a Linksys router, the address is:

  • 192.168.1.1
    Delete Computer History

6. It’s not always necessary for setting up home wireless network, If required, log in using your router’s default login credentials. Check your router’s documentation to obtain these credentials. For a Linksys router, the credentials are:

  • Username: admin
  • Password:

7. Set Wireless Network Mode to Mixed and set Wireless Network Name (SSID) to your name of choice. For a Linksys router:

  • Click the Wireless tab
  • Select Mixed from the Wireless Network Mode dropdown
  • Input your name of choice in the Wireless Network Name textbox
  • Click Save Settings

8. Set a unique password for your wireless network. For a Linksys router:

  • Click Wireless Security on the submenu
  • Select WPA or WPA2 from the Security Mode dropdown
  • Input your password of choice in the WPA Shared Key textbox
  • Click Save Settings
    Delete Computer History

9. At this point, router configuration is complete. Disconnect the Ethernet cable from the Ethernet port of your computer.

10. To connect to the wireless network, ensure that you wireless network adapter is on and:

  • In XP, right-click the wireless network icon in the System Tray and select View available wireless networks
  • In Vista, right-click the wireless network icon in the System Tray and select Connect to a network
  • In 7, click the wireless network icon in the System Tray
    Delete Computer History
    Delete Computer History

11. Choose the correct wireless network from the list that appears.
Delete Computer History

12. Type in the network password, and click OK/Connect
Delete Computer History

13. If the password is correct, you should now be connected to the wireless network.

You’ve finished! So setting up home wireless network at home was easier than you could have imagine. You are now secure to use your wireless connection with ease.After setting up home wireless network connection, speed up your connection with this tutorial

Popular Articles

Best Registry Cleaner
4 WAYS TO SPEED UP YOUR PC
Fix a Slow Internet Connection
Speed Up Internet Videos

DNS Lookup Error

Posted by | Uncategorized | No Comments
Fix a DNS Lookup Error

What is DNS and What is a DNS Error?

DNS stands for Domain Name Server. This translates the web addresses into IP address. Once this process is done its stored on a server that can easily recall these addresses instead of converting them.

If you’ve gotten a message that says webpage is not available or look up error, this is usually a DNS error. This error is caused because the DNS server is slow or unresponsive. This is a very common error and can prevent you from accessing a website. This error is often displayed in the browser as a webpage is not available. If you took a look at the cause of loading fail, one of the possible reasons is a DNS lookup error. You might see the error below when you have DNS errors. Read below to see how to fix DNS errors and DNS lookup errors.

Solution 1: Flush DNS Sever catch to Fix DNS Errors

You can easily flush DNS web caches by following the method below. You will have to access your command prompt to use the Flush DNSL setting.

  • Click Start
  • Choose All Programs and Then go to Accessories.
  • In Accessories, click Command Prompt
  • In the command prompt, type ipconfig /flushdns
  • Enter.

Watch the Video to see how to Flush DNS


Solution 2: Change DNS Servers

Yes, you could simply click the reload link in your browser. This often works. However, if the the frequency of these errors increase, you may need to take more action to correct the problem. Your DNS error could be caused by your internet service provider’s(ISP) unreliable severs. Don’t get angry and and yell at the them because you don’t actually need to use their servers. There are much more reliable DNS servers out there. So you can solve the problem by changing your DNS server. Here is how:

Start > Control Panel > Nework and Internet > Right Click Network and Sharing > Connection > Internet Protocol(TCP/IP) >Use the following DNS Servers > Ennter Your DNS server address and alternate address.

I like Open DNS servers. Here are the addresses.

208.67.222.222 and 208.67.220.220

For Visual Steps to Change Your DNS settings, Click Here.

Solution 3: Renew Your IP

A DNS lookup error can also be caused when your firewall or ISP is blocking access to a certain website. This is mostly due to ISPs but you can solve that problem by changing your DNS server settings. If you have a firewall, you need to make sure that its allowing your browser full access to the internet. If the problem persist, you might need to refresh your IP address by turning off your computer and switching off your router or modem. Leave it off for 5 minutes and turn it back on.

To see a Visual Tutorial on how to Renew your IP

WiFi Signal Strength

Posted by | Uncategorized | No Comments
Boost WiFi Signal Strength

Improving Reliability of Your WiFi Signal Strength

Before we begin please note that this is about improving reliability of your wireless connection, not security. However following these tips are also good security aides.

While it may seem counter intuitive ideally you have just enough WiFi signal being transmitted from your Wireless Access Point (WAP) to reach the desired area. Cranking up your Wifi signal strength to maximum just because you have it increases the likelihood of interference. Specifically it is called co-channel interference.

Special Note: You can improve internet speed and performance by removing errors, Click Here to learn more.

1. Change Router Channel for Stronger and Faster WiFi

Changing your channel is one of the easiest and fastest ways to improve your connection and speed. This is an easy step that many people neglect. The reason it works so well is that channel can be crowded with multiple routers in your vicinity. Changing the channel allows your router to use a wavelength that is not crowded and give it a stronger signal. This is an easy way to boost WiFi signal strength.

2. Directional Antennas

Antennas matter when when it comes to WiFi signal strength. Out-of-the-box a WAP is like a bare light bulb The technical term is omni-directional. It is sending your signal all over the place, without focus. The FCC limits how much radio frequency radiation your WAP can put out. You can focus that energy into a variety of different types of patterns.

It is beyond soap of this article to cover every antenna possibility. Generally speaking the most common types are focused to 180 or 90° patterns. Certainly there are more narrow focuses which are considered beam antennas. You can purchase commercial antennas or enjoy some of the creative designs that can be found on YouTube. The search term is cantenna.

If you’re looking to upgrade your WiFi WAP consider going to 802 11n and be certain that you are getting a dual band WAP.

While nothing lasts forever, the 5 GHz range is relatively uncrowded as it is a new frequency for the current price point. Yes it has been around for a while as 802 11a however that was rather expensive hardware, so not commonly seen.

Read carefully as there is some 802 11n hardware that only works in the 2.4 GHz range. Make sure it says dual band. If you don’t need all the bandwidth that is available consider turning off the 2.4 GHz band. This frequency range is very crowded. Everything from Bluetooth to microwave ovens operate in this range.

3. Your Cordless Phone and WiFi Signal Should Not Share.

Further look at your cordless telephone. It may well be operating in the same frequency range. Replacing your cordless telephone for a DECT version get you out of this frequency, and they are inexpensive.

4. Microwave Oven and WiFi Don’t Get Along.

If your microwave oven is old you would be wise to get a new one. Picture in your mind an outline of Mickey Mouse. That is exactly what a water molecule looks like. A microwave operates by grabbing the water molecule by its hydrogen ears and flipping the H2O up and down, creating friction. Given that microwave ovens must operate at that frequency. The only thing you can do if your microwave oven is leaking is get a new one.

If you are attempting to send your wireless signal outside keep in mind fog and rain will absorb your signal at 2.4 GHz. Refer back to 802 11n dual band and consider operating at 5 GHz only.

More Helpful Pages:

Speed Up Your Internet Connection
WiFi Problems and Solutions